Sometimes you just need a little more light on it. Photography is literally painting with light and, in the modern day, some of that painting happens after you take the image.
Hello, I’m Cara! Have you been following my tutorials here on PhotoshopBuzz? Then you’ve probably seen me tell you to use a Brightness/Contrast adjustment layer a time or two to brighten an image. This is an effective tool for lightening (or darkening) an image as needed.
However, the basic tool only affects the entire image. What if you want to brighten only parts of the image? Well, it’s quite simple. So come along and I’ll show you three easy ways to brighten certain parts of a photo in Photoshop!
Note: I use the Windows version of Photoshop. If you are using a Mac, the workspace will look slightly different from the screenshots displayed here.
Method 1: Brighten a Selection
There are actually a few methods you can use to selectively brighten images. They are all effective in their own way. However, one method may work better than another depending on what you want to brighten.
First up, you can brighten a specific area by making a selection. You can use any selection tool to make the selection. The object/area you’re trying to select will dictate which tool works best. Check out this tutorial for a rundown of selection tools.
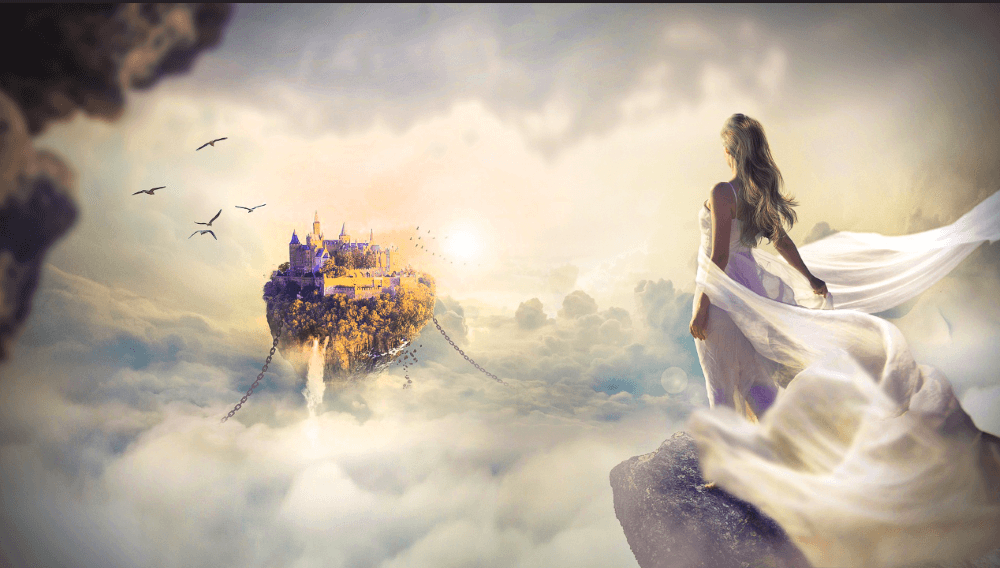
For this tutorial, I’m going to use this image.

I want to brighten the girl a bit and I think Photoshop’s automatic selection tool might work here pretty well. So I’ll grab a selection tool, then choose Select Subject from the Options bar.

Here’s the selection Photoshop made for me.
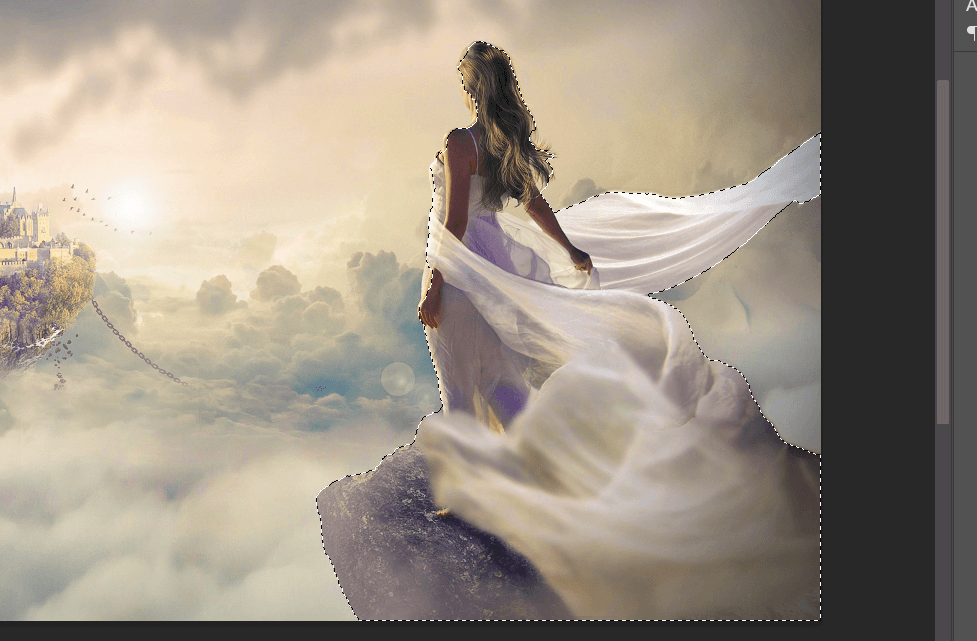
You can refine the selection with the Quick Selection tool (or another selection tool), but for this tutorial that’s not necessary. We just want to know how to brighten.
So go to Image in the menu bar hover over Adjustments and choose Brightness/Contrast. As I move these sliders around, only the selected area brightens.

Alternatively, you can use an adjustment layer to brighten the selection. I’d recommend this method because it uses a mask and is non-destructive. That means you can come back and make adjustments later.
Instead of going to Image in the menu bar, click the Adjustment Layer icon at the bottom of the Layers panel. Choose Brightness/Contrast from the list. The layer is added with your selection and automatically set up as a layer mask.
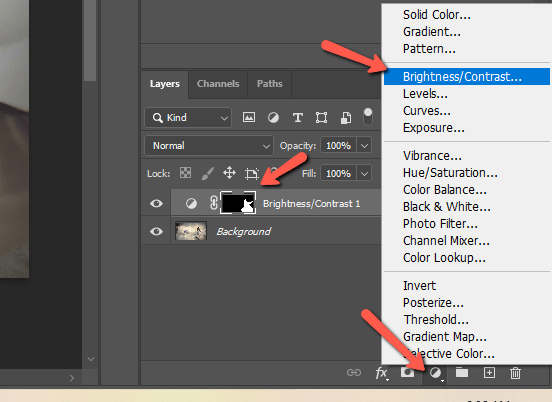
You can make adjustments now. If you want to come back later after working on other parts of the image, simply click on the layer to reactivate it and make further adjustments.
Method 2: The Dodge Tool
What if you don’t want to brighten such a specific part of your image? Perhaps you just want to add soft splashes of brightness here and there for dramatic effect?
The technique of brightening and darkening parts of an image goes back to the darkroom days of photography. It was called dodging and burning because of the techniques used back then.
Well, Photoshop makes it far easier to “dodge” your photograph (the term for brightening). Simply select the Dodge tool from the toolbar on the left.

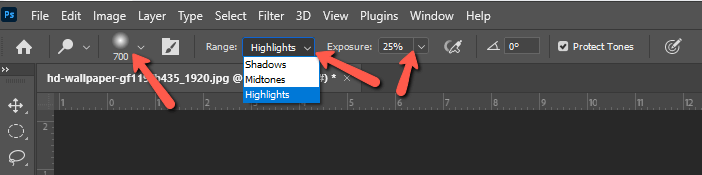
In the Options bar, you can choose your settings. You generally want to use a large, very soft brush for the best blending. From the dropdown menu next to the Range box, you can choose whether you want to affect the Shadows, Midtones, or Highlights.
In the Exposure box, choose how strong the brightening effect should be.
Here’s the before and after using the dodge tool to brighten the highlights of the castle.


I overdid it purposefully so you can see the difference better, but this tool is excellent for creating a subtle, natural brightening effect.
Method 3: Use a Brush
A third option is to use a Brightness/Contrast filter with a layer mask and brush. Click the Adjustment Layer button at the bottom of the Layers panel. Choose Brightness/Contrast from the list.
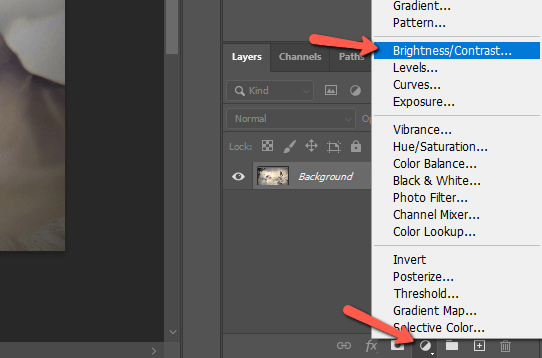
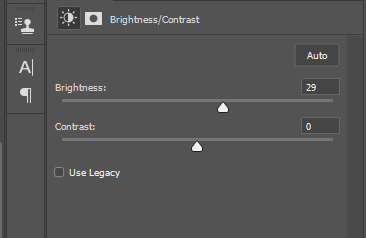
Slide up the Brightness slider until you like the effect. It will affect the entire image at this point, but that’s not a problem.
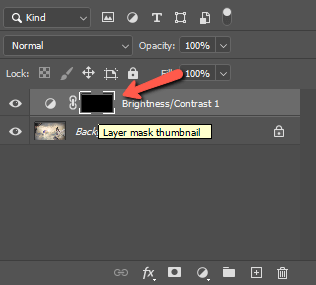
Click on the layer mask thumbnail and press Ctrl + I or Command + I to invert the mask from white to black. Remember, black conceals and white reveals so now we’ve hidden the changes.
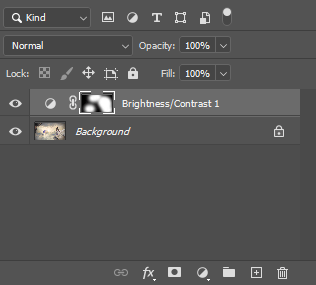
Press the B key to activate the brush tool and make sure the foreground color is set to white. Now paint white on the image making sure the layer mask is selected to spot reveal the brightness changes.
Pretty nifty, right? Both dodging and burning are quite fun as you selectively lighten and darken parts of the image for a stunning effect. Curious about what else you can do in Photoshop? Check out how to turn an image into a watercolor painting here!
About Cara Koch