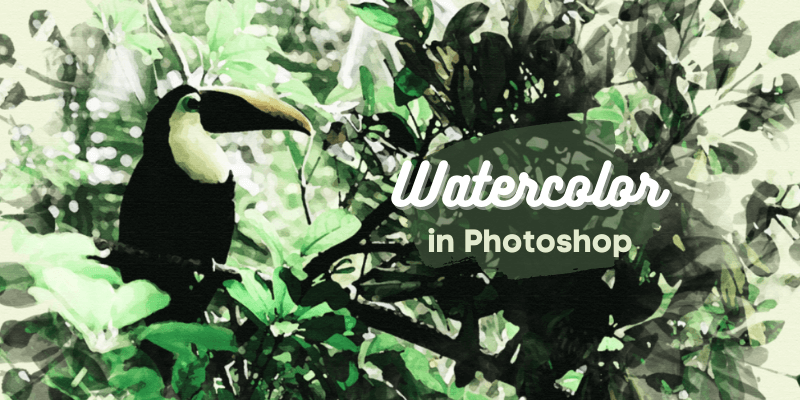
Is it possible to create a beautiful watercolor painting without water, paints, or brushes? I love the look of watercolor paintings and admire the talent of those who can paint them.
Hey! I’m Cara, and I couldn’t paint a watercolor painting to save my life. My artistic talents lie elsewhere…such as in photography. I love the fact that Photoshop gives me the ability to turn my images into watercolor paintings.
What’s more, though there are a lot of steps, with a few filters it isn’t difficult to do. Let me show you how!
Note: all the screenshots below are taken from Photoshop CC for Windows. Other versions will look slightly different.
Table of Contents
- Step 1: Duplicate and Convert to a Smart Object
- Step 2: Add a Watercolor Filter
- Step 3: Add a Dry Brush Filter
- Step 4: Add a Cutout Filter
- Step 5: Add Texture
- Step 6: Add Smart Blur
- Step 7: Add a Solid Color Fill Layer
- Step 8: Add a Negative Mask
- Step 9: Brush in the Image
- Step 10: Texturize the Fill Layer
- Step 11: Add Adjustment Filters
- Change Up the Photo
Step 1: Duplicate and Convert to a Smart Object
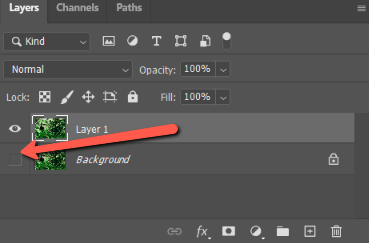
Open your image in Photoshop. It’s useful to keep a copy of the original image on the bottom in case you need it later. Let’s duplicate the layer with Ctrl + J or Command + J. Then, turn off the background layer by clicking the eye icon next to the thumbnail.
Now, right-click in an empty spot on Layer 1 and choose Convert to Smart Object from the menu that appears. Converting to a smart object allows us to modify the filters we’ll be applying which is helpful for fine-tuning.
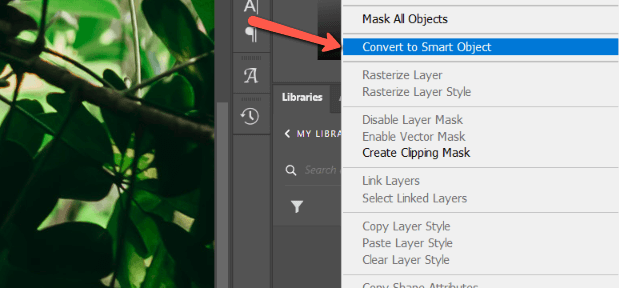
Plus, by making it a smart object, you can create the template and then swap out the photo later to create a whole new painting without having to go through all the steps. I’ll show you how to do that at the end.
Step 2: Add a Watercolor Filter
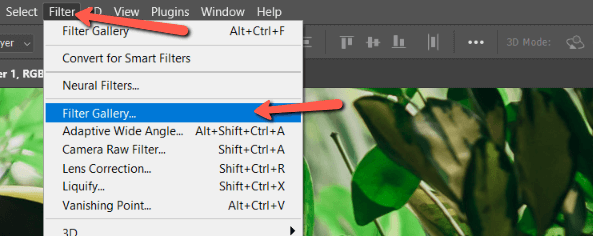
Okay, let’s start adding some filters. We’ll start with the most obvious one, the watercolor filter.
Go to Filter in the menu bar and choose Filter Gallery.
If the filter gallery is grayed out, your image is probably in the wrong mode. It needs to be in RGB Color and 8 bit for the filters to work. To check, go to Image in the menu bar and make sure that RGB Color and 8 Bits/Channel are selected.
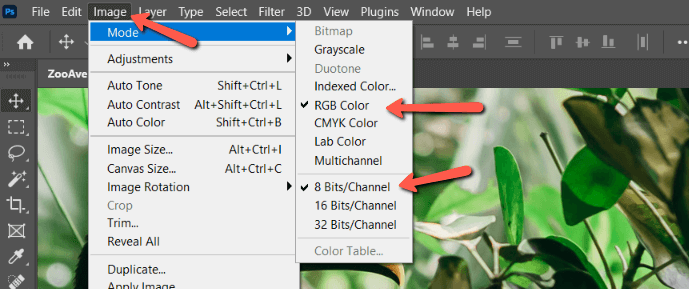
Once in the filter gallery, open the Artistic folder and choose Watercolor from the effects. On the right, you can adjust the values to help them fit your particular image. I used 11 for Brush Detail, 3 for Shadow Intensity, and 1 for Texture.
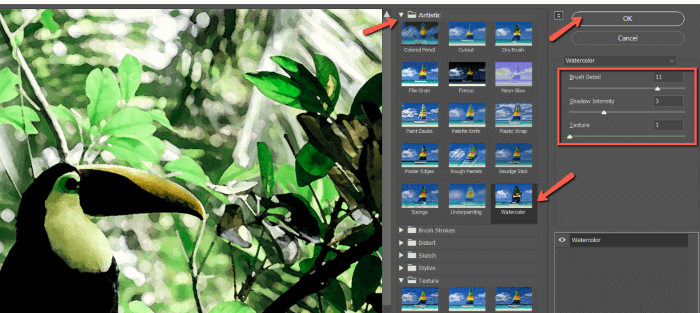
Click OK when you’re happy with the look.
Step 3: Add a Dry Brush Filter
Go back to the filter gallery and this time choose the Dry Brush filter – also from the Artistic folder. I’ve set my values at 2 for Brush Size, 8 for Brush Detail, and 1 for Texture, but adjust as needed.
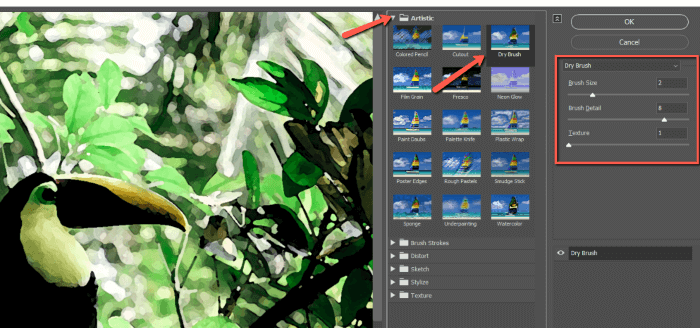
Click OK when finished.
Step 4: Add a Cutout Filter
Go back to the filter gallery one more time and select Cutout from the Artistic folder. I set the Number of Levels at 8, the Edge Simplicity at 2, and the Edge Fidelity at 2.
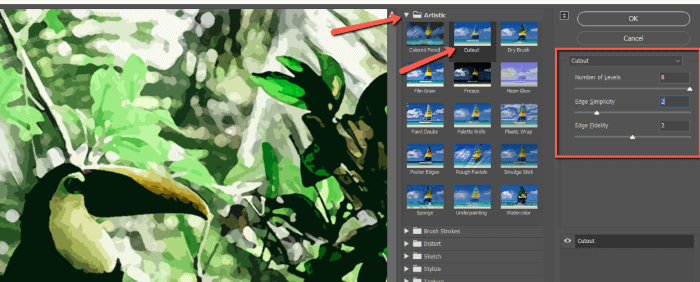
Even so, the effect is a little strong. Let’s adjust the opacity of the layer by double-clicking on the Blending Options button for the cutout filter. You’ll find this in the Layers panel to the right of the applied filter.
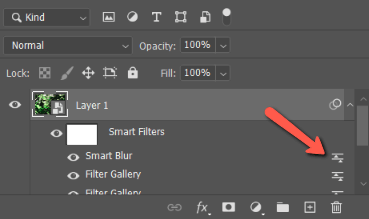
Set the Opacity around 40-50%.
Step 5: Add Texture
Watercolor paintings are usually painted on a canvas so there will be a slight texture to the paper. To make it look less like a digital construction, we should add a touch of texture as well.
This can be done by overlaying a paper texture image with the blend mode Multiply. Or you can apply a texture filter, which is what we’ll do.
Go to the Filter Gallery one final time. This time open the Texture folder. You can choose from four different textures in the Texture box – Brick, Burlap, Canvas, and Sandstone. We’ll stick with canvas.
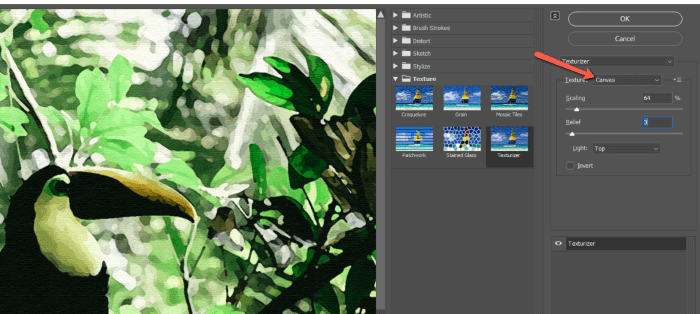
The values below allow you to change the look of the texture. A smaller number in Scaling creates a finer texture and a bigger number creates a rougher one.
Relief adds more light, further defining the textures. The Light box allows you to pick the direction of the light falling on the texture. I’ve set my Scaling at 64%, Relief at 3, and the Light is coming from the top.
Click OK.
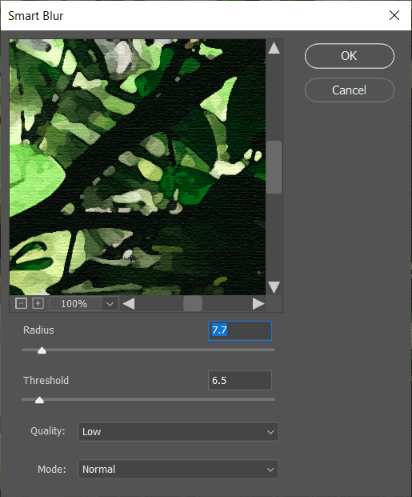
Step 6: Add Smart Blur
Okay, we’re looking pretty good at this point, but let’s soften the effects a touch with a bit of Smart Blur. Find it by going to Filter, hovering over Blur, and choosing Smart Blur.
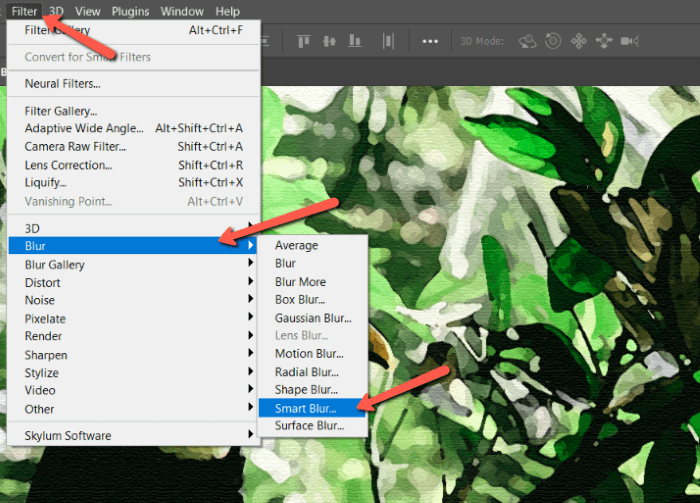
We just want a gentle effect, so I’ve got my Radius and Threshold values set pretty low as you can see. Click OK.
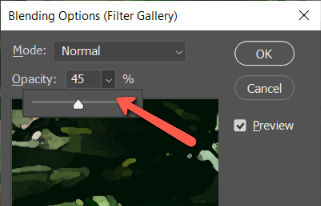
Let’s blend this effect gently into the image. Double-click on the Blending Options icon for the Smart Blur filter.

In the box that opens, change the blending mode to Screen and set the Opacity around 35%.
Step 7: Add a Solid Color Fill Layer
Watercolor paintings usually aren’t filled to the edges with the scene so we want to put a “canvas” behind the image. We’ll do that with a solid color fill layer.
Click the Adjustment Layer icon at the bottom of the Layers panel. It looks like a half-filled circle. Choose Solid Color from the menu.
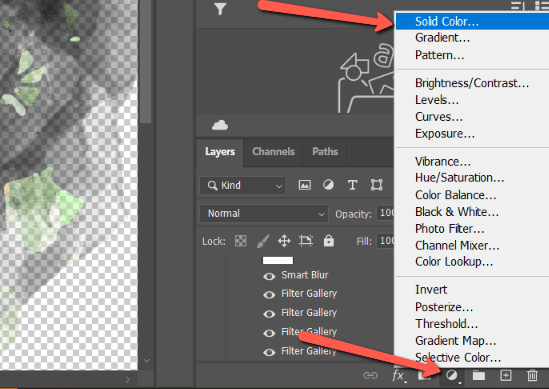
The color picker will pop up. You can choose pure white as your canvas or I like a cream color for this image. Ultimately, you can pick whatever color you want.
The fill layer will appear on top of the image. Grab the fill layer and drag until the blue lines appear to place the color layer under the image layer.
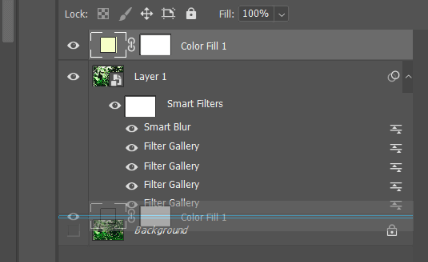
Now the image is back on top.
Step 8: Add a Negative Mask
We want the solid color to be peeking out around the edges as if the image were painted on a canvas. To do that, let’s create a negative mask on the image layer.
With the image layer selected, hold down the Alt or Option key while clicking the mask button at the bottom of the Layers panel.
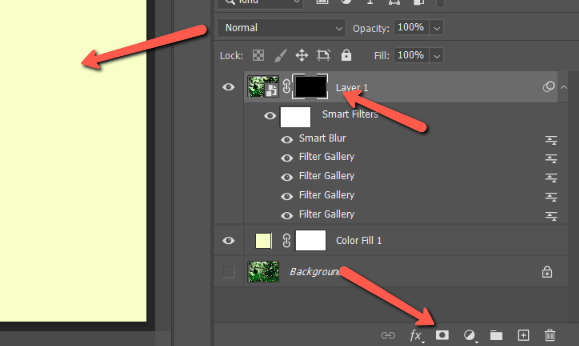
We’ve just “hidden” the image layer, so the color fill layer appears on top again.
Step 9: Brush in the Image
Remember, white reveals, black conceals. To bring the image through, we simply need to paint on this black mask with a white brush.
Select the brush tool by hitting B on the keyboard or selecting it from the toolbar on the left.
To get the best effect, you’ll want to use a watercolor brush to bring the image through. You can find free packs of Photoshop brushes in virtually any shape and style online. Download a pack and check out how to install Photoshop brushes here.
With the foreground color set to white, start painting over the image. I used some watercolor brushes as well as some flower brushes for an interesting effect around the edges. If you can’t find what you’re looking for, the brushes are pretty easy to make. You can check out that tutorial here.
Step 10: Texturize the Fill Layer
The texture filter that we applied to the image only affects the image. You may notice that the edges of the image where the fill color shows through no longer show the texture.
To fix this, go to the filter gallery again with the color fill layer selected. You’ll get this message.

Hit Convert to Smart Object. When the filter gallery opens, choose the Texturizer filter. The same settings you used before will still be entered so hit OK without changing anything.
Now the edges will also have the canvas texture.
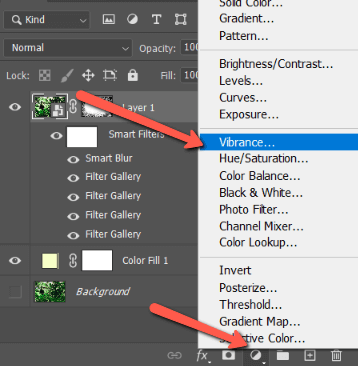
Step 11: Add Adjustment Filters
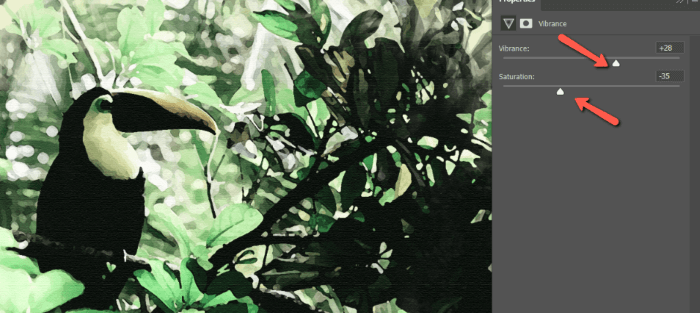
To give the image and more watercolor-esque look, we can use a couple of adjustment layers. Click the Adjustment Layer icon again and choose Vibrance.
Bring up the Vibrance a little and pull down the Saturation. This helps to give it that washed-out look of watercolor.
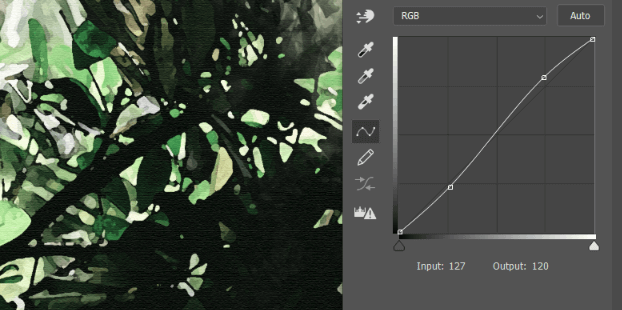
Some images will also benefit from a touch of contrast. Go back to the Adjustment Layer icon and select Curves.

Raise the highlights and lower the blacks to what works for your image.
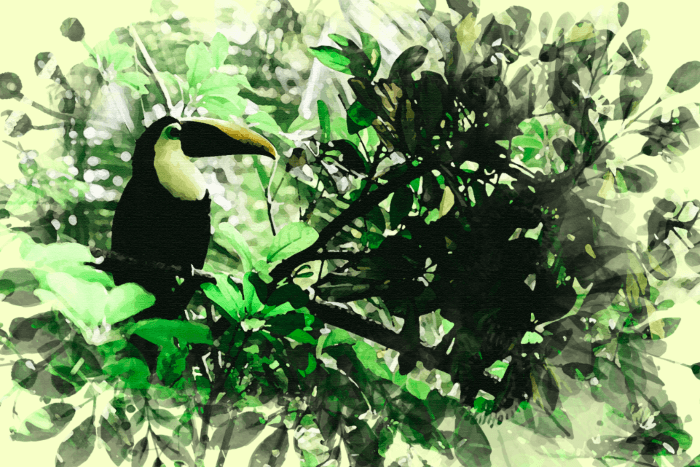
Here’s the finished product!
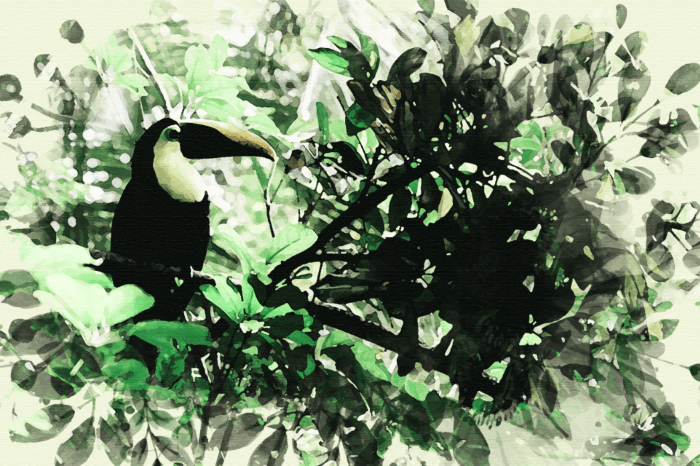
What do you think? Pretty cool, right?
Change Up the Photo
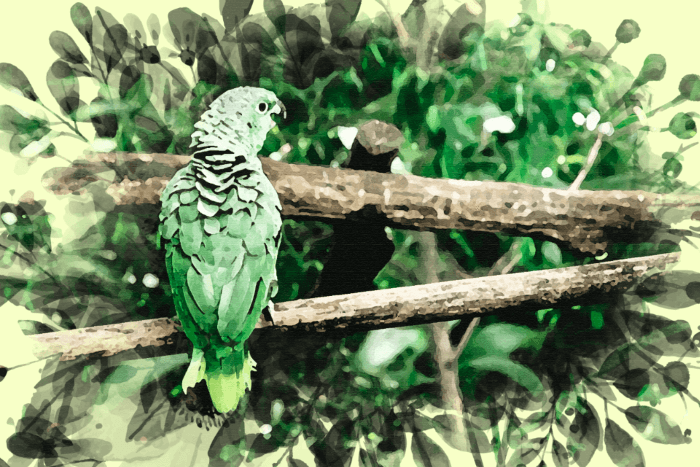
Remember how I said that turning it into a smart object would allow us to apply this effect to other photos? Here’s how to do it.
Right-click on a blank space in the image layer. Choose Replace Contents from the menu.

Browse to another image on your computer and click Place.
Boom! The new image drops right in. You may want to adjust the mask to better fit the new image or choose a new canvas color, but for the most part, you’re done!
Have fun with this technique, there is a lot to explore! Interested in other ways to create intriguing art? Check out our tutorial on inverting colors!
About Cara Koch