
Drawing a line in Photoshop is one of the simplest things you can do in Adobe’s popular image editor, but it takes a little bit more work to draw a fancier dotted or dashed line. It’s still pretty simple, but you’ll need to know just where to look in order to pull it off.
Like most things in Photoshop, there are a couple of different ways you can draw a dotted/dashed line.
If you want to create a vector shape that can be scaled and edited easily after you’ve finished drawing, you should use the Pen Tool method, but it’s also possible to configure your brush-based tools to create a dotted line effect.
For most situations, it’s probably best to start by using the Pen tool method, unless you’re absolutely sure that you need to use a brush to draw your dotted line.
Table of Contents
Method 1: Draw a Dotted/Dashed Line With The Pen Tool
With your document open in Photoshop, let’s jump into the steps.
Step 1: Select the Pen tool using the toolbox or the keyboard shortcut P.
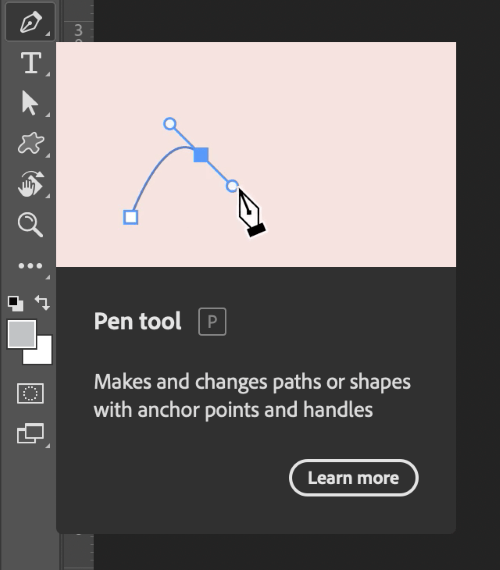
The Pen tool allows you to create and edit a path using anchor points to create any shape, from a basic straight line to a complex illustration. This path will become your dotted line, but first, we’ll need to apply a few custom settings to turn a plain old straight line into a fancy dotted/dashed line.
With the Pen tool active, locate the Options panel (usually placed along the top of the main document window). Make sure that the Pen tool is set to Shape instead of Path, which allows you to add strokes and fills to your creation.

Step 2: Customize the colors for your shape by clicking the swatches next to the Fill and Stroke options. Make sure the Fill color is blank, represented by a white square with a red diagonal line across it (as shown below), and set the Stroke color to the color you want your dotted line to be.

Step 3: It’s time to customize the dots in your dotted line. Click the Stroke Options dropdown menu, and you’ll see that Photoshop has preset dotted and dashed line patterns for you to use.
You can also click the More Options button at the bottom of the presets dropdown to customize your own dot or dash pattern.

Step 4: Once you’re happy with your line settings, click anywhere in your document to set the first anchor point of your path.
Step 5: Click again to create a second point, and Photoshop will begin drawing your path between each anchor point. Continue clicking until you’ve created your desired shape, using as many anchor points as you need.
You can also click and drag as you set anchor points to create a curved path, or hold down the Option and Command keys (use Ctrl and Alt on PC) to adjust your anchor points after they’ve already been placed.
Because your dotted line is a vector path instead of a raster graphic, you can edit it easily at any point without worrying about losing pixel data.
You can move and edit anchor points, adjust your line thickness and color, and adjust the shape and spacing of the dots in your line without having to redraw the whole thing from scratch.
Method 2: Drawing a Dotted Line With Brushes
As I mentioned earlier, this method has one main advantage, but also one big drawback. The primary advantage is that you can use it with any of Photoshop’s brush-based tools, from the Clone Stamp Tool to the Dodge tool.
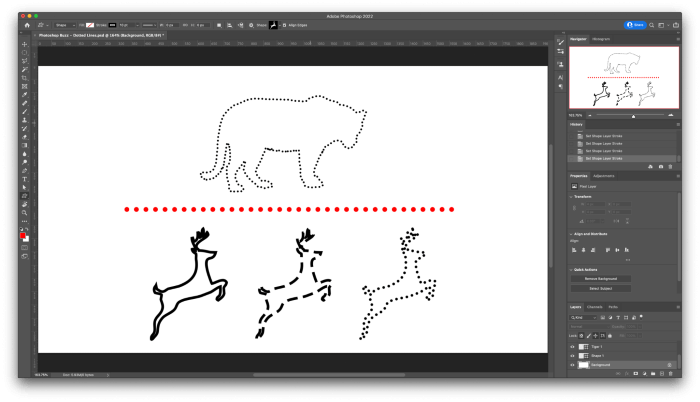
Because you’re using the brush system, you can create “dots” on your line using any shape you want.
This opens up a huge range of creative effects for you to play around with, but there’s still that one big drawback: your dotted line will be a raster graphic rather than a vector graphic. If you want to change your line at all, you’ll have to start from the beginning and re-draw it.
Step 1: Configure your brush for a dotted line effect, switch to the brush-based tool you want to use, and then open the Brush Settings panel using the Options panel or the keyboard shortcut F5.
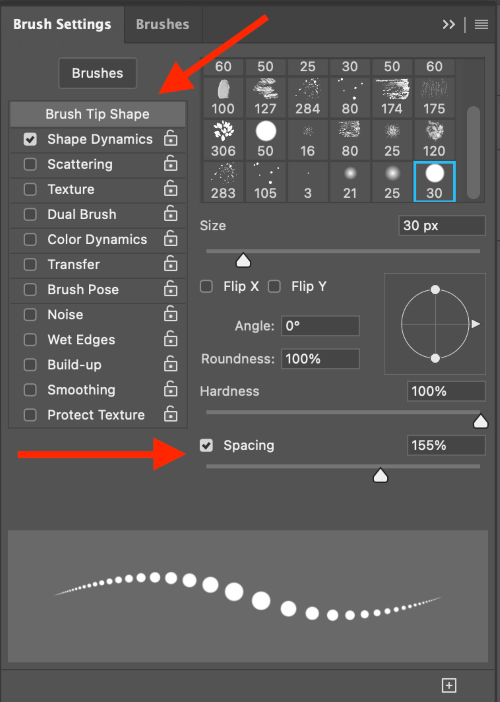
Step 2: Customize your brush shape to anything you want, and then select the Brush Tip Shape category in the left pane of the Brush Settings window.
The right pane will update to show you the relevant settings. The one we need to adjust is called Spacing and it’s located at the bottom of the panel.
Without getting into too much detail about how the Photoshop brush system works, the Spacing setting controls how often your brush “stamps” its shape while in use. Lower settings create a smooth consistent line, but any setting above 100% will show you each individual brush stamp as a separately spaced shape.
This can be used to control the density of the dots in your dotted line. A good place to start is usually between 150% and 200%, but you can customize this to anything you want to get the result you need.
You’ll see the preview section at the bottom of the Brush Settings panel update to show how your brush will look.
Step 3: Once you’re happy with the results, it’s time to actually draw your line!
If you want to draw a freeform line, then you can simply click and drag it anywhere in the main document window.
To draw a straight line, click once where you want the line to start, then hold down the Shift key and click once where you want the line to end. Photoshop will draw a perfectly straight line between the two points.
A Final Word
That’s all there is to know about how to draw dotted lines in Photoshop! No matter whether you’re working on a creative art piece or a graphic design project, one of these two methods will fit the bill perfectly.
About Thomas Boldt