
Ever tried winging it to learn a new tool in Photoshop? Some are pretty easy to figure out, especially if you are already familiar with other tools in the software.
The Pen Tool is not one of those. It doesn’t easily make sense right off the bat. However, it is easy to use, once you know how it works.
Hi! I’m Cara and as a photographer who enjoys photo manipulation, I’ve needed to cut out objects in an image on occasion. The Pen Tool is a very precise way to do this, but it’s a bit mystifying at first.
Come along with me as I demystify this handy tool!
Note that the screenshots below are taken from the Windows version of Adobe Photoshop, if you’re using the Mac version, the navigations may look slightly different.
Table of Contents
Where is the Pen Tool in Photoshop
Find the Pen Tool in the toolbar on the left side of the screen with the other Photoshop tools. It looks like the head of an old-fashioned ink pen. Alternatively, you can use the Pen Tool keyboard shortcut P on the keyboard to activate the tool.

How to Make a Straight Line Using the Pen Tool
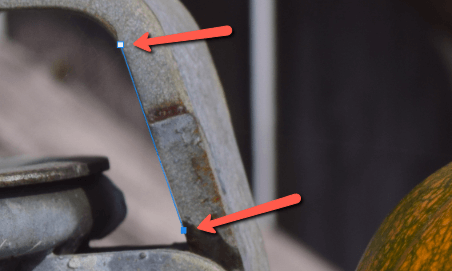
The pen tool allows you to quickly make a straight line by clicking twice to drop two points – once at the beginning and once at the end of the line. It’s so much easier than trying to draw a straight line (and failing miserably) with your mouse.
Here I just dropped two points on this image and the program connected the dots.
How to Make a Curve Using the Pen Tool
However, some objects that we want to cut out will always have straight edges. In fact, most of the time there will be curves, angles, and other obstacles to get around.
The pen tool also allows you to precisely follow curves and change angles super easily. But you have to wrap your head around how it works.
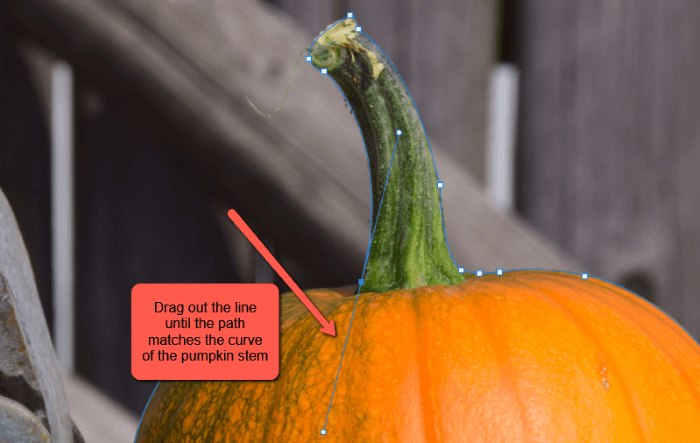
Just like making a straight line, you drop two points to make a curve. However, understanding where to drop those points is a little more confusing.
The first point goes at the beginning of a simple curve, the second point goes at the end. Then you drag the mouse out until the curve of your path matches that of the object.
It takes a bit of practice to start seeing where each curve begins and the next one begins. But once you get it down, this selection method goes pretty quickly and works very precisely.
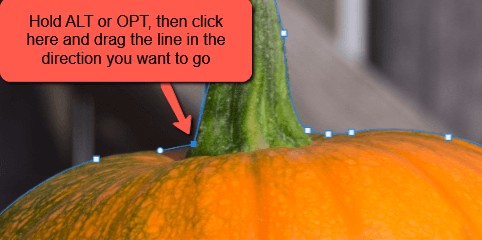
After coming down the pumpkin stem, I have to change angles. If I just drop a point off to the left to continue following the pumpkin, the curve will do all sorts of strange things.
To change the angle, hold down Alt or Option then click on the dropped point. (Not the ends of the line used to make the curve, that isn’t part of the path). Then drag that short little line to indicate the direction you want to go.
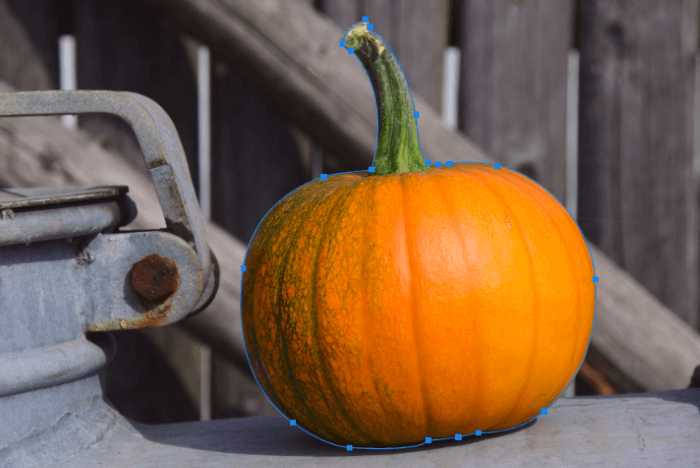
Now you can drop your second point and follow the curve. In this case, I finish the path. When you close a path, watch your cursor as you hover over the first point you dropped. A tiny circle will appear next to the pen tool icon. Click and the path closes.
If you want to leave the path open Control-Click or Command-Click somewhere away from the object.
Look at how nicely it outlines the shape of the pumpkin with just a few dropped points.
Making Adjustments
What if you mess up…and realize it after you’ve already dropped a few more points? Don’t worry you don’t have to undo and go back.
At any point, you can make adjustments by holding down Control or Command and clicking the drop point you want to move. You can also click anywhere along the path to adjust the section without moving the drop point.
How to Cut Out a Shape Using the Pen Tool
Finishing the path won’t automatically cut out the selection. To do that, switch to the Paths panel which can often be found in the layers panel.
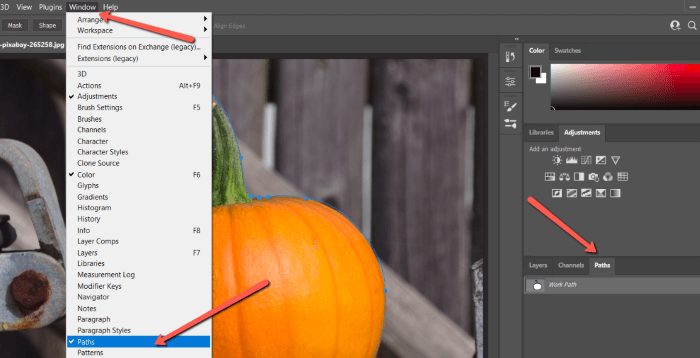
Depending on your Photoshop layout, the Paths panel may not be there. No worries, simply go up to Window in the menu bar and select Paths.
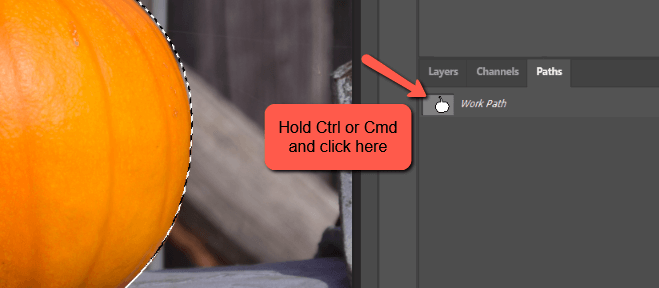
To turn the path into a selection, hold Ctrl or Command and click the thumbnail for your path. You’ll see the marching ants appear around your selection.
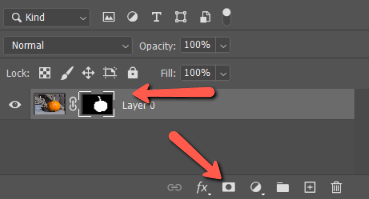
To cut it out, simply hit the layer mask box at the bottom of the Layers panel. The selection will appear on an inverted mask.
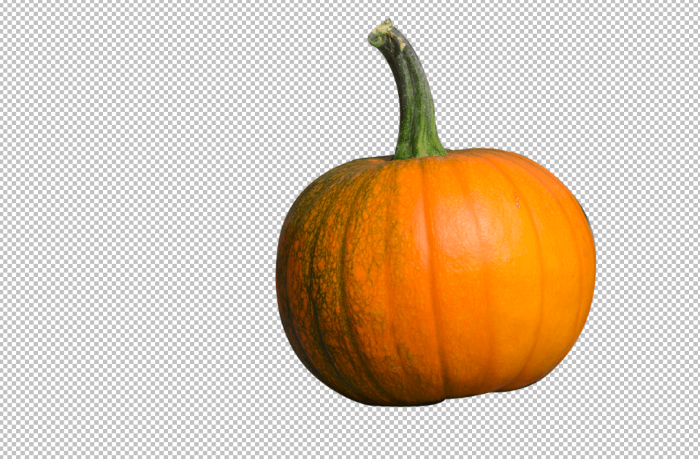
Boom! Bam! Thank you, ma’am! Now I’ve got a pumpkin I can use in an image, just in time for Halloween!
Looking for more exciting tips and tricks on how to use Photoshop? Check out more of our tutorials, like the Magic Wand Tool. It’s so easy to use it’s almost criminal!
About Cara Koch
jaia
Thank you. Please send more tips and links
APPIAH JOSEPH
Good work my love God bless you
Abolfazl zaimi
very very thanks you