So what’s the Quick Selection Tool in Photoshop? Here’s a quick explanation.
The Photoshop Quick Selection Tool selects textures in addition to colors, unlike other selection tools. Photoshop continually analyzes the image as you use the tool to choose pixels that are similar in texture, color, and pattern. With just a few clicks, the selection is precise.
You have more control over tiny regions you want to choose or deselect with the Quick Selection tool’s smoother edges.
I have over five years of Adobe Photoshop experience and am Adobe Photoshop certified. In this article, I’ll show you how to use the Quick Selection Tool in Adobe Photoshop.
Key Takeaways
- The quick selection tool is not the same as the Magic Wand Tool.
- Not every image will get the desired effect with the Quick Selection Tool.
How to Use the Quick Selection Tool
Follow the steps below to use the Quick Selection Tool in Photoshop.
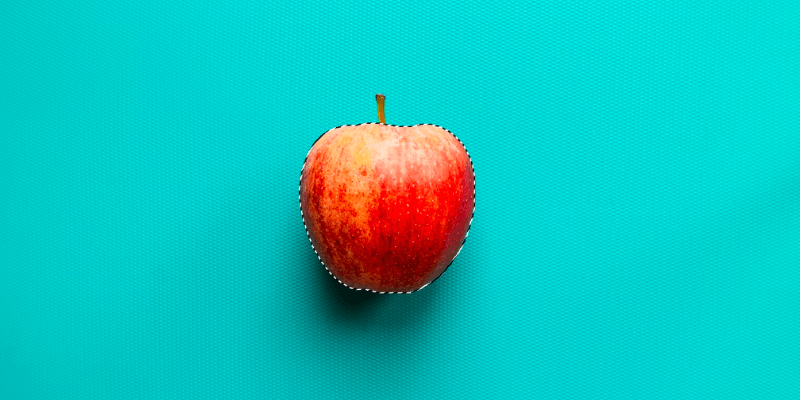
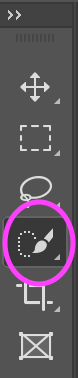
Step 1: Open Photoshop and a picture. In the toolbar on the left side of the screen, select Quick Selection. It is the fourth choice down and resembles a paintbrush drawing a dotted line. If a Magic Wand icon appears in its place, right-click it and then choose Quick Selection Tool.
Step 2: Make sure the Add to selection mode is selected at the top of the screen; it’s the same brush-and-dotted-line icon with a plus sign above it. By choosing this option, you add your selection each time you use the Quick Selection tool to click a photo rather than starting from scratch.
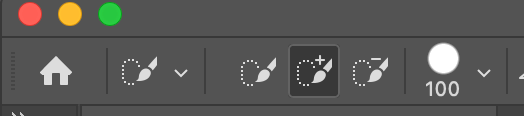
Step 3: Make sure to change your brush size down from the default, which mine is at 100, to about 20 or less, just to make sure we can be detailed and accurate and not be selecting the parts we don’t want.
Step 4: Select the desired area of the image by clicking. Click a different area or click and drag your mouse as if you were painting with a brush to broaden your selection. As you move the mouse, you can see the selection grow.
If you select something you don’t want, at the top of your screen you will see a Subtract option, go ahead and click that to remove the unwanted area.

And that’s the majority of how to use the quick selection tool! The Quick Selection Tool works best on photos with sharp edges and contrasty regions. These photographs will make it simple for Photoshop to make the right pick, with you occasionally just needing to make a few minor adjustments.
Bonus Tips
- You can simultaneously choose and deselect numerous locations with the Quick Selection tool. With a single mouse swipe, you can actually choose four or five different parts of a picture.
- It can be used to choose backgrounds, foregrounds, or any other area of a picture that you want to exclude.
- Selecting the Auto-Enhance option in Photoshop can result in smoother, higher-quality selection edges (they often appear a bit blocky on their own), but you might notice that the Quick Selection Tool takes a little longer to work when Auto-Enhance is turned on. Unless you experience performance issues, I’d advise activating Auto-Enhance.
Final Thoughts
Any artist or photo editor must learn how to use the rapid selection tools in Photoshop and know when to use them. Luckily, it can be done quickly and simply.
Even while using any of the quick selection tools will need you to go back and perform another round of adjustments, they still wind up saving you time. The best way to learn Photoshop methods is to practice and make mistakes.
Any questions about How to Use the Quick Selection Tool in Photoshop? Leave a comment and let me know.
About Aly Walters
Eoin Morris
You did your research and wrote an amazing how to use selection blog.