Photoshop is best known as a photo editor, but there are plenty of situations where you’ll need to use text and text layers.
You wouldn’t want to use it as a full-fledged graphic design program since there are better options than Photoshop for those tasks, but it’s still a good idea to know how to create and edit it in Photoshop.
Working with text layers in Photoshop is extremely easy, and Photoshop allows you to do all kinds of remarkable transforms and warps – all while leaving your original text layer still editable. It’s a perfect illustration of the value of non-destructive editing.
If you want to angle text that’s already part of an image, such as a picture that you grabbed from the web, that’s still possible but the method is a bit different and requires a few extra steps.
Let’s take a closer look at the two different situations.
Table of Contents
How to Tilt a Text Layer
If you’ve added text to an image in Photoshop, it is stored on a separate text layer as vector shapes. This allows you to transform, reposition, and edit the contents of your text layer without ever needing to convert it into pixels (a process known as rasterization).
There are a couple of different ways to apply a tilt to your text, depending on whether you’re actively editing the text contents or not, but let’s start with the simplest method.
Switch to the Text tool using the toolbox or the keyboard shortcut T, and click anywhere on your text in order to enter text-editing mode. Next, press and hold the Command key (use the Ctrl key if you’re using Photoshop on a PC) to enter a temporary Free Transform mode.

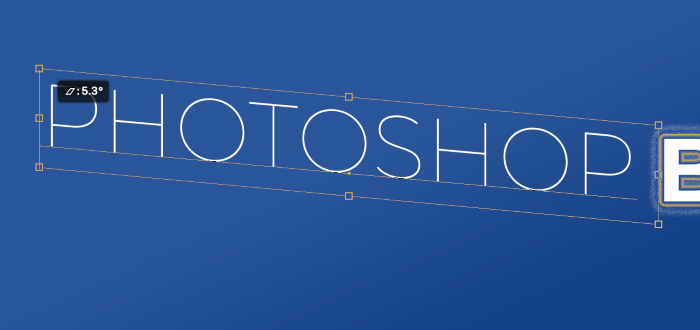
If you take a closer look at your text in the main document window, you’ll see that Photoshop has added an outline known as a bounding box around the edges of your text layer.
Each edge and corner of the bounding box has a smaller box called a “handle” that allows you to interact with the layer.
Each handle can perform several different types of transform operations, and your mouse cursor icon will change to show you which operation will be performed.
If you place your cursor directly over a corner, the cursor will change to indicate that a Scale operation will be performed.
If you move the cursor out far past the handle, outside of the bounding box, you’ll see that the arrows change to indicate that a rotation operation will be performed.

To apply a tilt/skew transformation, the simplest way is to use one of the handles in the center of an edge (shown above). Click a handle and drag to see the results of the effect, along with a helpful little popup overlay that tells you the current skew angle.

If you don’t want to mess around with keyboard shortcuts or you’re just sick of holding down the Command key forever, you can also open the Edit menu and click Free Transform.
Just keep in mind that Free Transform allows you to perform any kind of transformation, not just skews and tilts.
You can also enter Free Transform mode using the keyboard shortcut Command + T (use Ctrl + T if you’re on a PC), but keyboard shortcuts will only work if you’re not actively editing the contents of your text layer.
If you want to make sure that you only apply a tilt to your image without accidentally adding in any other transformations, open the Edit menu, select the Transform submenu, and click Skew.
You can also hold down the Command and Option keys (Ctrl and Alt for PC users) while you click and drag handles to modify the effects.
How to Tilt Rasterized Text
Now that you understand how bounding boxes and transformations work, it’s a lot simpler to explain how to use them to tilt rasterized text. It works exactly the same way as on a text layer, except that you’ll have to make a selection around your text first.
The fastest way to do this is with the Rectangular Marquee tool. Select it from the toolbox or press the keyboard shortcut M and draw a selection closely around the text you want to tilt.
Use the keyboard shortcut Command + J (Ctrl + J for PC) to duplicate your selection onto a new layer, and then press Command + T (Ctrl + T for PC) to enter Free Transform mode. Use the bounding box handles to add any kind of skew or tilt that you want to your text.
If you’d rather not use Free Transform mode, you can still open the Edit menu, select the Transform submenu, and click Skew to apply a tilt to your text.
A Final Word
Now that you know how to tilt text in Photoshop, it’s important to ask yourself if that’s really what you want to do. If you’re tilting text so that it matches the perspective in an existing image, that’s fine – but if you’re tilting your text as a design choice, I have to urge you to reconsider.
It has a negative impact on text readability/legibility, and it also just looks hideous 😉
Remember – always use your Photoshop powers for good, not evil.
Happy tilting!
About Thomas Boldt