Looking for an interesting way to create a mashup of a bunch of images? Or maybe you’re just looking for a creative way to spruce up an individual photo.
Creating a photo mosaic in Photoshop fits the bill for either pursuit.
Hello! I’m Cara and today I’m going to show you how to make a photo mosaic in Photoshop. The final effect is stunning and looks super complicated. In reality, it’s quite simple to put together by creating a pattern from a contact sheet.
Let’s get started!
Note: I use the Windows version of Photoshop. If you are using a Mac, the workspace will look slightly different from the screenshots displayed here.
Table of Contents
Step 1: Prepare the Mosaic Images
To create the mosaic, we’re going to need a bunch of photos. How many depends on the size of the mosaic/how you want your effect to look. The main thing is to choose a square number so you can create a pattern with the same number of rows across as it is tall.
For example, choose 49 photos for a 7 x 7 or 100 for a 10 x 10.
Also, if you want your individual images to display as squares, you’ll need to crop the images beforehand. You can do this in Photoshop (check out how to use the crop tool here) but this will be quite time-consuming if you’re working with a lot of photos.
I used the batch features in Lightroom to quickly crop mine. You can also use any photo editor that has these capabilities or you can find a free online tool to do the job.
Once you’ve got your pictures prepared, place them all into the same folder. This is important because when we create the contact sheet in Photoshop, we won’t be inputting individual image files, but the whole folder.
Step 2: Create a Contact Sheet
Now, we need to get all the images into the same project in Photoshop. We could painstakingly do this by spending all day placing each photo. Or we can let Photoshop do the heavy lifting and have it done in a matter of seconds.
Assuming you want to go with the second option, here’s how to do it.
Open Photoshop, but instead of opening an image or a new document as we often do, go to File and hover over Automate. From there, choose Contact Sheet II.
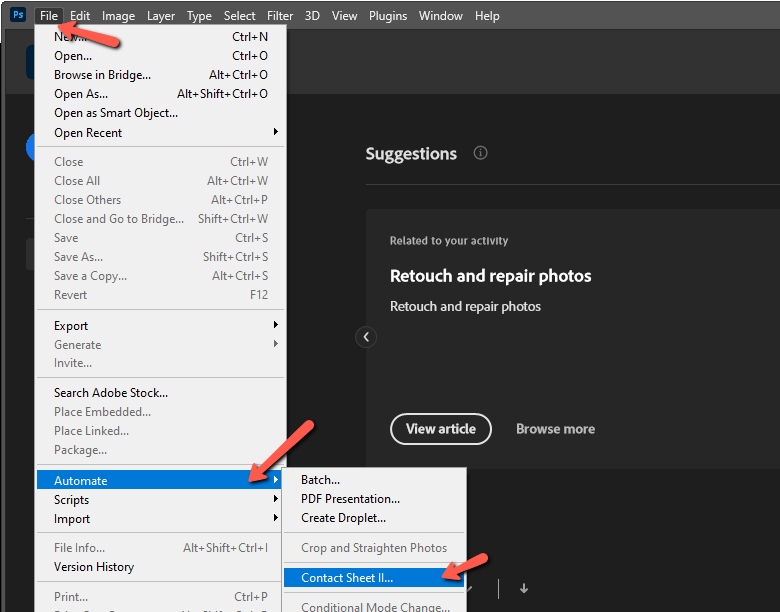
In the box that pops up, it’s important to get the settings right so your contact sheet turns out the way you want. Start at the top and make sure the Use box is set to Folder. Then click the Choose button. Navigate to your folder and click Choose Folder.
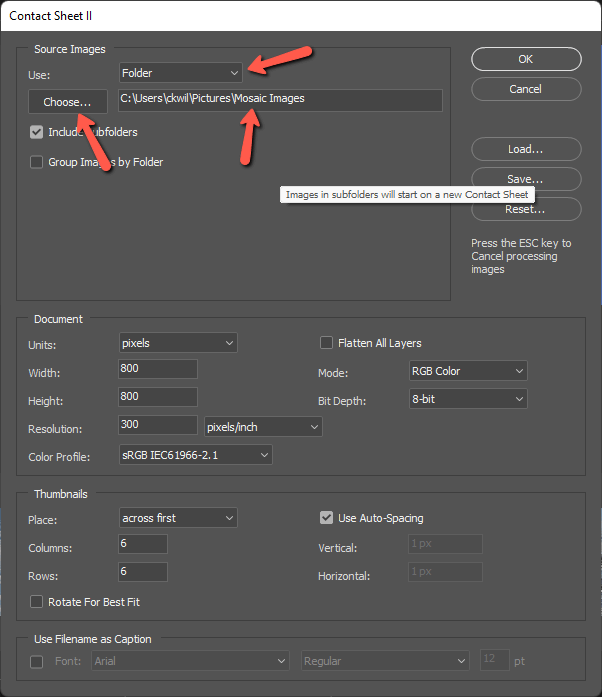
Moving down, let’s set up the grid. In the Units box, you can choose how you would like to measure your images. I’m going to use inches and set the width and height to 2. This will create square boxes for our images. If you want a different aspect ratio, this is where you put it.
Make sure the Flatten All Layers box is not checked. This will put each image on its own layer so you can modify its positioning later if needed. Make sure the Mode is set to RGB Color and the Bit Depth is 8-bit.
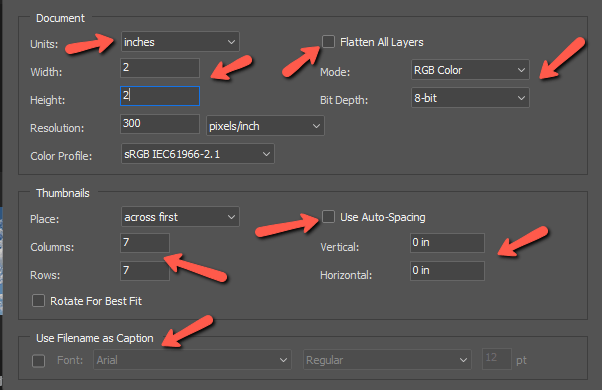
In the Thumbnails section, choose the number of columns and rows you want to use. I have 49 images, so I’m going to put 7 and 7 to create a square contact sheet.
Uncheck the Use Auto-Spacing box and set the Vertical and Horizontal boxes to 0. This will eliminate white spaces around the edges of the photos as much as possible. If you have different-sized images, check Rotate For Best Fit if you want to allow Photoshop that freedom.
Finally, at the bottom, make sure that the Use Filename as Caption box is unchecked. Otherwise, you’ll end up with a bunch of filenames running through your mosaic!
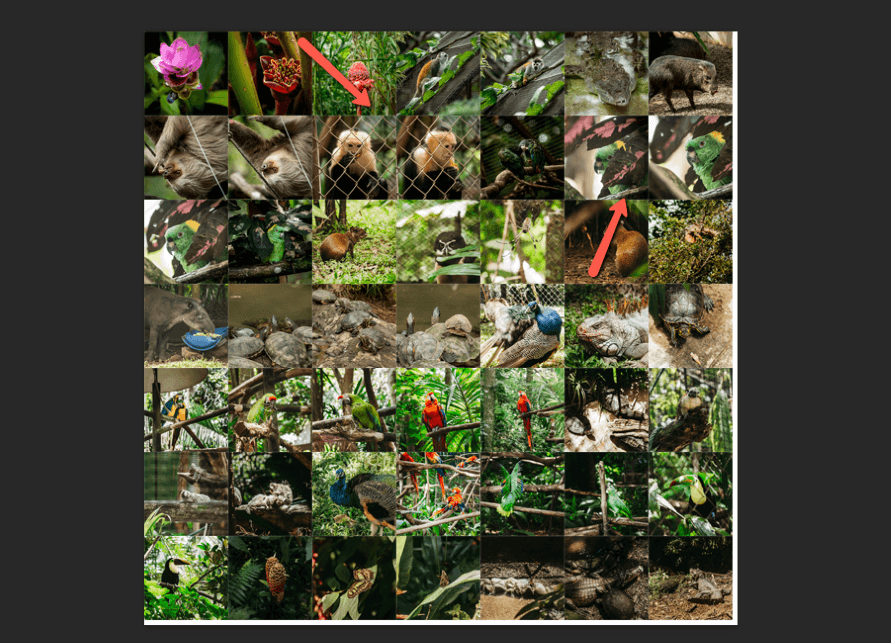
Once everything is all set, press OK and watch the magic happen!
Step 3: Adjust the Images
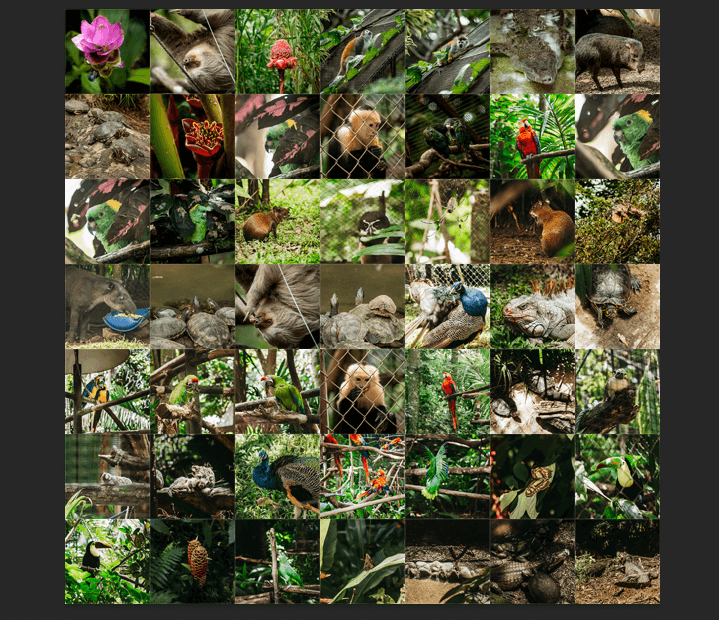
If you set everything correctly, should end up with a grid of images like this. Plus, each image should be on its own layer with a layer mask in the Layers panel.

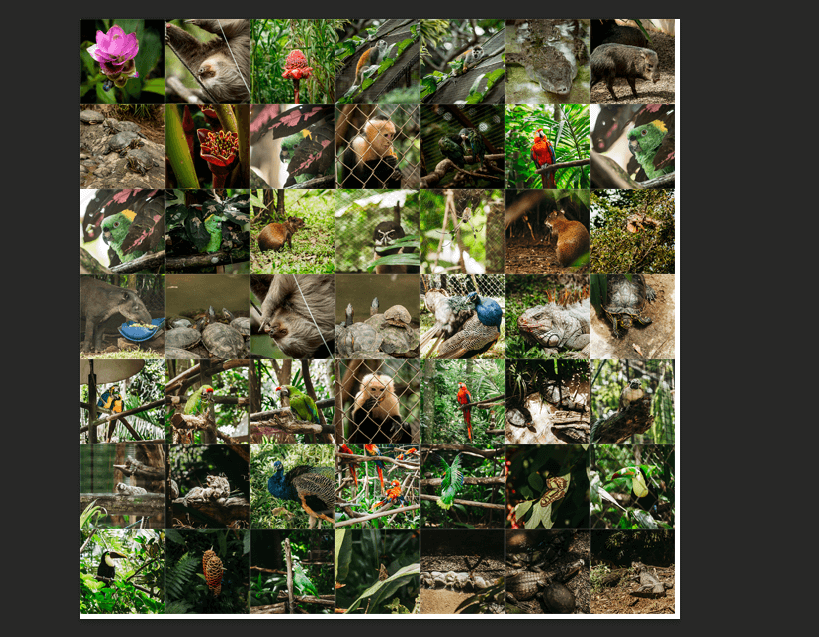
Now that you can see all the images together, you may want to change up the pattern a little. You have some similar images or duplicates next to each other or you might want to create a specific color pattern.
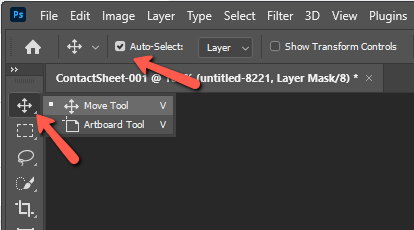
We can easily move photos around using the Move tool. Press V on the keyboard or select the tool from the top of the toolbar on the left.
Make sure that the Auto-Select box is checked in the Options bar. This will allow you to click on a particular image in the mosaic and Photoshop will automatically jump to the correct layer in the Layers panel. This will save you a lot of time rather than hunting for each image.
Click on the image in the mosaic that you want to move. Notice that the layer is selected in the Layers panel. Press Ctrl + T or Command + T to activate the Transform tool. Click and drag the image out of the way.
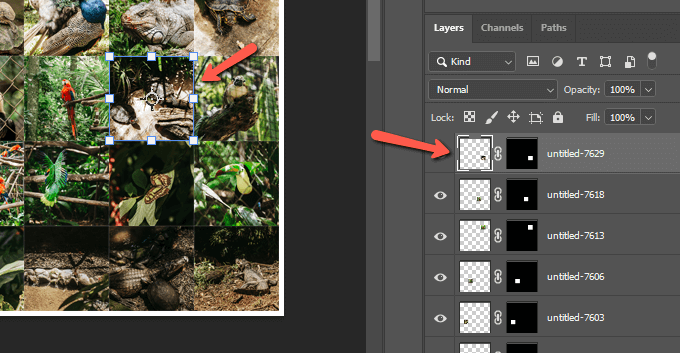
Repeat with the image you would like to put in the empty slot. Continue moving the images around until you are satisfied with your mosaic.
If you did not crop your images before making the contact sheet, you may have white space around some of them. You can fix this by resizing the images with the Transform tool to fill the boxes with no white spaces around the edges.
You may end up with white edges on the side as I did. Simply trim them off with the Crop tool by pressing C on the keyboard or choosing the tool from the toolbar on the left.
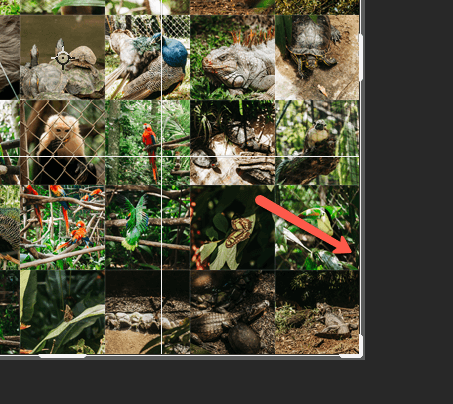
Click and drag to adjust the crop tool to trim off the unwanted edges.
Step 4: Define a Pattern
To use this mosaic more easily, we’re going to create a pattern with this contact sheet. Then we can add it to other projects to create the final image.
To make the pattern, go to File and choose Define Pattern.
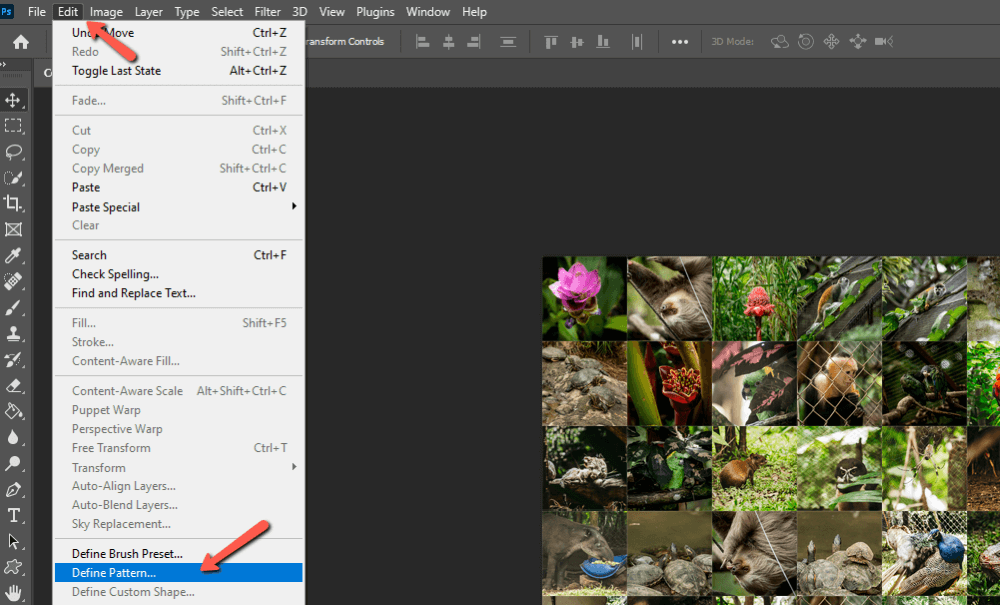
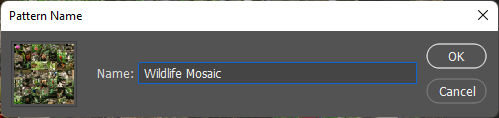
In the box that pops up, you can give your pattern a name and hit OK.
Step 5: Combine the Images
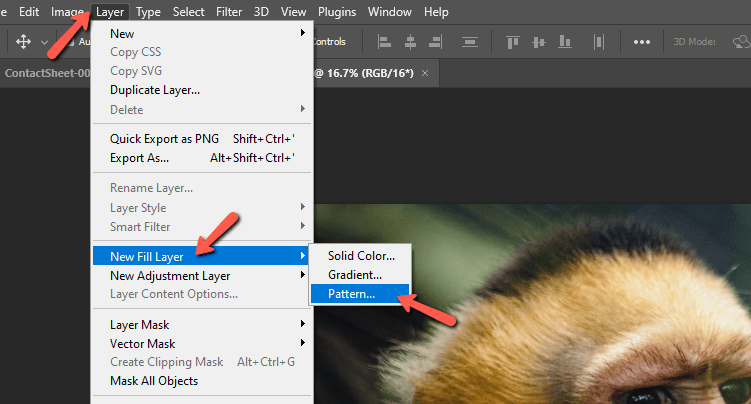
With the pattern ready, let’s open our main image in Photoshop. We want to add a layer on top and fill it with our newly created pattern. So go to Layer in the menu bar and hover over New Fill Layer, then choose Pattern from the flyout menu.
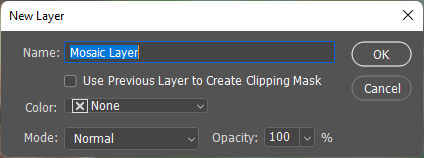
You’ll get a box where you can name the layer and press OK.
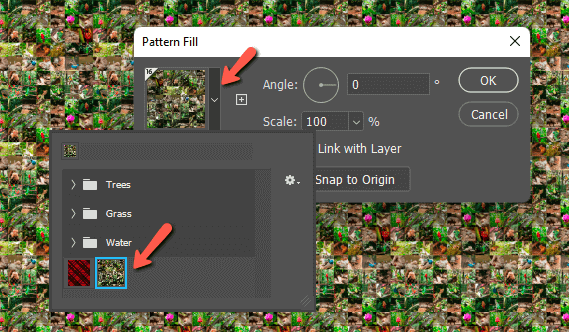
Press the little arrow next to the preview box to open your pattern options. Find the mosaic pattern you just created and select it.
You can resize the pattern by changing the percentage in the Scale box. If you want to set the mosaic pattern on an angle, you can do that with the Angle box. Click and drag the mosaic pattern on the image itself if you want to reposition it.
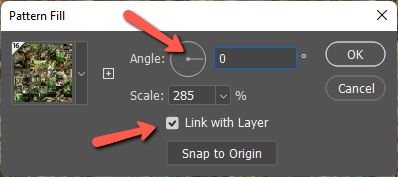
Once you’re satisfied with the size and position, press OK.
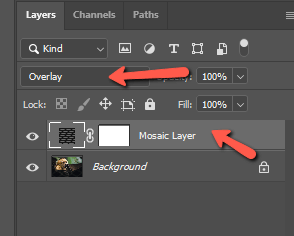
We need to change the blending mode of the mosaic layer so the main image can come through.
You’ll see a box near the top of the Layers panel that probably says Normal. Click on it to open the blending modes and hover over each for a live preview in the workspace. Different blending modes will work differently with each image, but Overlay will usually be a good choice.
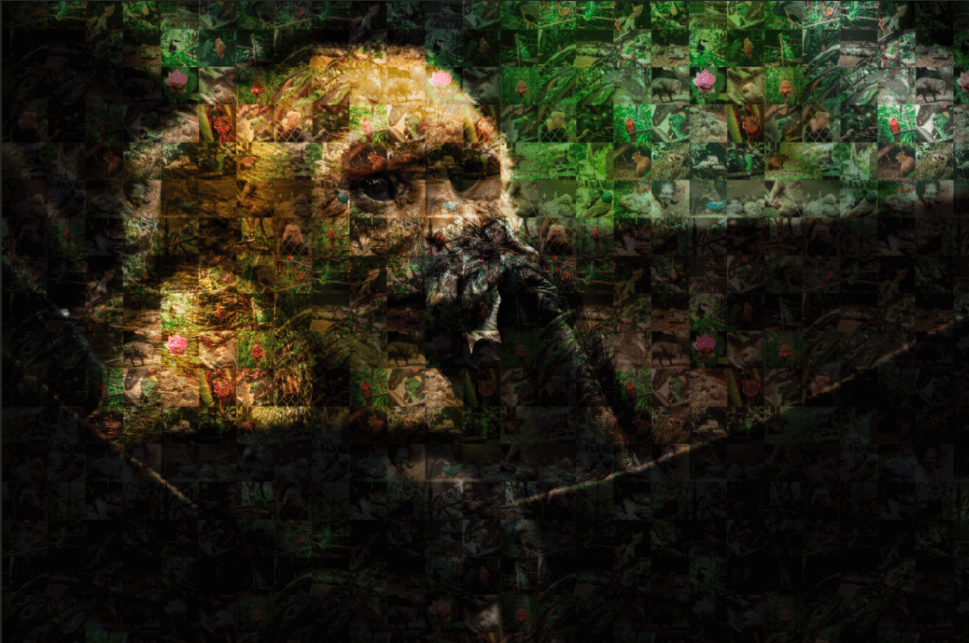
Step 6: Put on the Finishing Touches
At this point, your mosaic now looks like a mosaic. But you may want to make some adjustments to balance the image and the mosaic better.
There are a few different things you can try. You can lower the opacity of the mosaic layer if it seems too strong.

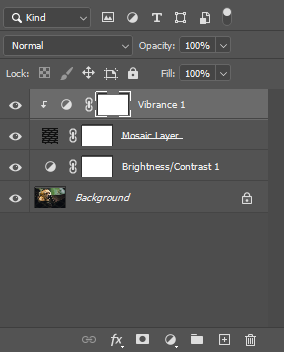
Or you can add adjustment layers like Brightness/Contrast to adjust the brightness and contrast settings. Try putting this layer between the image and the mosaic layer for the best results. Find these adjustment layers by clicking the half-filled circle icon at the bottom of the layers panel.
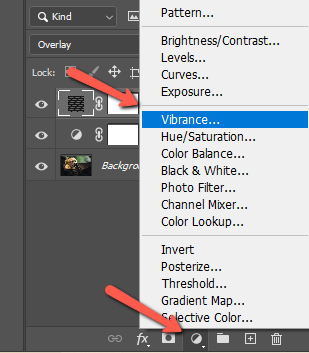
Try experimenting with other adjustment layers until you get a look you like. Remember, if you want to affect only the top layer, you’ll need to use a clipping mask.
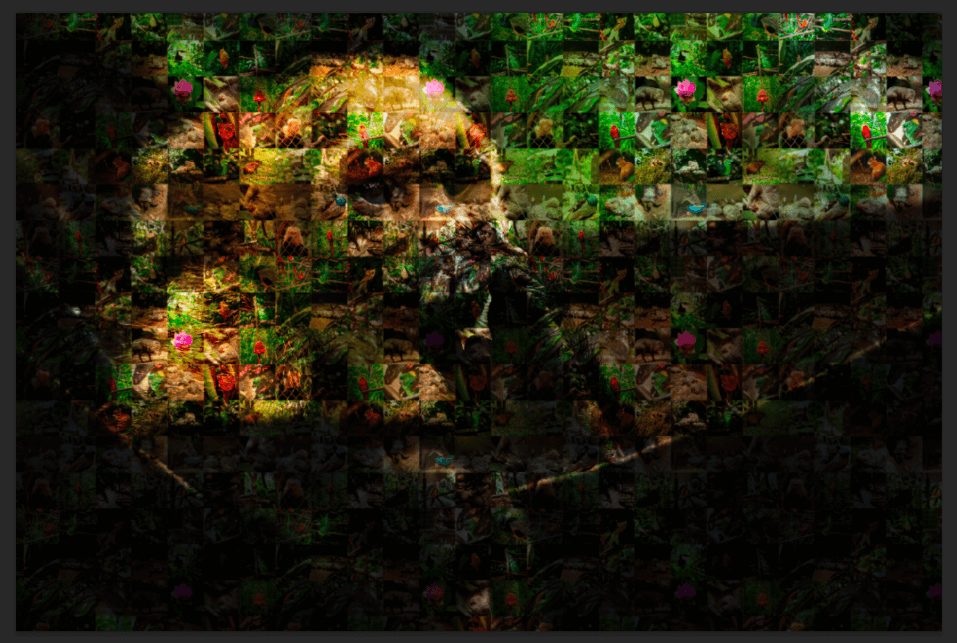
For my example image, I brought down the vibrance and saturation on the mosaic layer so the bright colors don’t distract too much from the monkey.
And here’s my final image!
What interesting things can you create with this technique? There’s only one way to find out! Curious about other Photoshop techniques? Check out how to add vintage textures to modern images here!
About Cara Koch