Say what!? The whole point of writing text is to be able to read it, right? Why would you want to make the text transparent in Photoshop?
Hi, I’m Cara! I am a lover of all things Photoshop and photography. Today, I am here to show you why you would want to make text transparent and how to do it. There is more than one method and which one you use depends on the effect you want to create. Let me show you!
Note that the tutorials and screenshots below are based on Photoshop CC Windows, they might look slightly different if you are using the Mac or other versions.
Method 1: Outlining the Text
For this example, I’ve already added an outline to the text by adding a stroke. In another tutorial, I explain how to add stroke to a text. Check that out if you don’t know how to do this.

The text color is white and the stroke is black. I want to make the text transparent so we can see through to the image below.
You could drop the opacity of the text layer. However, that will also make all the layer effects transparent. The stroke is a layer effect so that won’t work.
Instead, I’ll lower the layer Fill to 0% and voila! The text is still easy to read yet blocks the image far less.
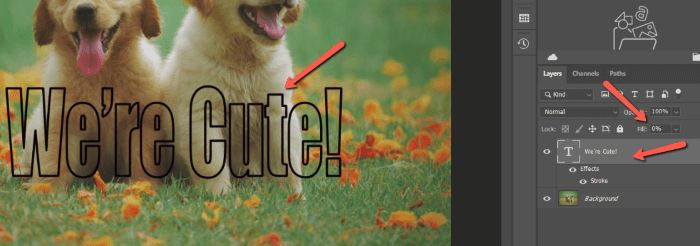
Make sure you have the text layer selected in the Layers panel when you do this.
Method 2: Border Behind Text
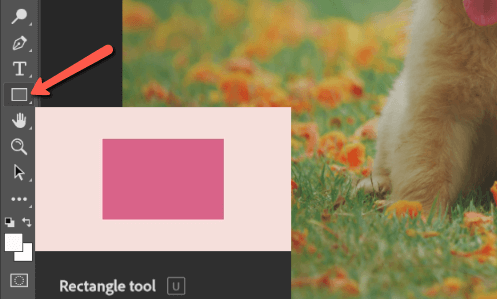
Another time we might want transparent text is when we’re using a border. Let’s make a border with the Rectangular Shape tool.
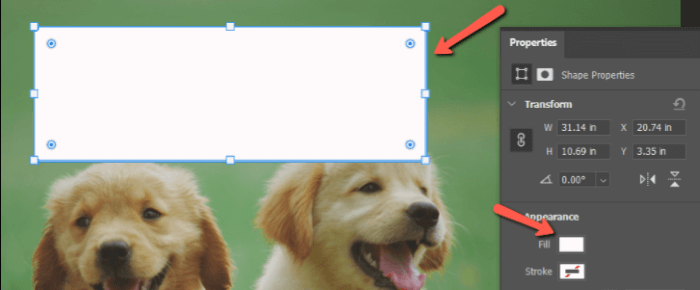
Click and drag to create a rectangle where you want it. In the Appearance section of the Properties menu make sure that the Fill box is not slashed through as the Stroke box is in this example. Double-click on the color swatch to open the color picker and choose a color.
Add your text outside the rectangle. We’ll put it in there eventually, but if you place it there initially your editing options are limited.
Write your text and accept the changes by hitting the checkmark in the Options bar. Hit Ctrl + T or Command + T on the keyboard to access the Transform Tool and resize the text. When you’re happy with the result, click and drag to put the text into the border.
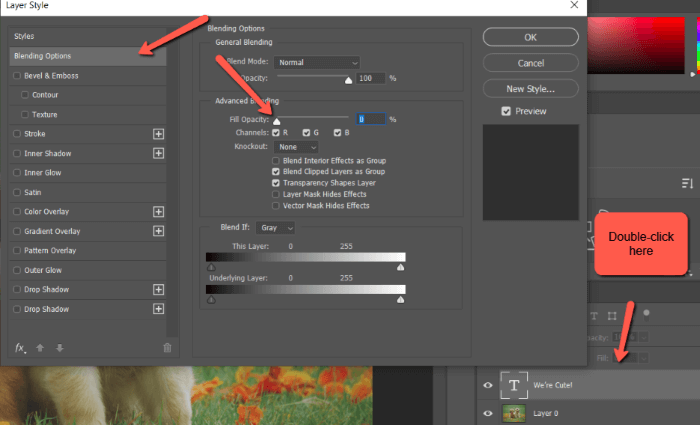
Double-click on the text layer to access the Layer Styles panel and go to Blending Options. Change the option in the Knockout box to Shallow.
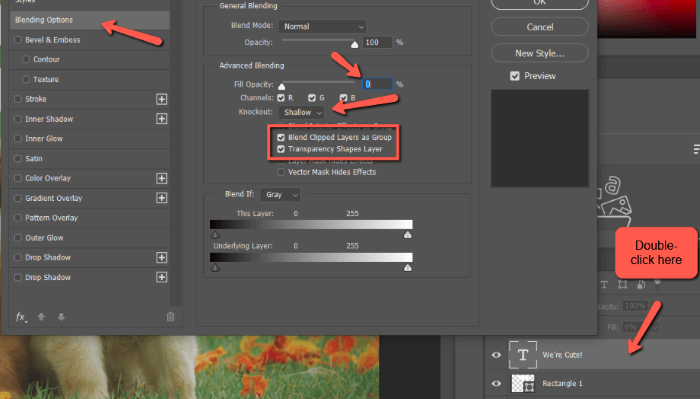
Both the Blend Clipped Layers as a Group and Transparency Shapes Layer options should be checked. Bring the Fill Opacity down to zero.
Boom!

What if you followed my instructions exactly and ended up with this instead?

Don’t worry, it’s a simple fix. Take a look at your layers panel. If you have a locked background layer you’ll get the first result.
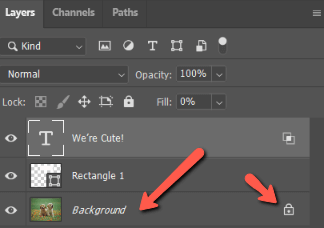
But if your background layer is unlocked and turns into Layer 1, the transparency will punch through the background layer as well. That’s why you end up with the second result.
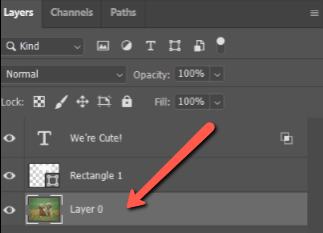
To fix this, you simply need to group the border and text layers together so the effects used only affect those two layers. Highlight both layers by clicking on one, then holding the Shift key while clicking on the other.
Now hit, Ctrl + G or Command + G to group the layers together.
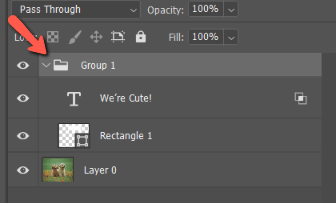
Now the knockout effect won’t touch the bottom layer and you’ll get this.

Method 3: Beveled Text
The last method we’ll discuss is how to make a transparent beveled effect. Let’s get rid of the rectangle border and eliminate the layer styles we used before.

Double-click on the text layer to open the Layer Styles panel again. Under the Blending Options tab, bring down the Fill Opacity to zero.
Now click Bevel & Emboss right beneath the blending options tab. The adjustment settings will appear to the right as usual. The Style box controls how the bevel is applied. Play with these to see which works for your design.

Beneath that, you can change the Depth which controls how strongly the letters stand out from the background. You can also pick a Direction. For example, Up brings the letters up out of the image, Down imprints them into the image.

The Size changes how soft or sharp the edges are and Soften allows you to soften the overall effect.
The Shading section below gives you the chance to make the effect more realistic. Check the Use Global Light and Anti-Aliased buttons.
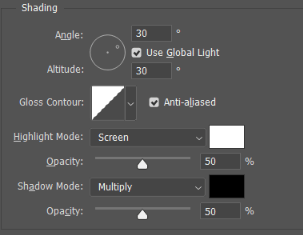
Use the Angle circle to choose the direction of the light. The opacity sliders of the Highlight Mode and Shadow Mode allow you to choose the strength of each effect respectively.
Play with these sliders to get the effect you like. As long as you have the Preview box checked on the right, you’ll be able to see your changes in real time behind the Layer Styles panel.

Here’s mine!

There you have it! Three easy ways to make see-through text in Photoshop to create intriguing effects.
Curious about what else you can do with text in Photoshop? Check out how to create a metallic effect here!
About Cara Koch