
Have you ever wanted your eyes to glow? You know, like the super cool glowing effect they use in movies like the X-Men or Marvel movies.
That would just be the cherry on top when you’re in the middle of an argument with someone. Well, once you’ve read this tutorial, you can! …at least in pictures. More importantly, you can add this effect to your artwork and create Marvel-style movie posters.
Hello! My name is Cara and I’m a professional photographer/superhero fan. Today I’m going to show you an easy way to create a glowing eye effect in Photoshop.
Let’s take a look!
Table of Contents
Step 1: Select the Eye
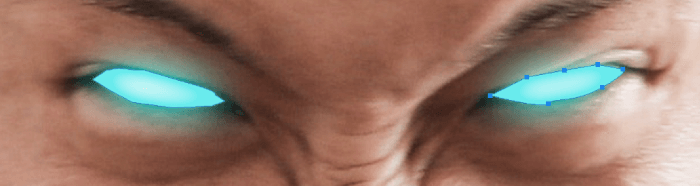
I’m going to be working with this image that I got from Pexels. He looks like his eyes should be glowing, don’t you think?

First of all, we need to select the part of the image that we want to glow. In this case, the eyes. You can use any selection tool such as the Lasso Tool or the Quick Selection Tool to do this. I’m going to choose the Pen Tool so I can trace the contours of the eye more accurately.

Step 2: Color It In
Once I’ve traced his eye, I’m going to right-click within the selection and choose Fill Path from the drop-down menu.
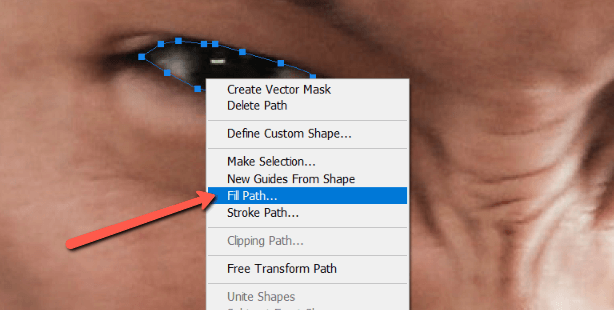
In the contents box, I’m going to choose Color and then pick my color from the color selection box that pops open. For this one, I’m going to go with white.
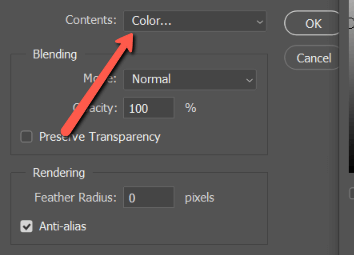
When I click OK, his eye will fill in with white. Repeat this process with the other eye.
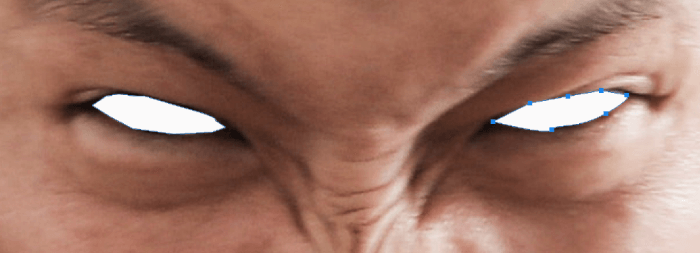
Looks awesome, right? Just kidding, we’re not quite done yet.
Step 3: Add the Glow
Right-click on the layer where you filled in the eyes and select Blending Options. We’re going to choose both Outer Glow and Inner Glow and then adjust the specific settings for each one. Let’s start with the Outer glow first.
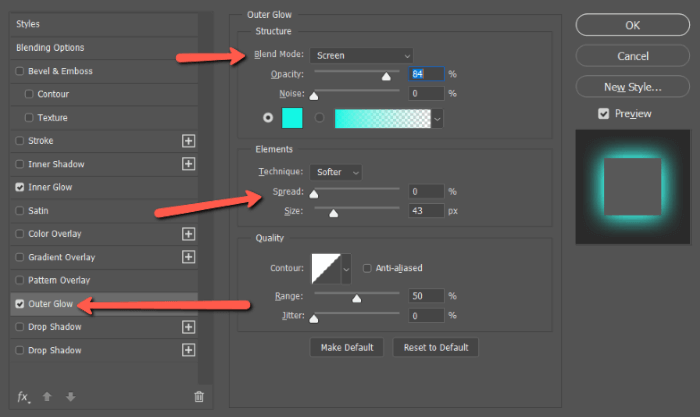
Make sure the blend mode is set to Screen. Under that, you can adjust the opacity to wherever it works for your image. You can keep the color white or choose a different color. I used this teal color for some extra pop.
Under Elements you want to make sure that Technique is set to Softer, Spread needs to be zero or close to zero and you can adjust the size to whatever works for your image.
Use the Inner Glow if you want to add color to the inner part of the fill.
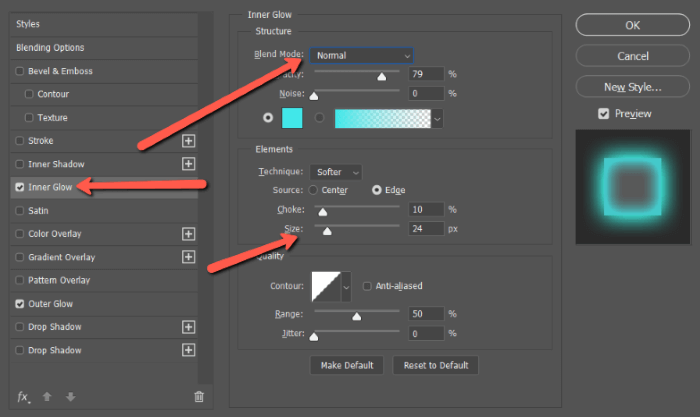
Change the blend mode to Normal and set the opacity where you like it. I chose a slightly darker teal color for this glow. Adjust the Choke and Size until you get the look you want.
Hit OK.
Step 4: Clean Up the Sharp Edges
Now we’re getting something closer to what we want. However, you can see that the edges are a little sharp in some areas. To clean them up, select the Eraser tool from the toolbox on the left.
In the menu at the top, set the brush hardness to zero so it has a nice, soft edge.

Then just bump those hard edges with the eraser tool to make them a touch softer.
Step 5: Add the Cherry on Top
To give the whole thing a touch more glow, select the Brush Tool from the toolbox on the left or hit B on the keyboard.

Set the size to a bit larger than the eye and bring down the Hardness so it’s nice and soft. Bring down the Opacity so it won’t be too strong. Then just click once over each eye to give it a bigger glow.
And here is the final product!

I don’t know about you, but I don’t think I want to get on this guy’s bad side, lol.
Exploring More Photoshop Tricks
This is just one simple trick of many you can do with Photoshop. Check out more of our tutorials, such as this one for changing eye color in Photoshop, today!
About Cara Koch
DominionCinemas
“I have always been fascinated by the magical effect of glowing eyes in photos, and this tutorial has just taken my excitement to another level! The step-by-step instructions provided are incredibly easy to follow, and the results are simply stunning. I can’t wait to try out these techniques and add a hint of enchantment to my own snapshots. Thank you for sharing this fantastic guide, it’s truly a gem for any photography enthusiast like myself. Best regards, Gary Ford.”