
Shadows are a useful tool in any photographic composition, but shooting while you’re out in the world doesn’t offer the same control as the studio.
Sometimes an inconvenient shadow or ten can ruin an otherwise perfect photo, but you can remove shadows in Photoshop using several different editing techniques.
There are four methods that you can use to remove shadows in Photoshop.
Note: the screenshots are taken from Adobe Photoshop CC Mac version. Windows or other versions can look different.
Table of Contents
Method 1: Curves Adjustment Layers
If you just want to soften your shadow instead of completely removing it, you can use a Curves adjustment layer to brighten your shadow.
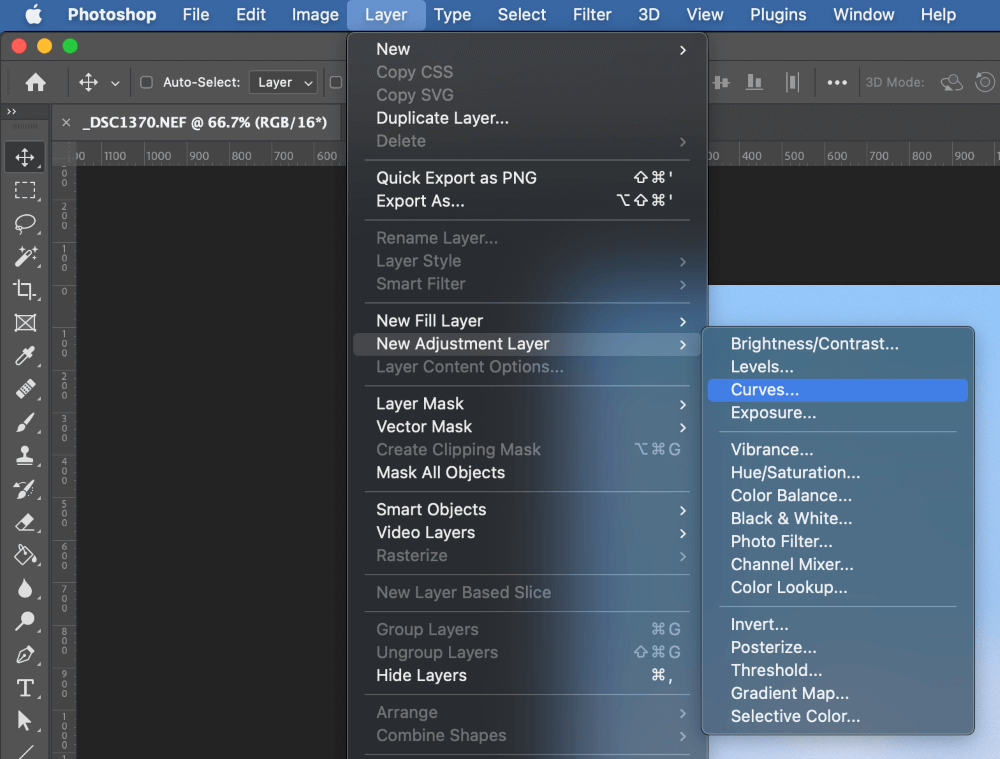
To get started, open the Layer menu, select the New Adjustment Layer submenu, and click Curves. Photoshop will create a new Curves adjustment layer with a layer mask, but the layer mask will be filled with white pixels by default.
That means any Curves adjustments you make will apply to the entire image instead of just your shadow, so we’ll have to fix that first.
Click the newly-created layer mask in the Layers panel, and press the keyboard shortcut Command + I (use Ctrl + I on a PC) to invert the layer mask, switching every pixel from white to black.
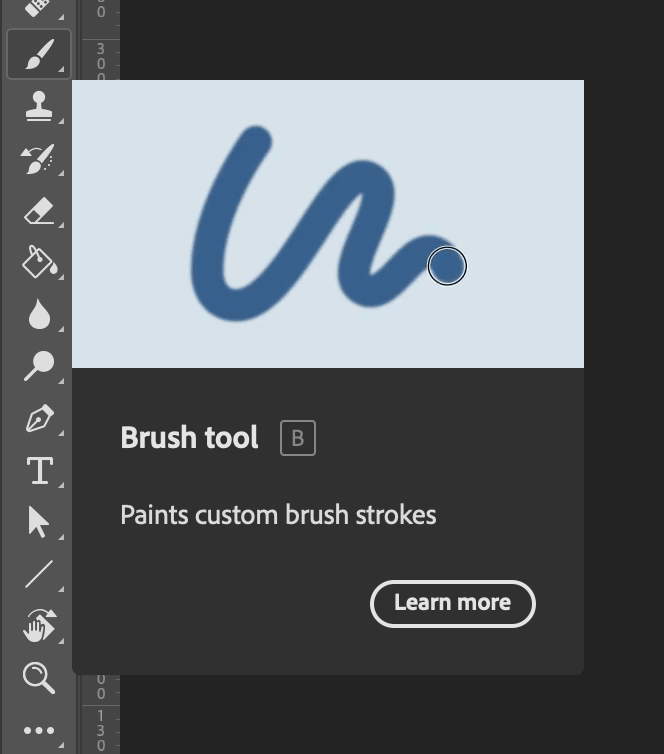
Next, set your foreground color to white using the color picker, and switch to the Brush tool using the toolbox or the keyboard shortcut B.
Make sure that your layer mask is still selected in the Layers panel, and then use the Brush tool to mask the area of shadow that you want to remove.
Once your mask is complete, locate the Properties panel, which should show the Curves tool. Since you want to remove shadows, you’ll need to target the left half of the histogram. Start by locking the mid-tones in place by placing an anchor point in the middle of the graph.
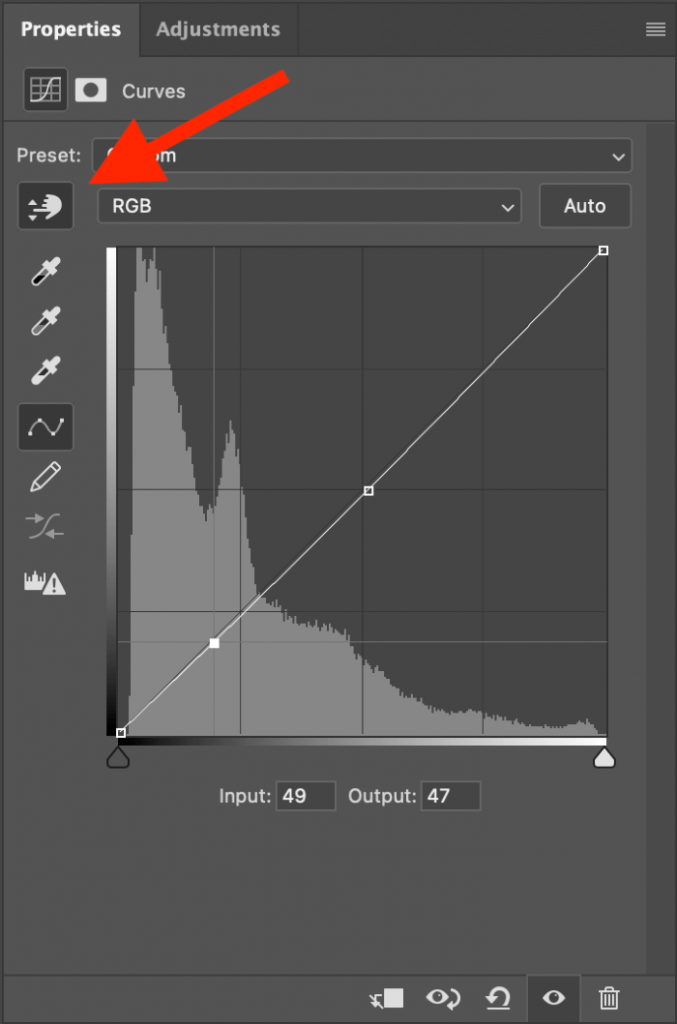
Next, switch to the Hand tool using the Properties panel and click on the shadow you want to remove. This will automatically place an anchor point at the corresponding point of the histogram in the Properties panel.
Drag this anchor point upward to brighten your shadow, but make sure not to overdo it or the effect will be too noticeable!
Method 2: The Dodge Tool
This tool might seem a bit antiquated to some of the younger PhotoshopBuzz visitors since it’s actually named after a chemical process from the days of film photography and darkroom development.
It’s a slightly simpler version of Method 1, but with a bit less control over how much of the brightening effect is applied.
Most importantly, there’s no easy way to make the Dodge tool non-destructive, so it’s a good idea to duplicate your background layer before you begin experimenting with the Dodge tool.
Right-click on your background layer in the Layers panel and select Duplicate Layer from the popup menu.
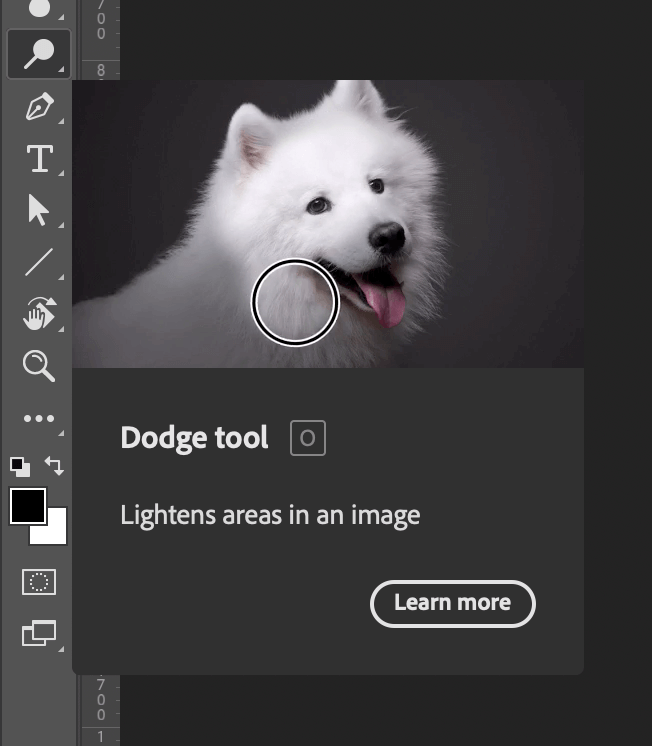
Switch to the Dodge tool by using the toolbox or the keyboard shortcut O. In the tool options panel at the top of the main document window, change the Range setting to Shadows, and adjust the Exposure slider to control how strong the brightening effect is.
Once you’re happy with the settings, you can begin using the Dodge tool just like any of Photoshop’s other brush-based tools. Just remember to keep that Undo command ready!
Method 3: Content-Aware Fill
Content-Aware Fill is one of Photoshop’s most appealing features, and it can really simplify the process of removing shadows.
Photoshop uses the contents of the rest of your image to make a semi-educated guess about what should fill the space, automatically generating a patch that covers up your unwanted shadows.
This doesn’t work perfectly every time, but it’s a useful option if your image has wide areas of repeating color and non-geometric textures. If you try to use it on a section of an image with a regular geometric pattern, it probably won’t do a very good job of lining things up properly.
To try it out, use one of Photoshop’s many selection tools to create a selection around the shadows that you want to remove.
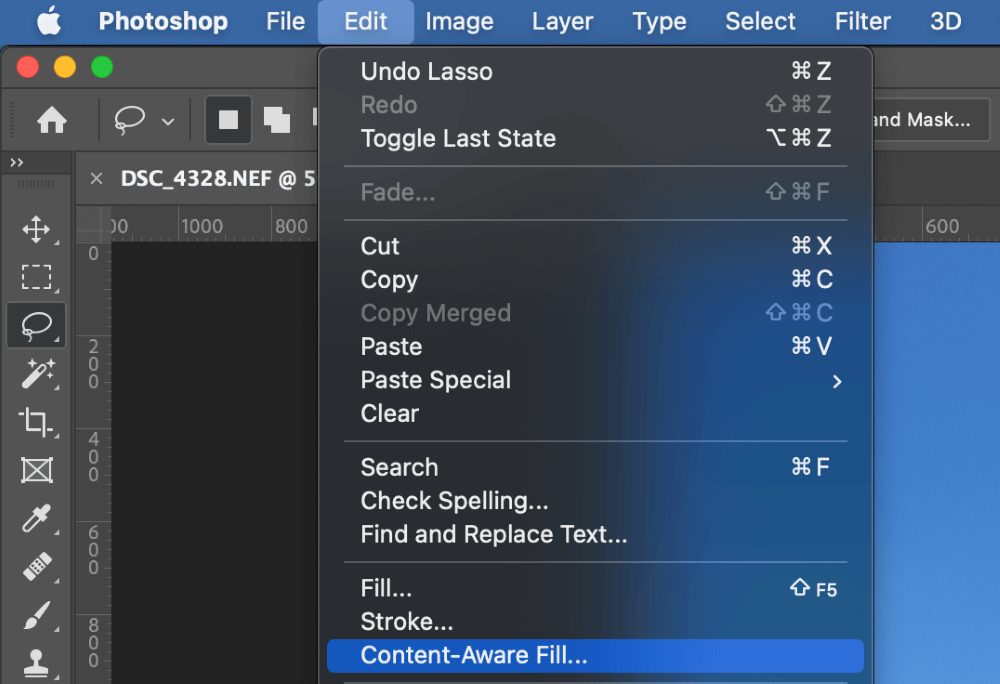
Next, open the Edit menu and select Content-Aware Fill. Photoshop will open a new workspace that allows you to preview and customize which areas of your image will be used as source material, as well as a few other fill settings.
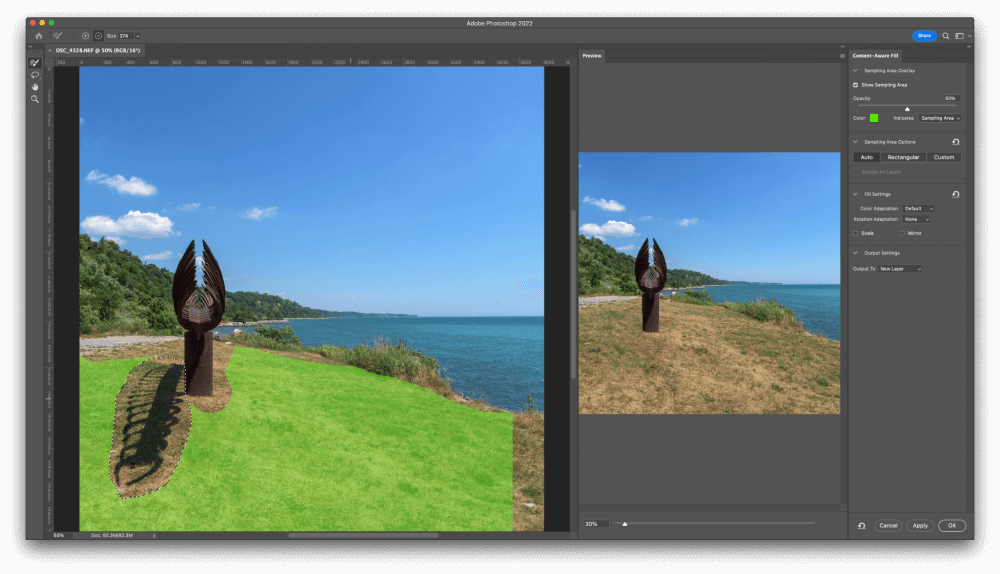
Keep an eye on the Preview window as you experiment with different settings to make sure that you get a good result. You can drag the dividing line between the Preview pane and the main image to get a better look at the final results.
Make sure that the Output To setting is set to New Layer, and click the OK button.
Your shadow should now be gone! If you’re not happy with the results, you can tweak the new layer that was created, or use the Undo command and try again.
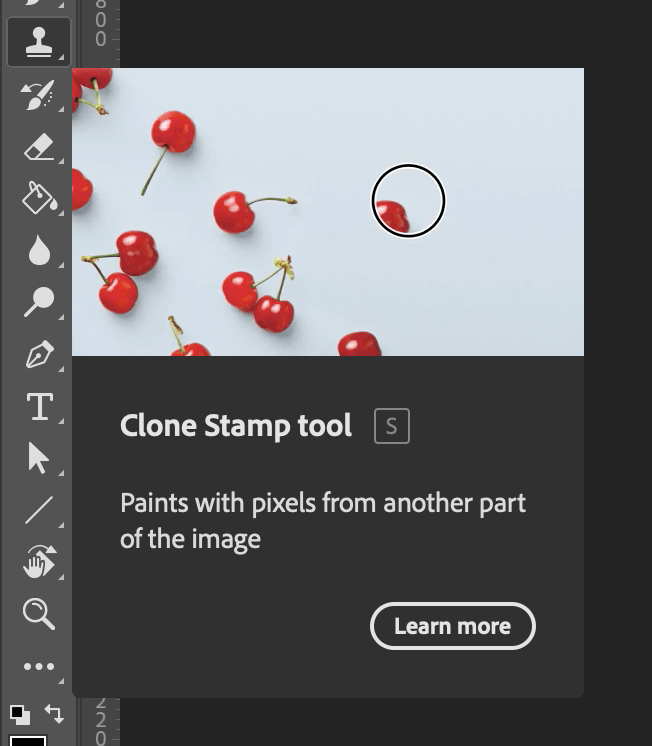
Method 4: Clone Stamping
I placed this method last on the list because it’s the most painstaking and time-consuming, and it’s usually a better idea to try the other methods first, but when all else fails, the trusty Clone Stamp tool is always there to fall back on.
The Clone Stamp tool allows you to paint using the pixel information from another part of your image, ‘cloning’ the pixels from your chosen source point into a new location.
This offers you an impressive degree of control over your image contents, although it can often be very difficult to create a realistic-looking edit.
To get started, create a new blank layer to hold your cloned pixels using the keyboard shortcut Command + Shift + N (use Ctrl + Shift + N on a PC).
Next, switch to the Clone Stamp tool using the toolbox or the keyboard shortcut S.
To remove the shadow from your image realistically, you’ll need to select a source point that has a similar texture, brightness, and color to the nearby unshadowed parts of your image.
Depending on the contents of your image, choosing the best source point can be the hardest part of clone stamping!
To set the source point, hold down the Option key (use Alt on a PC) and click on the spot you want to use.
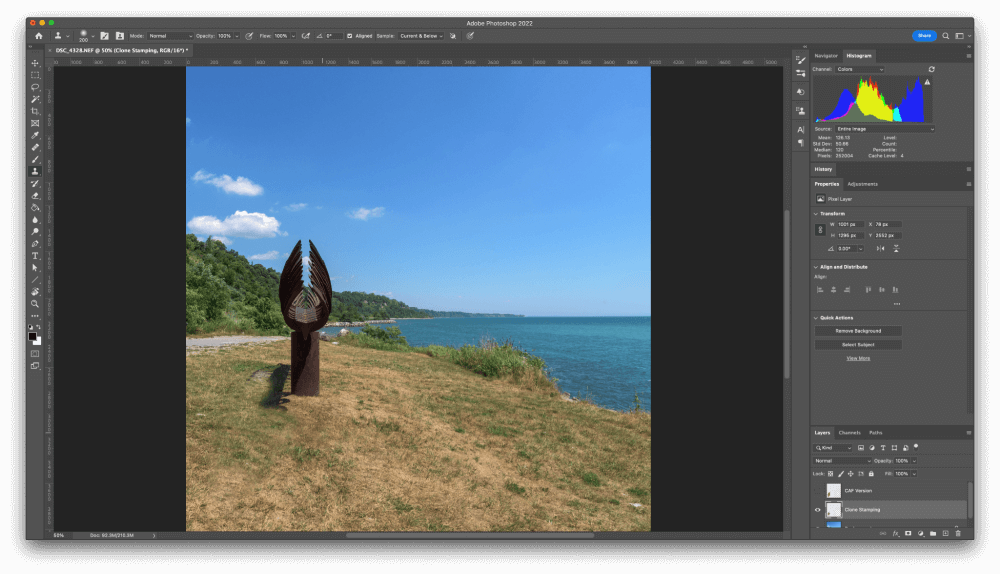
Finally, simply paint over your shadow using the sampled source point, and your shadow will seem to disappear!
A Final Word
Like many complex tasks in Photoshop, a lot of the process comes down to knowing which technique is best for the specific image that you’re working on – and now you’ve got four new methods to remove shadows in Photoshop!
Don’t forget that you can even combine them if necessary to get the results you want.
Whichever method you choose, happy editing!
About Thomas Boldt