There are a million possible reasons why you might want to expand a photo in Photoshop, but there are a few things you need to know first.
Whether you’re just trying to enlarge the dimensions of an image or if you want to expand your image background while preserving your existing content, I’ll show you the best ways to expand your image while preserving your image quality.
Table of Contents
How to Enlarge an Image
If you just want to expand the pixel dimensions of your image, the process is quite simple. But there’s a limit to how much you can make an image larger before the loss of quality becomes noticeable.
Because you’re increasing the pixel dimensions without having any additional image data to fill the gaps, Photoshop will have to guess which colors should fill the new pixels.
To get started, load your image in Photoshop, then open the Image menu and select Image Size.
Unsurprisingly Photoshop will open the Image Size dialog box, displaying a preview of your image as well as the pixel dimensions and resolution information.

Make sure that the Resample box is checked and then enter the new dimensions in pixels into the Width and Height boxes.
Or feel free to adjust the dropdown and select from another method such as percent, allowing you to enlarge an image quickly without having to do any mental math.
Before you click OK, it’s worth taking a second to explore the different Resample options. Automatic is the default option, but Photoshop has a secret weapon hidden in the Resample dropdown menu: Preserve Details 2.0.
This is (obviously) a new version of the Preserve Details algorithm with a slightly different result that’s typically less over-sharpened and less noisy.
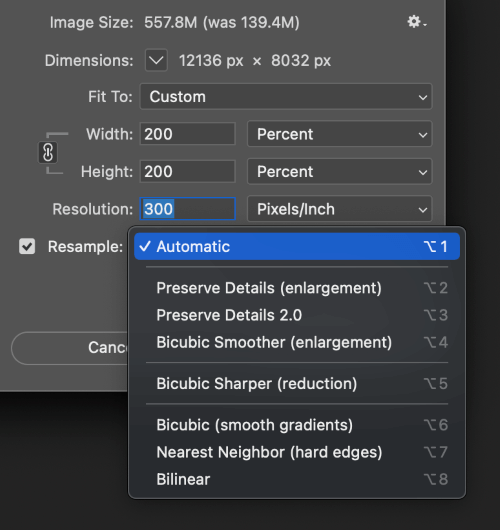
Depending on your image, you may find that neither of them looks good, so you can also try the Bicubic Smoother option, although this can produce a very soft result in some images.
You’ll have to compare the different options in the preview window to see which works best for your photo.
Once you’ve made up your mind, click OK and Photoshop will expand your image.
That’s all there is to it!
Advanced Technique: Expanding Your Canvas Size
If you want to expand the overall size of your image without changing the size of the original image content, Photoshop has some nifty tricks up its sleeve.
Depending on the content of your image, Photoshop can use a feature called Content-Aware Fill to automatically generate new image data to expand the size of your image.
First, you’ll need to create some extra room in your image by increasing the canvas size. This increases the overall size of the document without changing the existing image content, which gives Photoshop some empty space to fill.
To get started, load your image into Photoshop, open the Image menu, and click Canvas Size. You can also use the keyboard shortcut Ctrl + Alt + C (use Command + Option + C if you’re on a Mac).
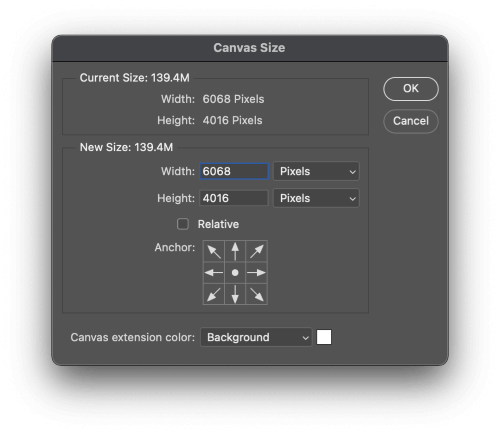
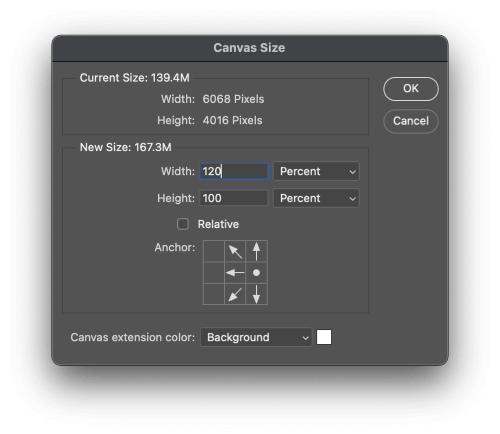
This step is fairly straightforward: enter the new dimensions you want into the Width and Height box, or change the units to Percent and let Photoshop do the math for you. If you’d rather just tell Photoshop how much more space to add, check the Relative box.
The Anchor section is also an essential part of expanding your canvas size. By default, Photoshop will expand in every direction equally, but you can click any of the nine grid boxes in the Anchor section to ‘anchor’ the image along a specific edge or corner of your image.
For example, if you place the anchor in the bottom left box, Photoshop will add your new canvas space to the top and the right sides of your image. If you anchor in the middle right, Photoshop will add space to the top, bottom, and left sides of the canvas, and so on.
Once you’re happy with the new canvas dimensions and the anchor point, the last step is to set the Canvas extension color. For this project, it’s best to choose a color that isn’t found in your image so that we can easily select the new pixels in a single click.
Once you’re happy with the new canvas, click the OK button and Photoshop will expand your canvas.
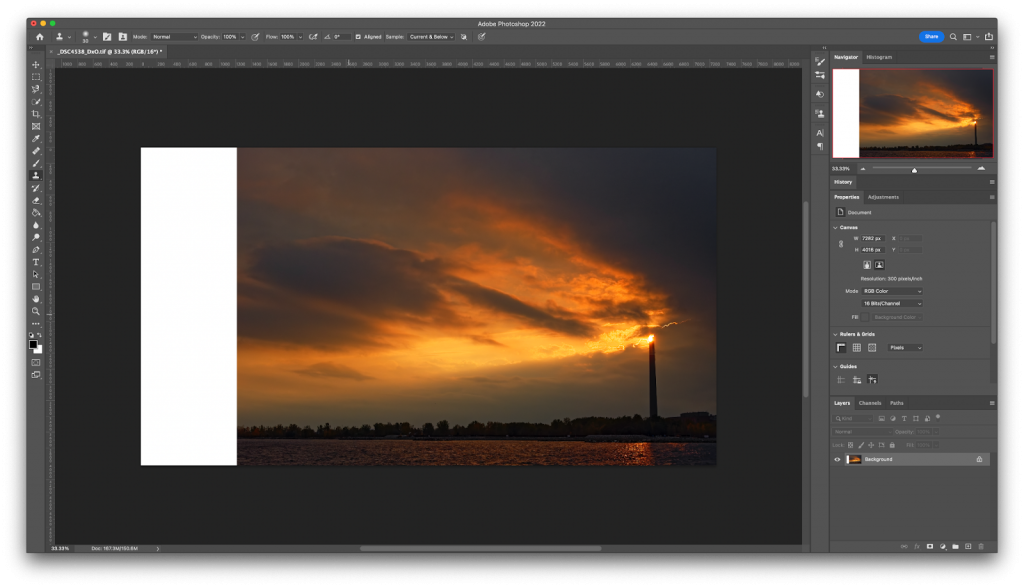
Next, switch to the Magic Wand tool using the toolbox, and select the new blank canvas space. As long as your canvas color is different enough from your original image, you should get a perfectly clean selection in a single click.
If not, try changing the Tolerance setting to 1 and click the blank canvas space again.
Now it’s time for the fun stuff! Open the Edit menu, and select Content-Aware Fill.
Photoshop will open the Content-Aware Fill workspace, which lets you define the areas of the image that Photoshop will use as source material, customize the settings, and see a preview of the final result.
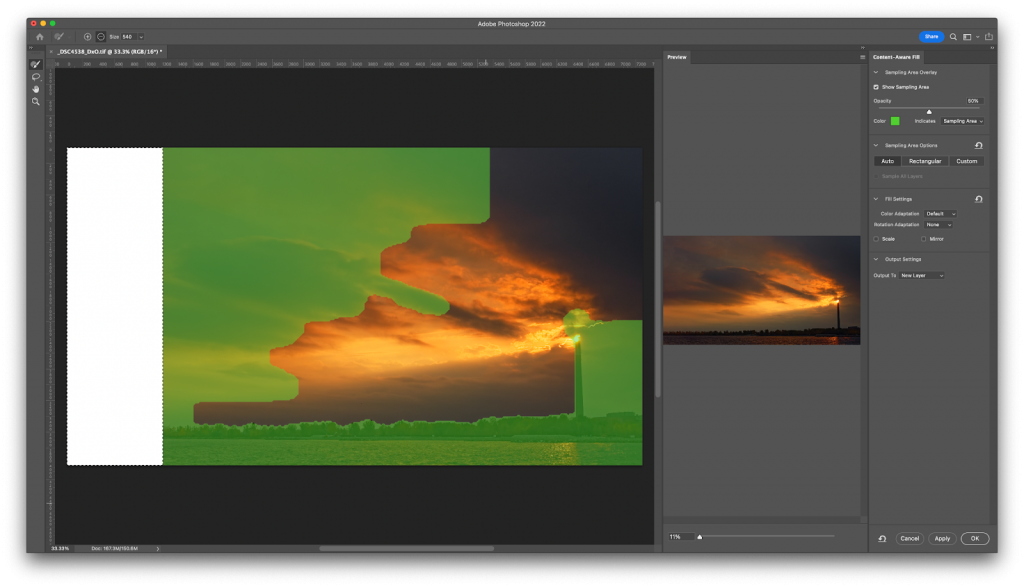
The areas covered by the green overlay are used as source material, and you can see immediately from the preview that the default option looks amazing. You can tweak the source material using the brush tools on the left side of the workspace, and customize the settings on the right.
Once you’re happy with the results, locate the Output Settings section on the right side of the workspace and set the Output To option to New Layer. That way, if it turns out you need to do some additional polishing, the newly-generated fill content will be easy to edit.

Click OK, and let Photoshop chug away for a while as it generates the new sections of your image.
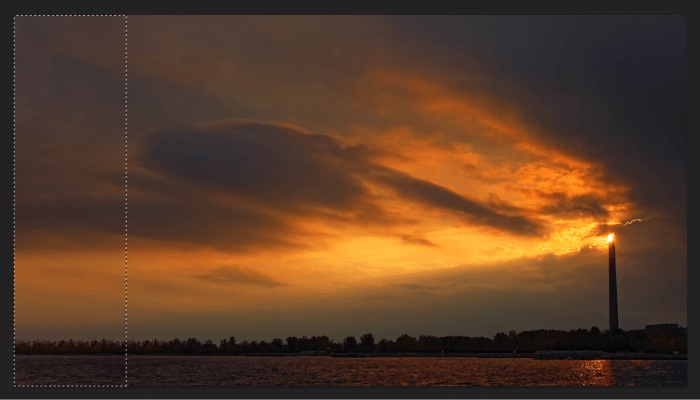
No matter how many times I use this tool, I’m always excited to see the results – especially when they look as good as this example. Even when the results are unusable, it’s always interesting to see what Photoshop did with the problem.
As you might guess, this technique doesn’t work perfectly with every image. Even in the example above, the treeline is very noticeable repetitive, and there are a few other minor quibbles, but it’s still an excellent result considering how little effort it took from me.
The more complex your image is, the less likely it is that you’ll get a good result, but it’s always worth a try. Using the tool a few times will help give you a better sense of what images will work best.
Bonus: Using Third-Party Plugins for Massive Upscaling
If you want to enlarge your image by a huge amount, you may have tried the quick guide at the start of this article and gotten frustrated when your image turned into a blurry mess.
You’re not the only one who has run into this problem, but thanks to recent advances in machine learning algorithms, we’re finally starting to see some impressive technical solutions.
Of course, the technology is still new, but even when it’s operating at peak effectiveness, the algorithms still can’t provide more information than you’ve already got in the original picture. They should be fine for large areas of color, but for more precise details like text information, they still come up short.
In other words, you won’t be able to pull off the kind of image enhancements you see in TV crime dramas. (I know, I know – but maybe one day.)
The current AI upscaling leader seems to be Gigapixel AI from Topaz Labs, but On1 has a similar product in development that should be launching shortly (or it may even be available by the time you’re reading this!).
These programs are available as plugins for Photoshop and should provide some high-quality options for scaling images upwards in the near future.
A Final Word
Whether you’re doing a basic enlargement or a full content-aware recomposition project, that’s everything there is to know about how to expand an image in Photoshop.
Do you have a favorite image expansion technique that I didn’t include in this tutorial? Let me know in the comments below and I’ll give it a try.
Happy expansions!
About Thomas Boldt