How hard is it to remove a background in Photoshop? Well, it depends on the image (and how perfect you want it to be).
But, as you may already be aware, Photoshop is pretty amazing. The new versions even have a quick way that allows you to delete backgrounds from certain photos without hassle.
As a professional photographer, I’ve run into images where I wanted to remove the background. Thankfully, Photoshop has several options for doing so.
Let’s take a look!
Note: all the screenshots below are taken from the Windows version of Adobe Photoshop CC. If you are using earlier versions or the Mac version, screenshots may look a bit different.
Table of Contents
Method 1: The Easiest Way
Best to use for: images with high contrast between the subject and background and don’t have too many complex lines. Also does well with solid color (including blown-out) backgrounds.
Photoshop has made what can be a very tedious task pretty quick with the click of a button. Of course, what you gain in speed, you may sacrifice in quality. Depending on the image your cut-out may not be quite perfect.
Step 1: Duplicate the Layer
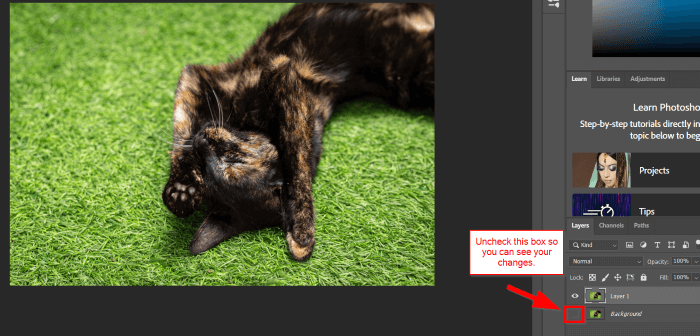
Duplicate the background layer by hitting Ctrl + J (Command + J if you’re on a Mac) or right-click on the background layer and click Duplicate Layer.
Then click on the little icon that looks like an eye to the left of the background layer to deactivate it. You can undo it if you make a mistake.
Step 2: Open Properties
The Quick Action background remover tool is in the properties panel. Open this panel by going up to Window in the toolbar, then select Properties.
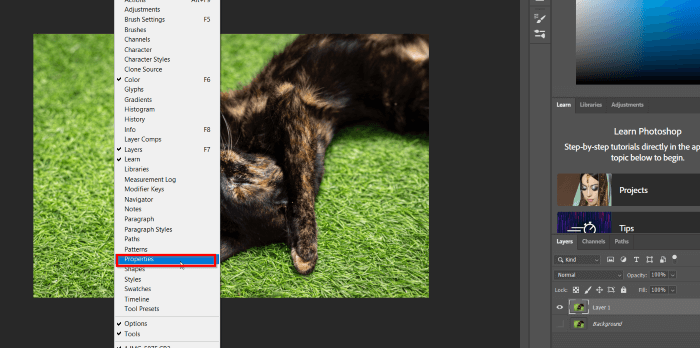
The properties panel will pop out on the right. You might have to scroll down to the section called Quick Action. If you don’t see any options under it, click the little arrow to the left to make it point down.
You should see a button labeled Remove Background.
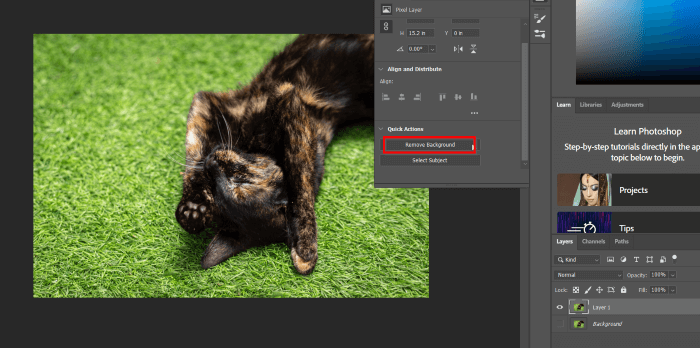
Now let Photoshop do its magic!
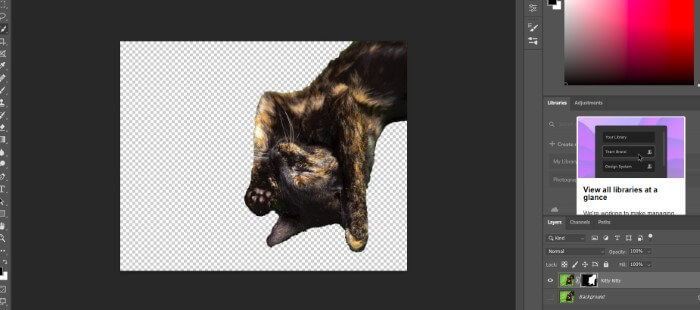
For this image, Photoshop didn’t do too badly. There is still a little grass around the kitty’s ears that needs to be fine-tuned and we’ve definitely lost the tips of the kitty’s fur and whiskers. But, for the most part, the work is done and it couldn’t be easier. For a quick project, it’s acceptable.
Method 2: Use the Background Eraser Tool
Best to use for: images with high contrast or color difference between the subject and the background.
Obviously, a tool called the background eraser tool must be a handy one in the fight against undesirable backgrounds. Let’s look at how to use this tool next for a bit more control over the final product.
Step 1: Duplicate the Layer
Press Ctrl + J keys (Command + J for Mac users), or right-click on the background layer and click Duplicate Layer. Click on the little icon that looks like an eye to the left of the background layer to deactivate it.
Step 2: Select Background Eraser Tool
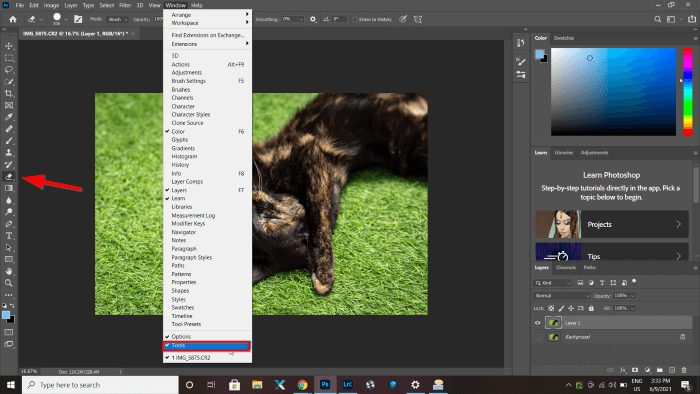
About halfway down the toolbox on the left-hand side, you’ll find the eraser tool.
Note: If your toolbox has disappeared, go up to Window in the toolbar and click Tools down near the bottom.
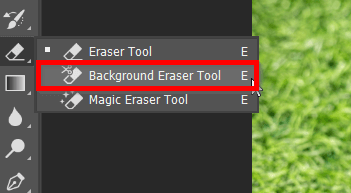
There are three types of Eraser tools you can select. If the Background Eraser Tool is not selected, right-click to access the dropdown menu and select it.
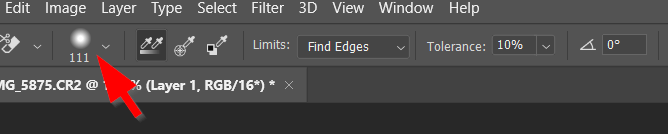
Step 3: Select Your Brush
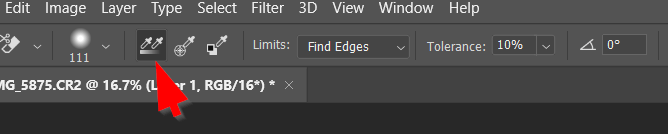
Now head up to the top and select your brush settings. Choose a size that is appropriate for your image, I’m working with one at 111 pixels.
Step 4: Choose the Sampling Type
To the right of the brush, you can choose your sampling type. The first one (which I have selected) is continuous. As you move the brush around, the software will erase any pixels that match the pixels under the crosshairs.
The next one to the right is called once. It will sample the color once and only erase the pixels that perfectly match that color. This is nice for fine-tuning later on.
Step 5: Choose Limits and Tolerance
In the limits box, select Find Edges. Then you need to set your Tolerance.
The bigger the number, the larger range of colors the tool will erase. I started with 20%, but the tool was erasing parts of the kitty. Lighter areas of the grass were too similar in color to lighter areas of her fur.
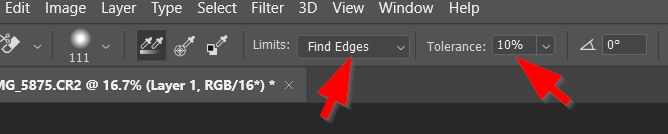
Once I lowered the tolerance to 10%, the tool stuck more to the greenish colors and left her fur alone. For the darker area around the top of her paw, I’m going to have to set it even lower so it will only erase the dark greens instead of the dark parts of her paw as well.
Step 6: Remove the Background
Once you’ve chosen your settings, it’s time to start painting!
As you can see, it’s doing a pretty good job of removing just the grass and leaving her hair alone. If I want to be super detailed and make it absolutely perfect, all I have to do is zoom in and work around her fur.
Remember to pick up the brush frequently. If you make a mistake, you can undo it, but you’ll have to redo everything since the last time you picked up the brush.
Obviously, this method will take more time than Method 1 introduced above, but I’ll have a perfect mask with all her fur and whiskers intact.
After I get the detailed work around her body done. I’ll switch to a larger brush to quickly remove the rest of the background. A little time-consuming, but pretty easy!
Method 3: Use the Quick Selection Tool
Best to use for: images with high contrast/color difference between the subject and the background.
Well, the background eraser tool introduced in Method 2 is powerful but can be time-consuming. A faster way to get decent results is to use the quick selection tool. Here’s how.
Step 1: Duplicate the Layer
Do so by pressing these combination keys: Ctrl + J (Command + J for macOS users). Or simply right-click on the background layer and click Duplicate Layer.
Step 2: Select the Quick Selection Tool
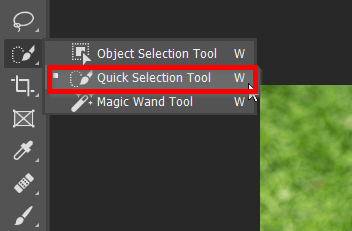
Choose the Quick Selection Tool from the toolbox on the left-hand side. If it’s not on top in the toolbox, right-click to access the dropdown menu to choose the tool.
Step 3: Select Subject
Use this tool to select the part of the image that you want to keep. The fastest way to get a good start is to click the Select Subject button at the top.
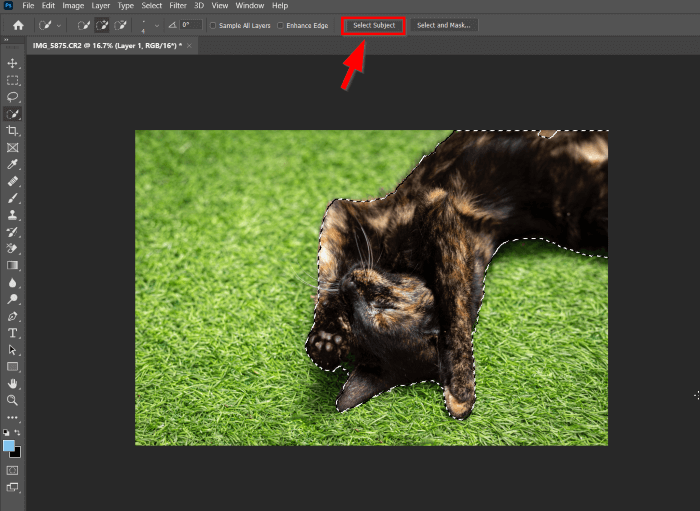
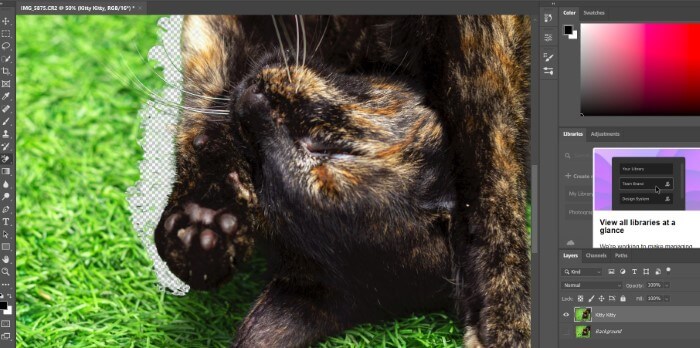
See? This automatic selection didn’t do too badly. Again, we’re missing the fine details of her fur and there are a couple of spots where the selection picks up part of the grass.
Step 4: Refine the Selection
Up at the top, you’ll see three modes for the quick selection tool. The second one with the little plus sign allows you to add to the selection. The third one with the minus sign allows you to take away from the selection.

For this image, I used the plus sign mode to add the spot on her tummy that was missed. Then I used the minus sign mode to remove the section of grass between her paw and ear that was selected.
Step 5: Create a Layer with the Selection
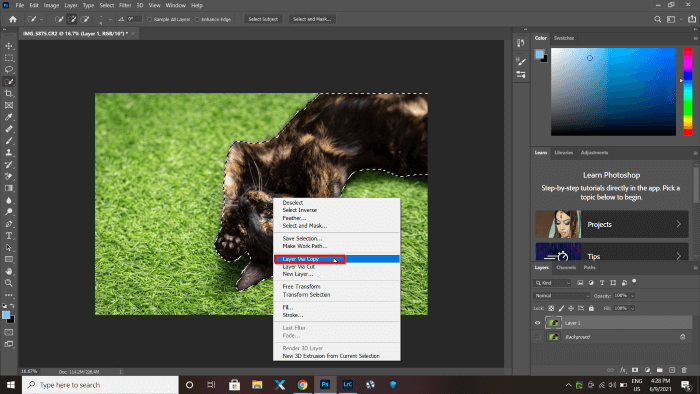
Once you’re happy with the selection, right-click within it to access the dropdown menu. Choose Layer Via Copy. Photoshop will now create a new layer with only the selected portion of the image.
At first, it will look like nothing happened. To make the background disappear, head down to the layers panel. Click the eye icon to the left of the background layer to deactivate it. Now, only the new layer with only the selection will appear.
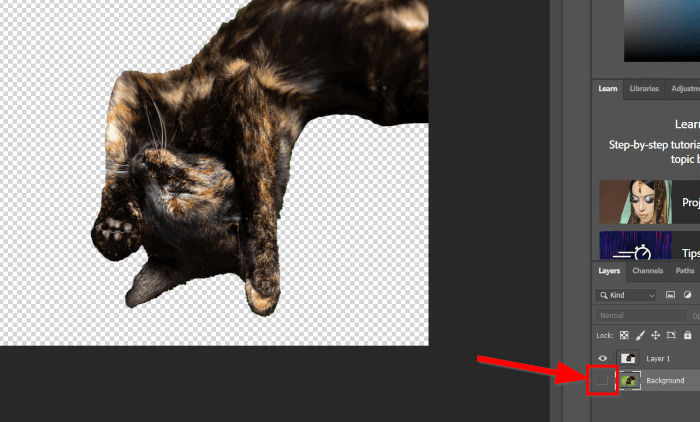
This is a quicker way to do a serviceable job. We’ve lost some of the detail in the ends of her fur. However, overall it looks pretty good and won’t suck away hours of your life.
Method 4: Use Pen Tool
Best to use for: Images that don’t have high contrast or when the automatic tools aren’t working well.
For images where there isn’t high contrast between the subject and background, Photoshop has a hard time distinguishing what it is supposed to select. The pen tool, though tedious, allows you to make the selection manually.
Step 1: Duplicate the Layer
Duplicate the background layer by hitting Ctrl + J (Command + J if you’re on a Mac). Or right-click on the background layer and click Duplicate Layer.
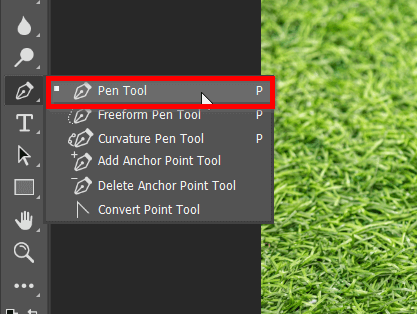
Step 2: Select the Pen Tool
You can find the Pen Tool from the toolbox on the left-hand side.
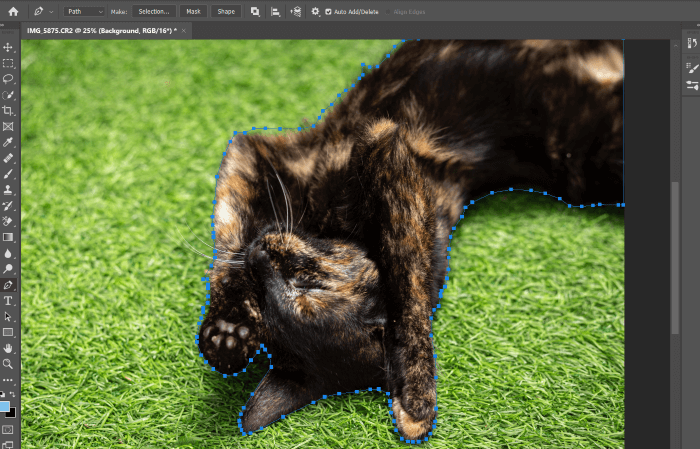
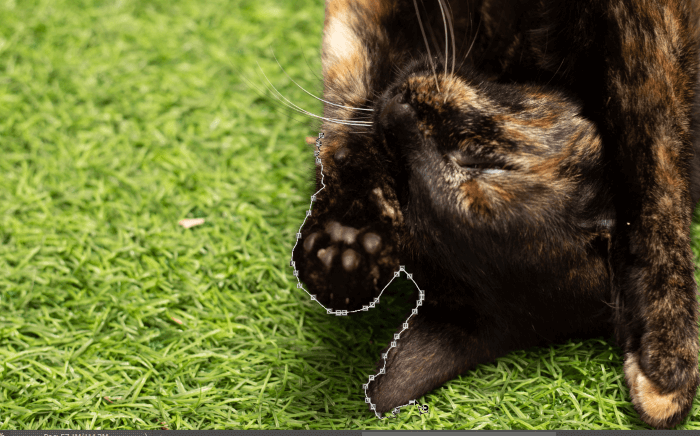
Step 3: Outline Your Subject
The Pen Tool works by cropping anchor points with straight connecting lines between them. If you need a curved line, hold down the mouse when dropping the second point and drag it around to get the desired curve.
If you drop an anchor point in the wrong spot, simply undo it by pressing the Ctrl + Z keys. You can also directly select points several steps back for fine-tuning with the direct selection tool.

Step 4: Save the Path
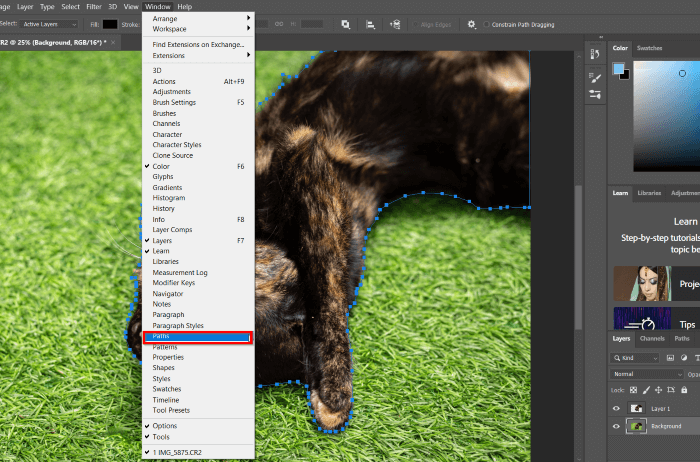
Once you’ve made your selection, save the path so you don’t lose your painstaking work. Go up to Window at the top and select Paths.
The Layers panel in the bottom right corner will switch over to Paths. Click the three-bar menu icon at the top.
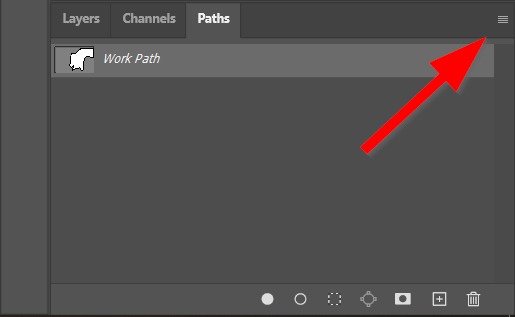
Choose Save Path from the menu that appears and name the path.
Step 5: Turn the Path Into a Selection
Right-click your path in the Paths panel and choose Make Selection. Now you’ll see the marching ants appear following your path.
Step 6: Invert the Selection
We want to delete everything except the selection, so you first need to invert the selection. Go up to Select and choose Inverse. You’ll see the marching ants appear around the background, selecting it.
Hit delete and watch your background disappear.
Method 5: Use Magnetic Lasso Tool
Best to use for: images with reasonable contrast and complex edges.
The Magnetic Lasso Tool works similarly to the Pen Tool, but Photoshop gives you a helping hand.
Step 1: Duplicate the Layer
Duplicate the background layer by pressing Ctrl + J keys (for Mac users, it’s Command + J), or you can right-click on the background layer and select Duplicate Layer.
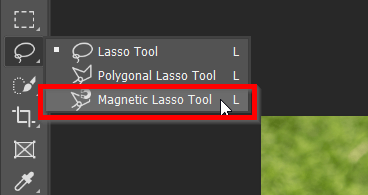
Step 2: Select the Magnetic Lasso Tool
You can find the Magnetic Lasso Tool in the toolbox on the left.
Step 3: Make the Selection
Move slowly and deliberately with the mouse. The program will follow your movements, reading the colors and contrast and doing its best to follow the subject’s outline.
You have to go all the way around the image until you get back to the beginning. Use the other tools we’ve mentioned above in this tutorial to adjust any areas where you missed the mark.
Step 4: Invert the Selection
Again, the object is selected and you want to delete the background. Invert it by choosing Select from the toolbar at the top and clicking Inverse.
Get rid of the background by hitting delete. Boom!
Remove Your Own Backgrounds
It’s always easier to work with images where the subject has a lot of contrast with the background. Thus, if you’re planning on cutting out your subject, photograph the subject against a background that will make your job easier.
If you can get the Quick Action or Quick Selection tool to work, you will save yourself tons of time and painstaking work in Photoshop.
Were these instructions helpful? Give it a try yourself and let us know how it goes!
About June
Paul Krone
What I would really like to know how to do is to take a black and white (grey scale) photograph and make it transparent. I have some drop shadows on white backgrounds which I would love to have as transparent layers. How would I make a photo transparent?
grumpyboyedge
Very useful, will be using this method alot more from now often, thanks
Heath Waller
Awesome tutorial! Just what I was looking for. I’ll be using this method often. Thanks so much for writing it!
Dan Tache
Excellent; most helpful; I have struggled with this (now, simple) problem for some time…thank you and thank you again!
Richard
I have an image as you show above – with a checker board background in PS but whenever I try to use this image – like in a power-point program it always comes with a white box around it no matter what I have done to remove it .
June
To use a file with a transparent background on the web you will need to save the file out as a png with a transparent background. To use it in print and some other editing programs you will need to create a clipping path around the image and save the file as a .eps. Hope that helps.
Ali Lynnq
Very helpful and worked great. Thank you!
Eugen
Very good post and thank you for this helpful tip. Instructions are very clear, and easy to follow.
This works well with non shiny products. But when you have a pen as an image, with lots of shiny parts, when you select the white background it will select also the shiny parts. What`s the solution here, please?
June
Hi Eugen, Thanks for your comments. For an image such as a pen you could try this method with a low tolerance on the magic wand tool and instead of choosing ‘select > similar’, press shift and continue clicking on the areas you want to delete. If that still picks up areas within the pen then I would suggest to use a combination of the eraser tool and wand – the eraser to carefully draw a line around the pen and then the wand on a high tolerance to select the background. I hope that helps.
lemon kudamono
Thanks. Awesome Tutorial ^^
wareagleblonde
I cannot get the “similar” to show up highlighted after following all the previous steps.
June
Hi, if ‘similar’ is not showing up, it could be that the magic wand has already managed to pick up everything in that color. Could that be the case? If so, and all the areas are selected already, you should be able to continue and skip that part.
Daryl
The best tutorial ever. simple and Very effective esp with low res images
Ryan Hunter
Very helpful! Thank you!
Tommy
Do you have a post about using it? 🙂 I mean like merging it wit another image. I’m having a real trouble with it and I can’t seem to find to write word to google
June
Hi Tommy, you should be able to drag the image that you are left with onto another document to merge it with another picture. It depends how you want to merge them together as to which process you would use..
Jaimin
Thx very much.. very good tutorial for beginners.. hands up..
Barbara
Very helpful! Many thanks.
Kimberly
Works great! Thanks so much.
Carolyn
This tutorial was very very helpful – I’m not well-versed in photoshop and your instructions made this process simple. Thank you so much!
June
You are welcome Carolyn, thanks for the feedback.
PeaceMaker
Thank you very much for your great and clear help.
Ole
Use channels! It’s way faster and gives a much better result. METHOD: Select the layer, right-click and choose Layer from Background, apply Quick Mask, mark the image, Edit -> Copy, go to Windows -> Channels, turn off all the channels, turn on the Quick Mask channel, select the Quick Mask channel, Edit -> Paste, Image -> Adjustments -> Invert, turn on all the channels, turn off the Quick Mask channel. Look, no details lost! 🙂
Heidi
Awesome. Just what I was looking for. Thanks!
Juan Acevedo
Thanks, for an excellent tutorial! A breeze to follow your instructions.
Camille
This is very helpful! Thanks a lot!
Tim
🙂 Never could get this to work. When I click delete after selecting the white area with the magic wand, nothing happens except the crawling ants go away… still white, solid background.
June
Hi Tim, Thanks for your comment. The ‘crawling ants’ made me chuckle 🙂 my first thought on the issue you are having is that you are working on a layer with a white background underneath. So that when you press delete it just looks although nothing has changed, although my crawling ants always stay there until I deselect them. Check in the layers palette to see if there is an issue there. Hope that helps 🙂
Jason K. Stiger
Nice post. This article cover all the basic things of background removal
June
Thanks Jason!
josh
young designer am finding it really great