
Whoops! That’s not what I wanted to do there!
How many times have you said this to yourself when working in Photoshop? I can attest that this was a common refrain in my head when I first started working in Photoshop as a photographer.
Hey there! I’m Cara, and I’m going to show you a simple tip that will save you a lot of frustration when working in Photoshop. Read on to learn how to undo and redo in Photoshop in various ways and when to use each method.
Note that the screenshots below are taken from the Windows version of Adobe Photoshop, if you’re using the Mac version, the navigations may look slightly different.
Table of Contents
The Famous Control (or Command) + Z
If you’ve ever used a computer, you are probably already familiar with the hotkeys Ctrl + Z or Command + Z. This allows you to undo the last action taken in word processing programs and many other types of software.
It works the same in Photoshop. Just hit this hotkey combination to undo the last action you took.
If for some reason you like doing things the long way, you can also access the command by clicking Edit in the menu bar. The first option in the dropdown menu is Undo (action), and (action) will be whatever the last action was that you took.
In this case, I used the brush tool, so it shows Undo Brush Tool.
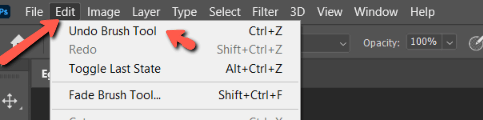
If you liked what you did, you can Redo the action by hitting Shift + Ctrl + Z (Shift + Command + Z). If you want to go back and forth (undoing and redoing the last action) you can use Alt + Ctrl + Z (Option + Command + Z). This is helpful when I can’t make up my mind (which happens a lot, lol).
But this method of undoing has its limitations – the main one being you can only go back one step at a time. So here are some other methods for how to undo in Photoshop.
Revert to the Last Saved Version
What if I want to jump back several steps? And have the option to jump back to the current state? One way to do this is to revert to the last saved version.
Of course, I had to have had the foresight to make a saved version before I started making the changes I want to undo. Or I might want to revert to the original image that I opened, which is perfect for this command.
I can do this by going to File in the menu bar and selecting Revert. Alternatively, I can hit F12 on the keyboard.
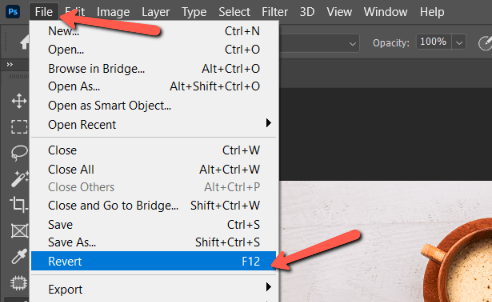
The cool thing about this is that Revert is an undoable action. You can immediately recuperate all the changes you made before reverting by simply hitting Ctrl + Z (Command + Z) to undo the Revert command.
Boom!
The History Panel
What if I don’t want to revert to the last saved version, but I do want to jump back multiple steps? I can sit there hitting the keyboard shortcuts until the cows come home or I can make it easy on myself and use the History Panel.
In the Essentials (default) Photoshop workspace, the history panel icon appears at the top of the toolbar to the right of your image. It looks like three boxes stacked on top of one another with a curved arrow.
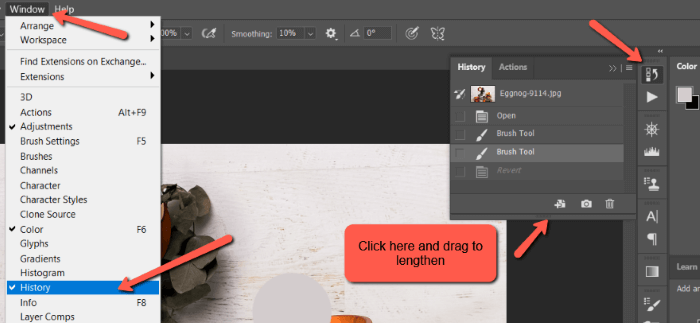
If you don’t see this toolbar, you can find the history panel by clicking on Window in the menu bar. Then go down and select History and the panel will appear.
The panel will display a list of your actions with the newest ones at the bottom. You can scroll through this list or grab the bottom of the window and tug it down to make it longer.
Click on any of the actions and the image will jump back to that state. Click on the bottom action to reapply the removed actions.
Keep in mind that if you jump back to a previous state and do another action, it will automatically delete all the actions you jumped over. Hitting Ctrl + Z doesn’t work to get them back so be careful with this.
Take a Snapshot
If you want to jump back a few states and make changes without losing those states, use the snapshot feature.
Click the little document icon with the plus sign at the bottom of the History Panel. This will create a duplicate state. Now you can make new edits, then jump back and forth to compare.
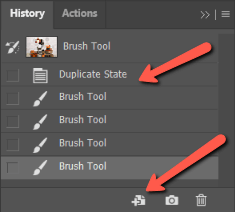
This is useful when you want to easily compare two different edits to an image.
Adding States
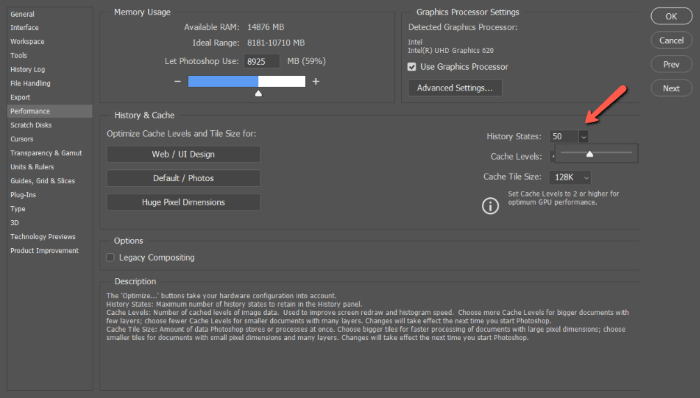
Also, keep in mind that the History Panel can only hold a set number of states, 50 by default. Though that sounds like a lot, you can rack up 50 states pretty quickly. Everything you do counts as a new state.
If your system is powerful enough, you can change the number of states to give you more room to work with.
Go to Edit in the menu bar, hover over Preferences at the bottom of the menu, then choose Performance.
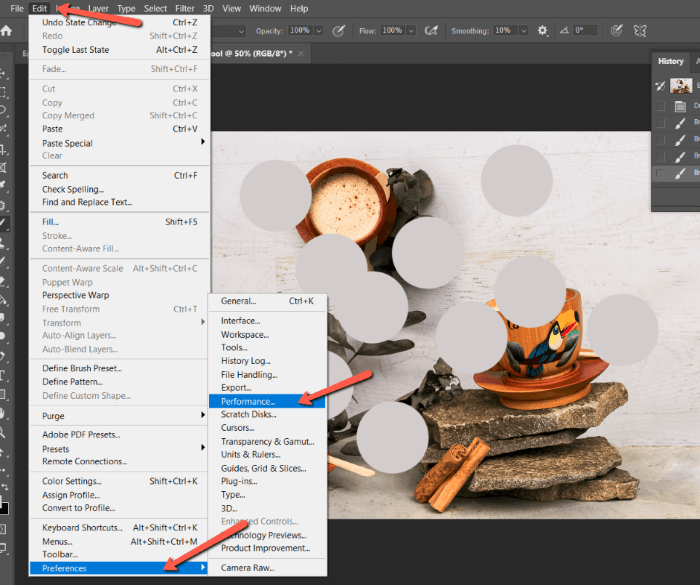
The History States box in the Performance menu will show how many states are currently available. Click the arrow to the right and a slider bar will appear allowing you to choose your own number, up to 1000.
Keep in mind that working with more states requires more memory. If Photoshop starts to lag after you increase the number of states, try dropping it back down.
If you can keep track of 1000 states, my respects! I think I would get confused and frustrated.
Taking a Step Back in Photoshop
One of the blessings of digital art is the ability to undo or redo. Artists working with a physical medium have limited ability to undo their actions. Most of the time they just have to work with their mistakes.
I hope this overview helps you in your journey as a digital artist! Check out more of our great tutorials like how to use the stamp tool to learn even more about Photoshop!
About Cara Koch