
Have you ever wondered how they get those gorgeous glamour shots? You know, those ones where the image is super close to the model’s face, yet she has this impossibly clear, beautiful skin.
No matter how close you look, there is no smudgy indication that somebody took the Clone Stamp tool to her skin. Are they just that good with the clone stamp?
Maybe. Or maybe they pulled out a secret weapon, the frequency separation technique. Let’s add this secret weapon to your arsenal today and learn how to use frequency separation in Photoshop!
Note: I use the Windows version of Photoshop. If you are using a Mac, the workspace will look slightly different from the screenshots displayed here.
Table of Contents
What is Frequency Separation?
Frequency separation is a technique, not a tool in Photoshop. Try as you might, you won’t find a neat tool called frequency separation that pops out to perform the technique for you. Luckily, setting it up isn’t too difficult and we’ll go over it in a moment.
First, let’s understand what we’re doing.
Information in an image has frequencies. High-frequency information includes fine details like skin texture, lines, pores, hair, etc. Low-frequency information includes light information like shadows, tones, and colors.
The idea with frequency separation is to separate high-frequency and low-frequency information so they can be edited independently. This allows you to remove redness in the skin without mussing the skin’s texture or smooth rough areas of skin without messing up the shadows.
Frequency separation itself doesn’t make any changes to your image. But once you’ve applied the technique, you can use other editing techniques with great results.
How to Set up Frequency Separation
First, let’s look at the setup. To save yourself a few steps in the future, you may consider recording these steps into a Photoshop action.
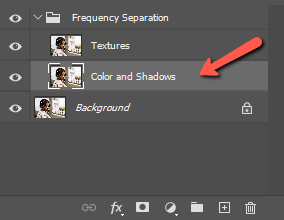
Step 1: Copy the Background Layer
After pressing “Play” on your action, make two copies of the background layer. Press Ctrl + J or Command + J twice to do this.
Double-click on the layer names and rename them to something like “Textures” for the top and “Color and Shadows” for the bottom so you can keep track of them.

Step 2: Organize
Keeping your work organized in Photoshop is a huge timesaver. So let’s immediately group these two layers and put them into a folder we’ll call “Frequency Separation.”
Hold Shift while clicking on both layers to highlight them both, then press Ctrl + G or Command + G to put them into a group together. Then, double-click the group name to rename it.

Step 3: Add Blur
To create the separation, we add a touch of Gaussian blur. Select the Color and Shadows layer.
Then go to Filter in the menu bar. Hover over Blur and choose Gaussian Blur from the list.

In the settings box, set the Radius to 5 pixels and click OK.

Step 4: Apply the Image
This is where things start getting a little complicated. Make sure that you have selected the Textures layer. Then go to Image in the menu bar and choose Apply Image.

In the box that appears, we have a few things to set. In the Layer box, choose your Color and Shadows layer. Change the Blending mode to Subtract. Set the Scale box to 2 and the Offset to 128. Press OK when you’re finished.

Step 5: Change the Blend Mode
Now, you’ll notice that the Textures thumbnail turns gray. In fact, your entire image turns gray since this is the top layer. Head over to the Layers panel and change the blend mode to Linear Light. Your image will reappear as normal.

At this point, you’re ready to begin editing separate frequencies in the image. You won’t have made any actual changes yet. If you are recording an action, this is where you stop.
Smoothing Skin with Frequency Separation
Now, let’s look at this in action and try smoothing the skin in the separated frequencies. To do this, we simply add some Gaussian blur to the Color and Shadows layer. Of course, we don’t want to do this universally, but you can target your edits with a selection.
Since the selection doesn’t have to be perfect, we can use the Lasso tool to draw a quick selection around the area you would like to smooth. Choose the Lasso from the toolbar on the left.
To avoid a hard line around the edge of your selection, feather the edges with the Feather box in the Options bar. Somewhere between 30 and 50 pixels is usually good, depending on the size of your image.
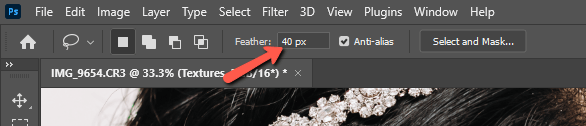
Now, use the Lasso to draw a loose selection around your target area.

To get a preview of your feathering effect, press Q to activate the Quick Mask feature. Press it again to toggle off the mask.

Now add blur by going to Filter in the menu bar, hovering over Blur, and choosing Gaussian Blur. Set the Radius to between 10 and 20 pixels, or more if needed. You’ll notice that the skin gently smooths, without losing all its texture.
Continue selecting areas of the skin and adding blur until you’re happy with the smoothing. Here’s the before and after for my image.


As you can see, the technique smooths the skin but does not remove blemishes altogether. This gives the skin a softer, yet still natural-looking appearance. You can use this to soften wrinkles as well without taking them away completely (which can look unnatural).
For very deep wrinkles, you may also want to lighten the area with the Dodge tool. Learn more about how to use the Dodge tool here.
Blemishes like pimples generally won’t disappear completely with this skin-smoothing blur technique either. You can supplement by using a Healing Brush on the Textures layer. Make sure to bring the Hardness of the brush down to around 70% or less to feather the edges.
Using these tools in this separated frequency layer means you won’t lose the texture as will happen if you use the tool by itself. However, these powerful tools still naturally wipe away any blemishes on the skin.
Work carefully and soon you’ll have a radiant glamour portrait of a model with impossibly beautiful skin!
This technique can also be used to remove tattoos Curious about other amazing tricks in Photoshop? Check out how to open eyes in an image here!
About Cara Koch