The most common usage of Photoshop in the entire world is probably editing portrait photographs. From magazine covers to advertisements to wedding shoots, almost every professional photograph you see has been edited with Photoshop.
As a result, every single editor has their own preferred methods for how to handle portrait retouching, but when it comes to removing skin blemishes or acne, the Spot Healing tool still reigns supreme. Here’s how it works!
Table of Contents
The Quick Guide to Remove Blemishes in Photoshop
If you’re familiar with Photoshop but you’ve never done portrait retouching before, here’s a quick overview of the process.
- Step 1: Open your image in Photoshop and create a new layer.
- Step 2: Set the Spot Healing Brush to Content-Aware and Sample All Layers.
- Step 3: Select your blank layer, then brush over each blemish to remove it.
Obviously, there’s a lot more to it, but that’s the general idea of how it works. If you want a bit more detail about how the process works as well as some helpful tips about how to get the most out of the Spot Healing brush and what to do if it fails, then read on!
A Note About Fashion Editing
(If you want to get straight to the detailed tutorial, skip ahead – but I urge you not to)
There’s a lot of discussion around the world at the moment about the unrealistic beauty standards that are created by the fashion industry, and rightly so.
While it’s important to be good at your job, it’s also important to realize the role that we play as image editors in the creation and continuation of these unrealistic standards. It’s one of many reasons why I tend to avoid working and editing in the marketing and fashion-related industries.
Be aware of the impact you can have on everyone who sees your work and consider making alternate editing choices. Just because you can give someone perfectly smooth and highly unrealistic skin doesn’t necessarily mean that you should.
Just think about it.
The Detailed Guide to Removing Blemishes With Photoshop
I hope that little editorial didn’t completely remove your desire to learn how this process works since there are plenty of situations where you might need to remove blemishes from your subject that don’t fall into the fashion/beauty standards trap.
The same blemish removal process also works on objects as well as people, allowing you to improve product photographs and fine art photographs, among many others. With that in mind, let’s dig a bit deeper into Photoshop blemish removal.
Step 1: Create A New Layer
As you may have read in my other articles around the site, non-destructive editing is an extremely helpful approach. It uses Photoshop’s layer system to edit images without altering the original image pixel data, which is stored safely out of sight.
In this case, we’ll be adding a new layer as a patch to cover up the blemishes that you want to remove from your subject. If you need to go back and adjust your edit at a later time, you won’t have to start the entire process from scratch.
Load your image in Photoshop, then open the Layer menu, select the New submenu, and click Layer. You can also use the keyboard shortcut Command + Shift + N (use Ctrl + Shift + N if you’re on a PC) to speed things up.
You’ll be making a lot of new layers in your Photoshop editing career, so it’s a good shortcut to remember.
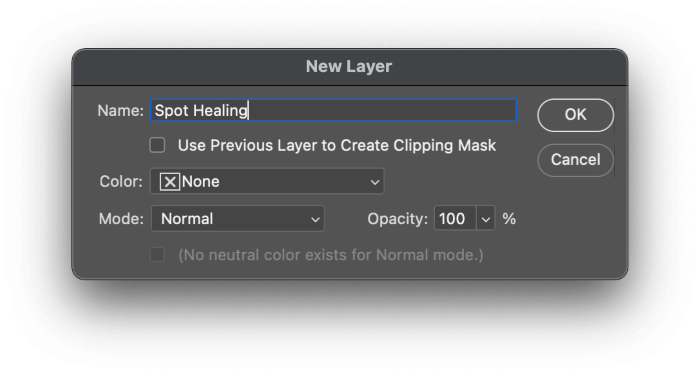
Give your layer a descriptive name and click OK. You might be tempted to skip this, but it’s a good habit to learn at the beginning. It’s all too easy to find yourself with 20 different layers named New Layer and no idea which layer controls which image element. Name your layers!
Step 2: Spot Healing Settings
Next, switch to the Spot Healing Brush tool using the toolbox icon shown below or the keyboard shortcut J.
Photoshop nests a few different tools in the same toolbox location, so you may have to cycle through them to get the Spot Healing Brush. You can also hold the Shift key while pressing J to cycle through all the tools that share the same shortcut.

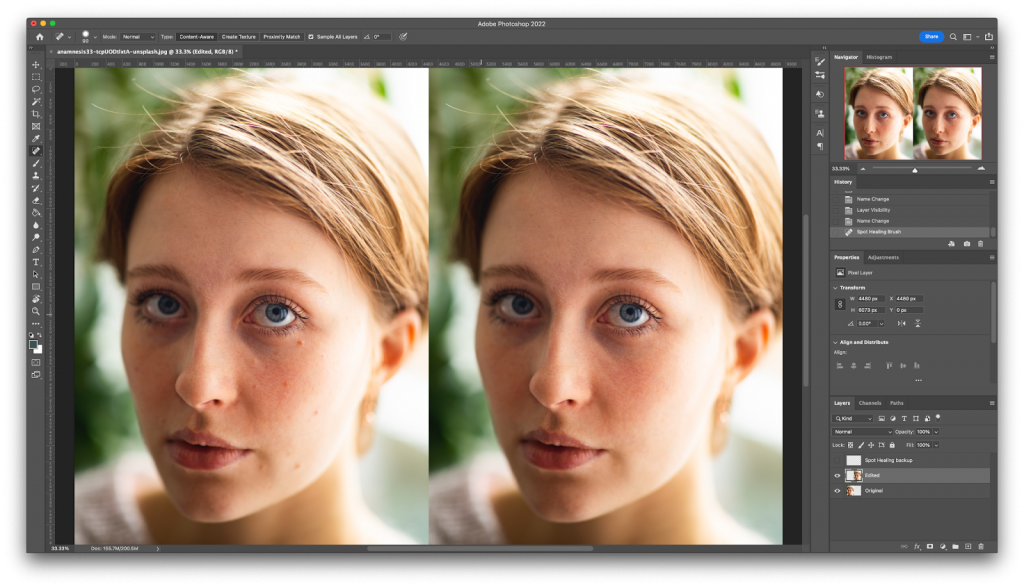
With the Spot Healing Brush tool active, look to the options bar above the main document window, and make sure the Sample All Layers box is checked.
This is the magic step that allows you to use properly non-destructive editing since you can paint on one layer using pixel data from your other layers.
You’ll also need to make sure that the Type setting is set to Content-Aware, at least to start with. Depending on your image, you may have to test out the other settings as well, but Content-Aware is the best place to begin.
Step 3: Blemish Removal
With all the set-up work out of the way, it’s time to actually use the Spot Healing Brush. Luckily, this is the easiest part!
Make sure that your new blank layer is selected, and then simply paint over any blemishes that you want to remove. As you click and drag, you’ll see that Photoshop includes a gray overlay that indicates the area that will be corrected when you release the mouse button.
Try to keep your brush strokes as short as possible, as attempting to cover large areas in a single stroke can create an unrealistic patchy effect.
As with all of Photoshop’s brush tools, you can quickly adjust the brush size using the square bracket [ and ] keys and adjust the brush edge hardness by holding the Shift key while pressing [ or ].
Note: the photo used in this tutorial is provided by @anemesis courtesy of Unsplash.)
The original photo (left) doesn’t need any retouching, but sometimes people are curious to see what they would look like without their beauty marks (right).
Troubleshooting Stubborn Blemishes
While the Spot Healing Brush is very good, it’s not completely perfect, and there are times when you might need to bring in some other tools.
The Healing Brush tool is nested with the Spot Healing Brush in the toolbox, and you might have better luck with it on some stubborn blemishes.
Both the Spot Healing Brush and Healing Brush tools have some degree of automatic function, though, and there are times when you need to have absolute control over the results.
When that happens, it’s time to pull out the trusty Clone Stamp Tool. It’s a bit harder to use than the automatic tools, but it’s also extremely powerful.
For both tools, make sure that you have the Sample setting at Current & Below in the options bar before making any edits.
This is similar to the Sample All Layers setting you used with the Spot Healing Brush, and it allows you to create your new edits on a separate layer using pixel data from your original image.
A Final Word
At this point in the article, I usually say something like, ‘That’s all there is to know about _____’ but in this case, it’s really only scratching the surface of how to remove blemishes in Photoshop.
Hopefully, you’ve got a good grounding in the basics, but you’ll have to use your own editorial instincts to decide which method (or combination of methods) is best for the image you’re working on.
And don’t forget: use your Photoshop powers for good, not for evil.
Happy editing!
About Thomas Boldt