
What do you do when you want to perform the same action in Photoshop on several images? Some of you (like me in my early Photoshop days) might painstakingly repeat the process on each image.
Others of you (like me now that I don’t have time to mess around) will create a new action and let Photoshop do the work for you.
Nice to meet you! I’m Cara and today I’m going to show you the time-saving trick of how to create your own actions in Photoshop. Let’s get started!
Note: the screenshots below are taken from the Windows version of Adobe Photoshop, if you’re using the Mac version, the navigations may look slightly different.
Table of Contents
Why Create Actions?
In the other tutorial, I showed you how to extend the background on an image. I have about 25 images from the same shoot that I would like to extend as well.
The process to extend the background is only a couple of steps, but I would have to do it 25 times. It’s much better to create an action, then batch process the images and run the action on all 25 of them at once.
Actions can be simple, like the demonstration one we’ll create today. Or they can be complex with a lot of steps. You can use actions to add complicated effects or edits to images without having to go through all the steps again.
Now, let’s look at how to create Photoshop actions!
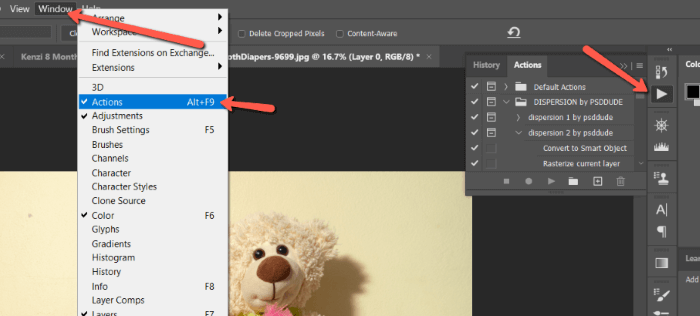
Step 1: Open the Actions Panel
I highly recommend working on a copy of your image, especially if you’re creating the action after already applying some changes. You can do this by going to File, selecting Save As, and checking the Save as a Copy box.
You can also create a snapshot in the History panel. Learn how to do that here.
Once you’ve got your copy, open the actions panel. You can click the Play icon on that thin strip of tools to the right. Alternatively, go to Window in the menu bar and click Actions.
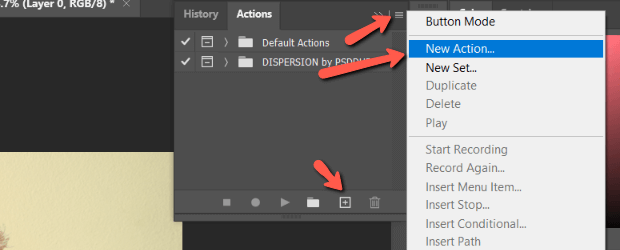
Step 2: Create a New Action
You can set Photoshop up to begin creating a new action in a couple of ways. Click the New Action icon (looks like a plus sign in a box) at the bottom of the panel. Or click the hidden menu (3 parallel lines) in the top right corner to open the Actions Menu. Then click New Action…
In the dialog box that pops up, name your action. I called mine, Extend Background. The Function Key allows you to set a shortcut key for your new action. This can be helpful if you’ll be using it a lot.
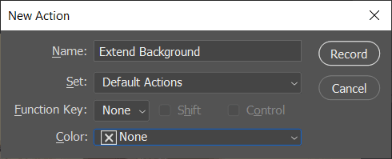
In the Color box, you can set a color for the display in Button Mode. Once you’re happy with the settings, hit Record.
Step 3: Record the Steps
Check to make sure the Record Button turns red in the Actions panel. Now, every movement you perform will be recorded in the action. If you need to pause the recording, you can stop it in one of three ways:
- Hit the ESC key
- Click the Stop Playing/Recording button
- Or select Stop Recording from the Actions panel menu
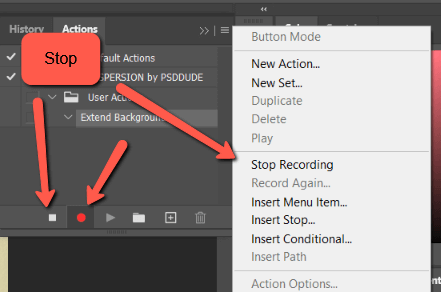
To pick up recording again at the same spot, choose Start Recording from the Actions panel menu.
If you mess up, you can undo your steps as normal. But keep in mind that the recorded action stays. You can get rid of this easily by grabbing and dragging actions you want to delete to the trash can at the bottom of the Actions panel.
That’s all there is to create an action in Photoshop. However, a good action is customizable to fit many other images. Here are a few tips for making your actions customizable.
Adding a Stop
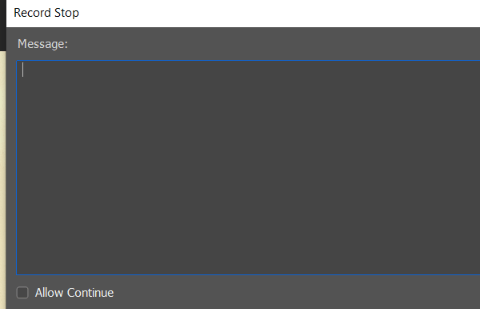
There are a few tasks in Photoshop that can’t be recorded. Thus you can add a stop to the action so the program will stop and prompt you to manually perform the task. You can do this while recording or go back and add it in after you finish recording.
You can also include a little note to remind you what needs to be done.
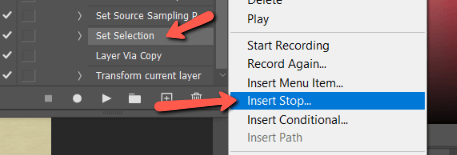
Select the action or command after which you want to stop happening. Then click Insert Stop in the Actions panel menu.
You’ll be prompted to enter your reminder message. You can also choose to give yourself the option of continuing the action without stopping by selecting Allow Continue.
The Option to Change Settings
As an action runs, each task will be completed with the same values as when it was recorded. For example, when I extend my canvas with the Crop tool, the action records that and will extend the canvas to the exact same size every time the action is run.
But that size may not work for every image that needs to be extended. To control this, you can drop a Modal Control that will pause the action and allow you to choose a value when you run the action.
When you hit Enter or accept the changes, the action continues to run.
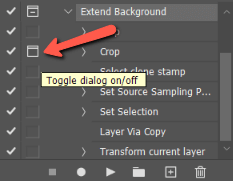
To drop this modal control, just check the box next to the command where you want to pause it.
There are a few commands that you can’t record in an action. However, you can still insert them into your action with the Insert Menu Item command.
Keep in mind that no values will be recorded for the command in the action. Instead, if the command opens a dialog box, the action will pause and open the dialog box. Once you set the values and hit OK or Cancel, the action will continue.
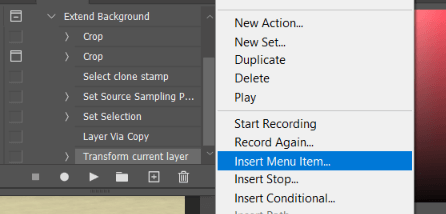
Inserting the command is simple. Select the task after which you want the menu item to occur. Then select Insert Menu Item in the Actions panel menu.
You’ll see this window:
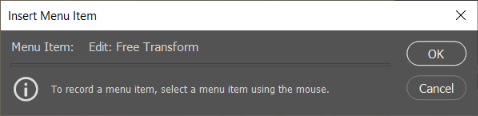
Then, click whatever menu item you want to insert. As an example, I chose the Free Transform command from the Edit menu.
Edit or Rerecord
You can edit or rerecord parts of your action as necessary to iron out the kinks. Simply double-click on a command to adjust its values.
You can also go back and add commands after you finish recording. Just select the task after which you want to add a new command, then hit the Begin Recording button to add the new commands.
Rearrange the commands in the list by dragging and dropping.
Finally, you can rerecord an action completely by selecting the action and choosing Record Again from the Actions panel menu.
There are all sorts of options to tweak your action and make it perfect. Have fun with it!
To learn more about actions, check out our tutorial on how to use actions!
About Cara Koch