Resizing a single image in Photoshop is quite simple, but if you’ve got a lot of images to resize, you get tired and bored of processing them all by hand – especially if you’re working against a deadline!
It’s much simpler to get Photoshop to handle opening, resizing, and resaving each image automatically, and you won’t have to worry about making a mistake or missing an image.
Unfortunately, while Photoshop can handle batch image processing in a few different ways, it feels to me like this is one area of the program that could definitely use some of Adobe’s more modern design philosophy.
Actions and the Image Processor have barely changed in a decade – if not longer – and they’re starting to show their age.
In this tutorial, you’ll learn how to batch resize images in Photoshop.
Table of Contents
Resizing Using the Image Processor
The simplest way to resize multiple images automatically is by using the Image Processor. It can only process images stored in the JPG, PSD, and TIFF file formats, but this should be more than enough for most situations.
If you have a huge number of images to process, make sure that all the images are contained in the same folder. Instead of selecting images individually, Photoshop will process every image in the folder all at once and output the resized copies to another folder of your choice.
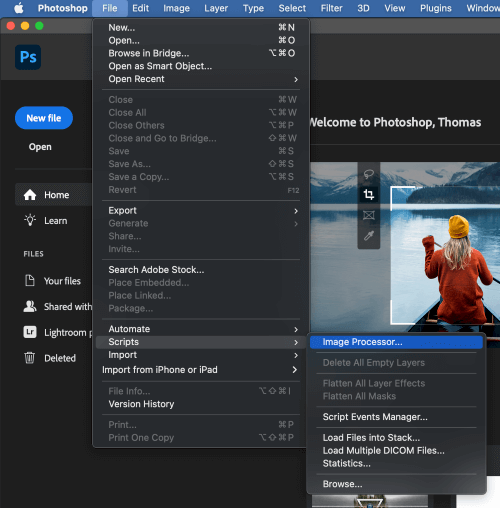
To get started, load the Image Processor by opening the File menu, selecting the Scripts submenu, and clicking Image Processor. As you can see below, it’s arranged into four simple steps.
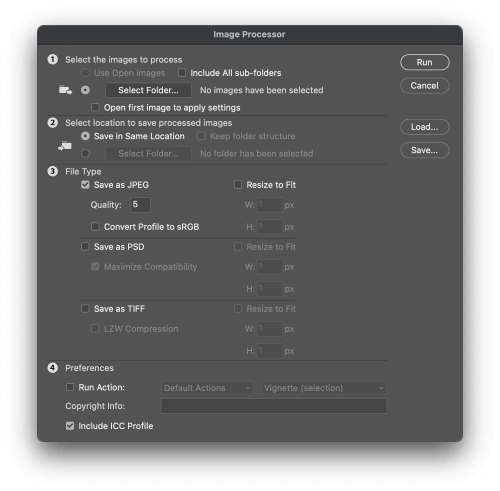
Step 1: Select the images to process
The Image Processor gives you a few different ways to define which images are going to be processed.
If you’ve only got a few images to process, you can open them all in Photoshop at once and select the Use Open Images option.
But this isn’t always practical when you’ve got hundreds of high-resolution images to resize, since opening them all would quickly consume all your available system resources.
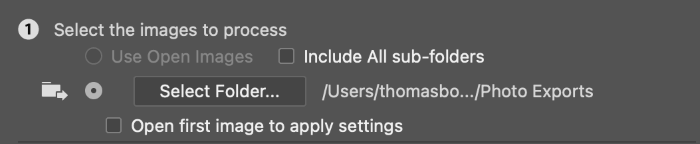
It’s usually a better idea to place all the images you want to resize in a separate folder and then use the Select Folder option to tell Photoshop where they are.
If you haven’t already placed the images you want to resize into a separate folder, be sure to do so now using Finder if you’re on a Mac or File Explorer if you’re on a PC.
If you’ve got multiple nested folders full of images that need to be resized, you can check the Include sub-folders option. With this option disabled, Photoshop will only process images in the exact directory that you specify.
Step 2: Select the location to save processed images
This step is quite simple: you need to choose a place to store the resized images created by the Image Processor.
I recommend that you create a new folder named “Resized Images” or something similar so that you can keep them separate from the originals without getting confused about which is which.

You can also choose to save the files in the same location, but the Image Processor won’t rename your files, so you’ll end up overwriting the originals with the newly resized versions.
This might seem like a timesaver, but if something goes wrong (unlikely, but it’s possible!) then you’ll have destroyed your original images.
If you enabled the Include sub-folders option in Step 1, you may also want to enable the Keep folder structure option in this step. This will recreate a similar folder structure in your output folder, preserving any special organization while still allowing you to resize multiple images.
Step 3: File Type
Once you’ve defined your source and saved folders, it’s time to get down to the actual resizing. Select a file type, and then check the Resize to Fit box in the appropriate row. Enter the new size you want Photoshop to use in pixels.
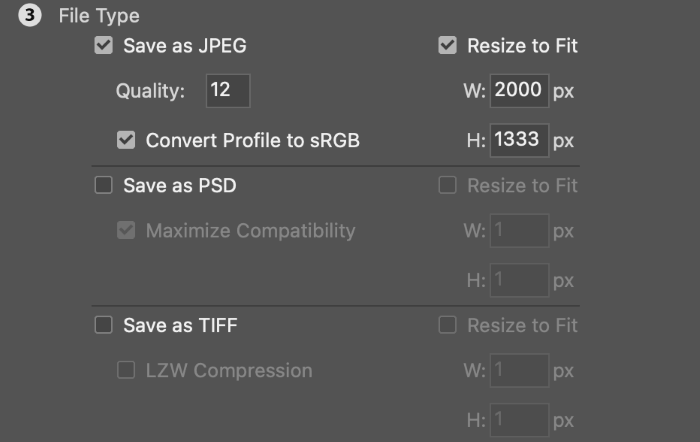
This is the area where the Image Processor begins to show its age. Photoshop only allows you to choose between JPG, PSD, and TIFF file formats, although I guess that most of you will be using this process to resize JPGs.
Still, it would be nice to have the option to resize automatically using any of the image formats that Photoshop supports – especially PNG files.
Observant image editors will notice that it’s actually possible to output to all three formats at once with different resize dimensions, although I’m not sure how often you’ll need or want this feature.
Step 4: Preferences
This last step is optional and allows you to add any pre-defined Action that you’ve created before the final resize operation is performed. You can also choose to include copyright info in each image’s metadata, but it’s only a basic text field.

I’m not sure when you’d want to apply Actions in this location instead of simply using Actions to handle resizing and saving without using the Image Processor at all, but I’m sure that there are situations when it would be useful.
Time To Run!
Take one last look over your settings, and make sure that everything is configured correctly. When you’re satisfied, click the Run button in the upper right corner of the Image Processor window.
You won’t be able to use Photoshop while it’s actually doing the image processing, so feel free to go make yourself a cup of coffee or take a meditation break while Photoshop handles all the tedious work for you. Feels good, doesn’t it?
Resizing Using Actions
It’s also possible to resize multiple images using Actions, but Actions are better suited to more complex edits with multiple steps. However, in combination with the Batch command, they do allow you to automate the resizing and saving of images in other formats such as PNG and GIF.
If you want to learn more about how to use Actions in Photoshop, there’s a dedicated guide to them available here from my PhotoshopBuzz colleague Cara.
A Final Word
There’s nothing more tedious than performing the same action hundreds of times in a row, and it’s no surprise that human error (not to mention human boredom) can quickly become a major problem when you’re processing hundreds of images.
Save yourself all of that time and aggravation by using the Image Processor to easily resize multiple images in Photoshop!
Happy Resizing!
About Thomas Boldt