
Everybody wants to look younger. Some people slather creams and serums on their faces every day in the quest for younger-looking skin. However, there isn’t any way to smooth wrinkles once they appear.
Or is there?
Hey there! I’m Cara, a lover of photography and one who stands amazed by the wonders of Photoshop. One of these wonders is the ability to turn back the clock and erase wrinkles from faces. Photoshop can work some serious magic, let’s look at how to do it here!
Note: the screenshots and tutorial below are based on Photoshop CC for Windows. If you are using the Mac version, they’ll look slightly different.
Table of Contents
Step 1: Make the Edits Non-Destructive
Edits made directly to the background layer are destructive. This means if we mess up we can’t go back to the original image (other than undoing a bunch of actions).
There are a couple of ways to make the edits nondestructive. One is to duplicate the image by pressing Ctrl + J or Command + J. Make your edits to the copied layer and you always have the first as a backup.
Another method is to put a blank new layer on top. To do this, press the New Layer button at the bottom of the Layers panel. It looks like a square with a plus sign inside.

When you make edits, simply make sure that your new layer is selected to make them in this blank layer instead. Also, check the Options bar to ensure that you’re sampling from All Layers or Current and Below or you’ll be sampling from an empty layer and nothing will happen.

Step 2: Open the Healing Brush Tool
All right, let’s dive in with the Healing Brush tool. Choose your healing brush from the toolbar on the left.
There are two options, the Spot Healing Brush tool or the Healing Brush tool. You can use either, but the regular Healing Brush tool allows you to choose the sampling point. The Spot Healing Brush tool will choose the sampling point for you.
Either works, but you get a little more control with the Healing Brush tool. That’s the one I’m going to grab.

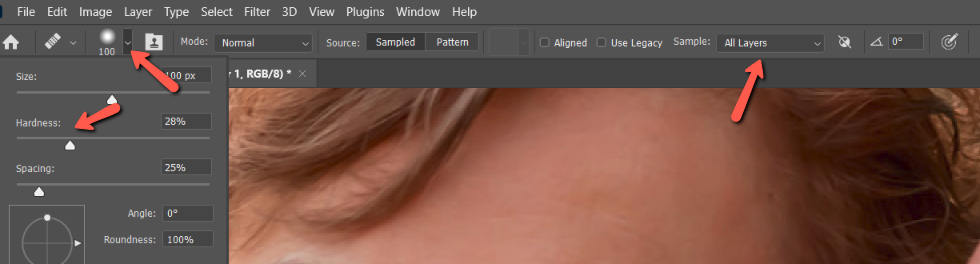
Let’s look at the settings. Click the little arrow next to the brush icon to open the brush settings. For better blending, you’ll want to bring the hardness down. Also, make sure that the Sample box says All Layers or Current and Below.
Step 3: Sample Some Smooth Skin
Hold down the Alt or Option key and click on a smooth area of the skin to sample the texture. Carefully paint along the wrinkles to gently snuff them out.
Remember, you want natural results. If you remove all the wrinkles from an older person, it will look strange. So don’t go too crazy with this technique.


Step 4: Minimize Deep Wrinkles
Now, if I try to totally erase the crow’s feet around her eyes, it will look odd. Not only is it really difficult to blend it well, but it’s just unnatural for her not to have these wrinkles.

Looks odd, right? Instead, let’s minimize the appearance without removing them completely.
We’ll do that by turning down the opacity on the healing layer. For this example, I’ll add a new layer on top, but I’ll turn the opacity of this layer down to about 50%. The strength you’ll need depends on the image.

Now, sample a smooth skin spot and paint over the crow’s feet wrinkles just like we did before.


As you can see, the wrinkles aren’t gone, but they are less noticeable. Especially when we zoom out on the image.


A Word About the Stamp Tool
You might wonder why we picked the healing brush tool instead of the stamp tool. If you know anything about the stamp tool, it seems like it works the same.
However, the healing brush tool takes the texture from the sampled area and blends it with the color from the area we are changing. This helps keep the color right as there might not be another patch of skin that is the exact color and brightness that you need.
That being said, you can use the clone stamp tool if you want. But I prefer the Healing Brush tool and I think it will work best for most people.
Excited about the wonders of Photoshop? I get it! Check out this tutorial on how to change hair color. You’ll be transforming your images in no time!
About Cara Koch