
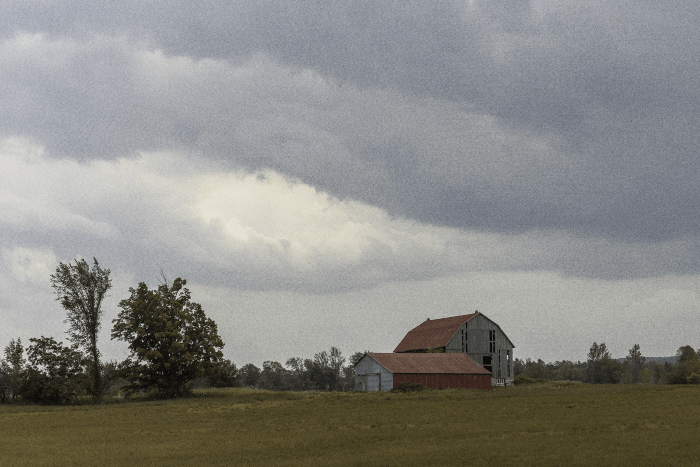
One of the most common tasks in digital photography is to remove the inevitable digital noise created by our camera sensors.
The digital noise created by camera sensors is very similar to the grain effect visible in some film photography, which is created by the photosensitive chemicals in the film stock as they react to light (this is a very crude explanation, but it’s enough to be getting on with!)
But what happens if you want to add grain to your image? It’s not quite as common anymore, since fewer people remember the heavily-grained images from the early days of film photography, but there can be a certain charm to the style.
While it can be a useful creative strategy when recreating film photography effects, it’s also useful for making your other edits blend in with the untouched areas of your image. Some editing processes such as blurs and warps can remove the noise/grain from an image unintentionally, creating areas that appear ‘smoother’ than the rest of the image.
Note: Because of this similarity between digital noise and film grain, many editors use the terms interchangeably. It’s not technically correct, but we’re here for the editing, not the semantics!
Table of Contents
The Quick Guide to Add Grain in Photoshop
If you just need a refresher course on the basic idea, here’s how it works.
- Step 1: Create a new layer with the Overlay blending mode, filled with 50% neutral gray.
- Step 2: Convert it to a Smart Object.
- Step 3: Apply the Add Noise filter.
- Step 4: Apply the Gaussian Blur filter.
- Step 5: Adjust layer Opacity and Blending Mode as needed.
That’s a quick explanation, but it covers the basics. If you’re already comfortable working in Photoshop, that’s probably all you need to get started. But if you’re new to Photoshop or you want a more detailed explanation of the process, read on!
The Detailed Guide to Add Grain in Photoshop
Here are the detailed steps to add noise in Photoshop.
Step 1: Create Your Grain Layer
This process works better when it’s applied to a new layer instead of working directly on your image. This gives you a greater degree of control and flexibility and it leaves your original pixel data untouched in case you want to adjust or even remove the effect later on.
Open the Layer menu, select the New submenu, and click Layer. You can also use the keyboard shortcut Command + Shift + N (use Ctrl + Shift + N on a PC). Photoshop will open the New Layer dialog box, giving you a chance to customize the settings.
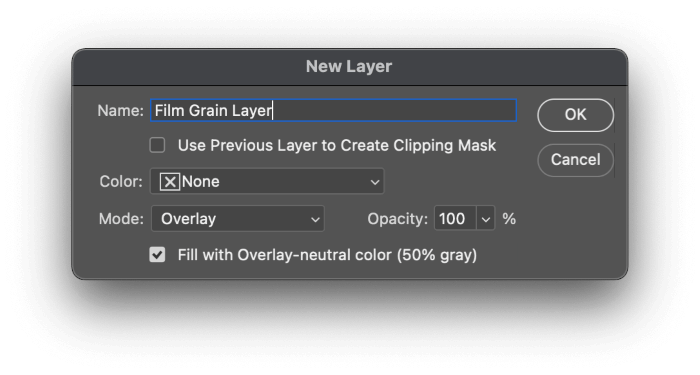
Give your new layer a descriptive name, and set the Mode: to Overlay. Once you switch the mode, you’ll be able to check the box below marked Fill with Overlay-neutral color (50% gray). This used to be a multi-step process, but newer versions of Photoshop have streamlined the process a bit.
Click OK and Photoshop will create the new layer.
Because the blending mode is set to Overlay, you won’t see an immediate change in your image, even though the new layer is filled with neutral gray pixels.
Step 2: Convert to Smart Object
Converting your film grain layer into a smart object will allow you to apply filters non-destructively so that you can adjust the grain intensity and color without having to start the whole process from the beginning again.
Make sure your grain layer is selected in the Layers panel, and then open the Filters menu and click Convert for Smart Filters.
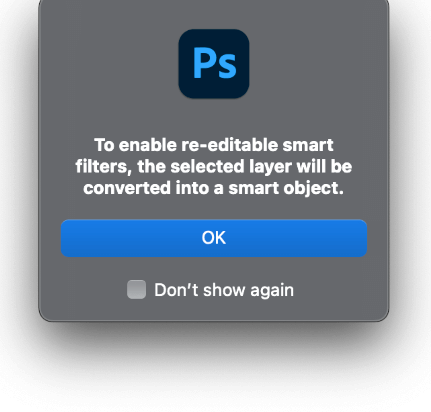
Click the OK button, and feel free to check the box labeled Don’t show again so the process will be smoother the next time you convert a layer into a smart object.
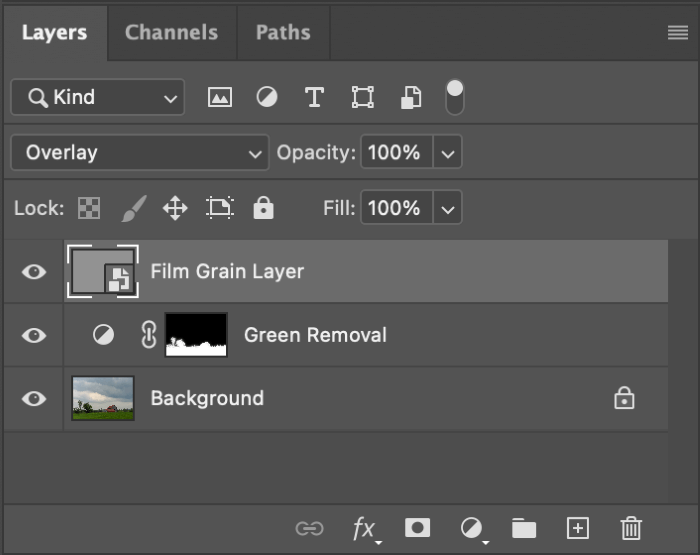
In the Layers panel, you’ll see that the thumbnail for your grain layer has a new icon in the right corner, indicating that the layer is now a smart object.
Step 3: Adding Grain
With the layer prepared, it’s finally time to add some noise! It can be hard to see digital noise/grain when you’re zoomed out of your image, though, so zoom in to 100% on a prominent part of your image such as your subject’s face or a relatively bright area so that you can see the results of the effect properly while previewing.
Make sure your grain layer is still selected in the Layers panel, then open the Filter menu, select the Noise submenu, and click Add Noise. Photoshop will open the Add Noise filter dialog (see below), allowing you to customize the type and amount of noise/grain being added.
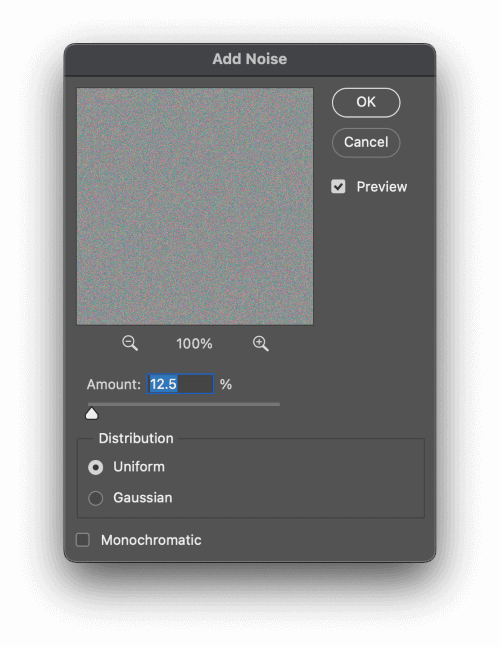
By default, the filter is set to add 12.5% color noise in a Uniform pattern, but this looks pretty unrealistic. Change the Distribution setting to Gaussian, and check the box labeled Monochromatic.
Technically, digital noise is not monochromatic, but most color noise is corrected automatically in-camera so it stands out far too much when re-added to an image.
You can set the Amount to whatever you’d like, although remember that because you converted the layer into a smart object, you can go back and adjust the Add Noise settings any time you want.
I think using the default setting of 12.5% is far too much, and you’re better off with something closer to 5%, but it’s entirely up to you!
It’s a good idea to experiment with a few different options, and you can toggle the Preview checkbox on and off to compare the results of your effect. Once you’re happy, click OK and Photoshop will add your noise.
Step 4: Gaussian Blur
Photoshop’s Add Noise filter creates noise that is very sharp-edged, which means that it doesn’t always look entirely natural. You can skip this step if you’re already happy with the results, but it’s worth a try if you’ve never done it before.
With your grain layer still selected, open the Filter menu again, select the Blur submenu, and click Gaussian Blur.
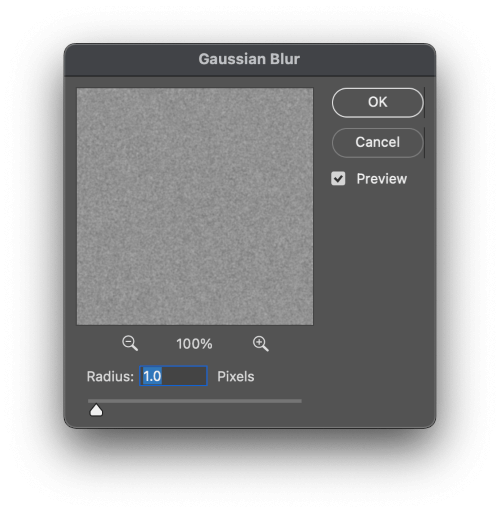
Adjust the Radius setting until you’re happy with the results, again toggling the Preview checkbox on and off to compare the results on your image.
Your ideal setting will depend on both your creative vision and the amount of noise that you added in the previous step, but usually, you want a setting of 1.0 pixels or less. By the time you get up to about 3 pixels, the noise is very smoothly blurred and almost looks like flat neutral gray again.
When you’re satisfied, click the OK button.
Step 5: Final Adjustments
Again, this step is optional if you’re already happy with the results, but there are a couple of additional adjustments you can apply to refine your result even more.
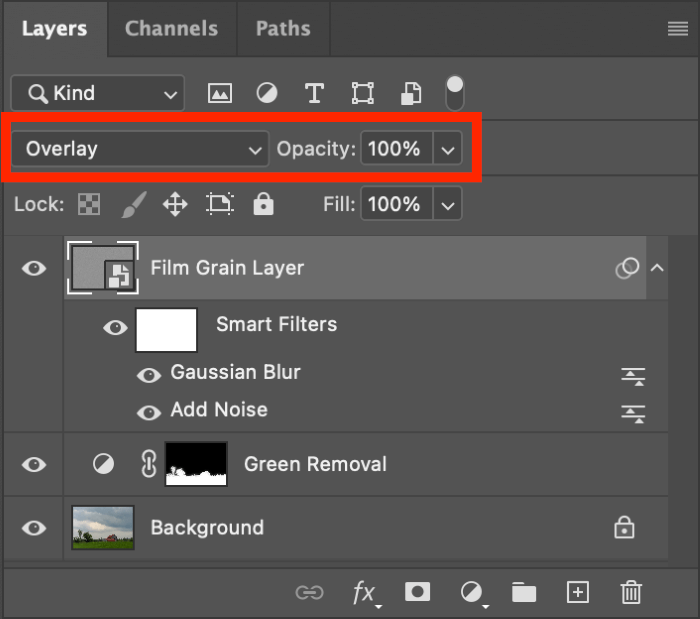
Adjusting the Opacity setting for your grain layer can modulate the effect, and you can also adjust the blending mode from Overlay to Soft Light for an even more subtle effect.
At this point, you can simply save your image if you’re pleased with how it turned out, but if you want to explore some different grain effects, you can also go back and simply re-edit the filters that you applied earlier. Because you converted your grain layer to a smart object, they’re infinitely re-editable!
To access your active filters, simply double-click the appropriate entry in the Layers panel. Photoshop will give you a warning about how stacked filters interact, but just click OK and don’t worry about it.
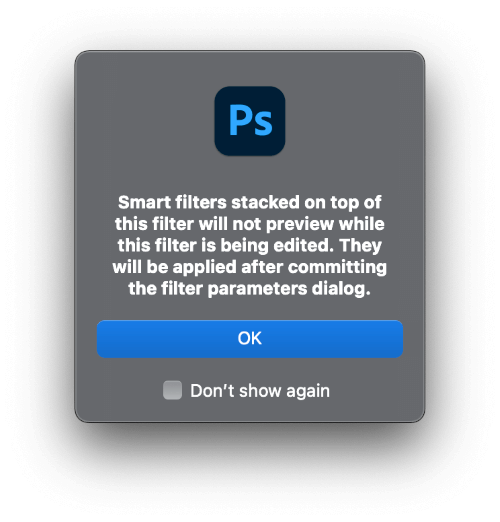
Essentially, it means that it won’t apply the entire stack of smart filters until you finalize the edit you’re about to make.
That might seem a bit annoying at first, but when you realize that it’s possible to have a huge number of smart filters applied to the same object, you can see why it might be impractical to be constantly recalculating them while you’re still in the process of making your adjustments.
Make any refinements or adjustments to your chosen smart filter, and click OK again to see the final results. You can do this as many times as you like, so feel free to experiment.
If you want to apply your film grain to a specific section of your image, such as an existing edited area, you can apply a layer mask or clipping mask to your grain layer to constrain where the effect is applied.
A Final Word
Now that you know how to add grain in Photoshop, you can create everything from film effects dating back to the birth of photography all the way up to completely seamless digital edits. You’ll have to use your own judgment about what looks like a realistic noise/grain effect, but that’s part of the fun of image editing!
About Thomas Boldt