
Ever wished you could embed a clickable hyperlink in a JPEG image or design? When creating designs for websites, social media, or any kind of digital advertising, it would be helpful to make your promotions clickable so you can direct people exactly where you want them to go.
Hello! I’m Cara, and once again I’m here to tell you that Photoshop makes a seemingly complicated task quite simple. There are four major steps to add a hyperlink to an image in Photoshop. Let me show you how it works!
Note: I took these screenshots from the Windows version of Photoshop CC. If you are working with a Mac you will find that the workspace looks a little different.
Table of Contents
Step 1: Open Your Image in Photoshop
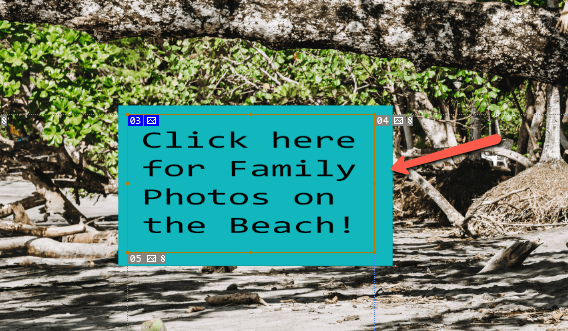
For this example, let’s look at a photo I took recently during a family session on the beach. I want to add a clickable button here to encourage people to visit my website for more info about family photos.

Step 2: Make a Selection Using the Slice Tool
Adding the hyperlink is very simple. Choose the Slice Tool from the toolbar on the left. It will probably be hiding behind the Crop Tool.

Click and drag around the area you would like to make clickable. If you want to make the entire image clickable, drag the mouse around the whole image. Otherwise, just drag around the specific area you want people to click on.
Step 3: Add a Hyperlink
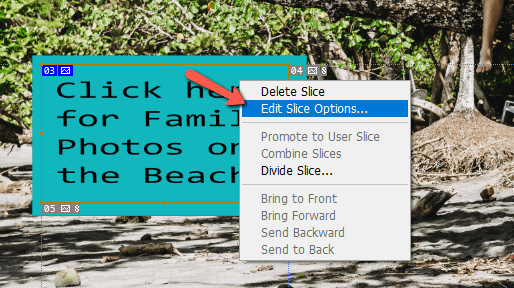
Now it’s time to add the hyperlink. Right-click on the image and choose Edit Slice Options.
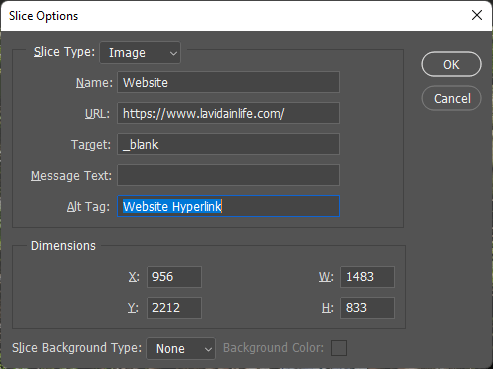
In the menu that opens, you have a few options to fill out. Start by naming the slice in the Name box. This is helpful if you are adding multiple links to the same image.
Place the URL you want to direct people to in the URL box. Make sure to include the http or https part of the address. Both Photoshop and the browsers reading your link need this information.
If you want the link to open in a new tab (as opposed to replacing the page your image is on) type _ blank in the Target box.
Finally, the Alt Tag box will let people know what the link is for if it doesn’t load correctly.
That’s it! Adding a hyperlink couldn’t be easier. You can add as many hyperlinks to an image as you like. Just repeat the steps up to this point.
Step 4: Export for Web Use
Now there’s one more step to the process that you need to be aware of. If you don’t export your image correctly, it won’t include the hyperlink.
To preserve the hyperlink go to File, hover over Export, and choose Save for Web.
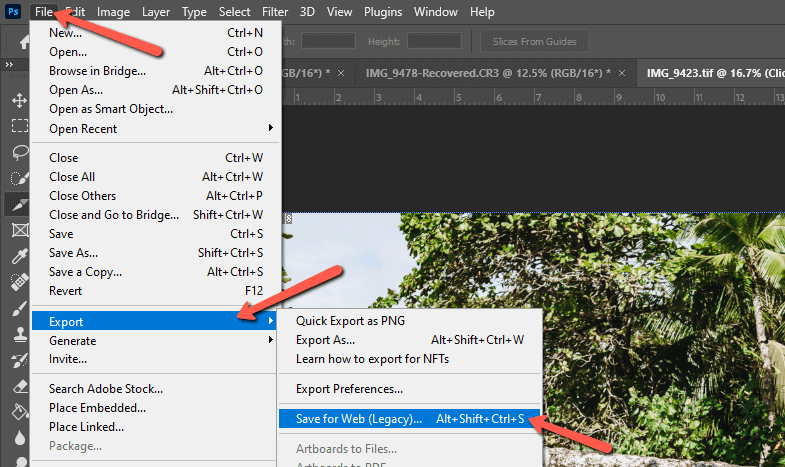
You can also use the keyboard shortcut Alt + Shift + Ctrl + S or Option + Shift + Command + S.
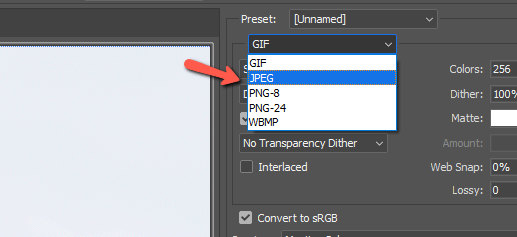
In the file type box, you must choose either JPEG or PNG.
Then click Save.
A box will pop up to save the file on your computer. Navigate to where you would like to save the file. You can give your image a new name here if desired. Before you save, make sure to change the Format box to HTML and Images.
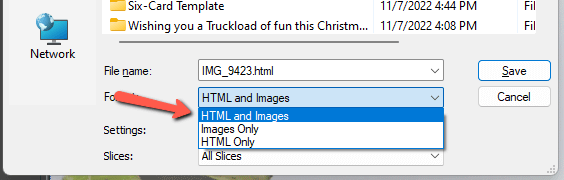
If you choose HTML Only, browsers will open a blank page and your image won’t display. On the flip side, if you choose Images Only, the image will display without the hyperlink included.
Once everything is set, press Save.
Note that instead of one file, the image and hyperlink files are saved in separate files. These need to be kept together or the hyperlink won’t work.
When you go to post your image, you’ll need to open the hyperlink file with a text editor to display the HTML code. Copy the code and paste it into the HTML file of the webpage where you want to display your clickable image.
And that’s how you add a hyperlink to a JPEG image in Photoshop! Curious to learn more about technical stuff in Photoshop? Check out this comparison of JPEG vs PNG vs GIF file types!
About Cara Koch
Bots1
Hi,
I am trying to create an email signature with the above method but it just displays as a whole lot of different image box’s that are empty when I place it in my signature. Do you know how to get this to present correctly? Thanks
June
Hi,
Have you put the URL in the URL section in the setting?
Amy
What does that mean?
June
Hi Amy,
You can add a link to your image so when clicking on the image, it can direct you to the link
tom
you lost me here:
“When you go to post your image, you’ll need to open the hyperlink file with a text editor to display the HTML code. Copy the code and paste it into the HTML file of the webpage where you want to display your clickable image.”
June
Hi Tom, sorry about the confusion. I meant when you publish the image, choose the image file with the HTML and Image format that is saved.