
If you’ve been using Photoshop for a while, you’re probably familiar with the Lasso tool. It’s a handy tool for making quick, but very messy selections that are only useful when precision isn’t necessary.
Hello there, I’m Cara and if you’ve never taken a peek under the Lasso tool to find the Magnetic Lasso tool, I’m about to blow your mind! This selection tool makes creating accurate selections so much easier.
Get this, as you loosely trace around your object, the lasso line snaps automatically to the edges of your subject – as if it were magnetic! Awww, Photoshop is seriously amazing!
Don’t believe me? Let’s take a look at how to use the Magnetic Lasso Tool in Photoshop and I’ll make a believer out of you!
Note: I use the Windows version of Photoshop. If you are using a Mac, the workspace will look slightly different from the screenshots displayed here.
Table of Contents
Where is the Magnetic Lasso Tool in Photoshop
In the typical toolbar layout in Photoshop, the Magnetic Lasso tool is hiding behind the regular Lasso tool. To find it, click and hold or right-click on the Lasso tool to open the flyout menu.
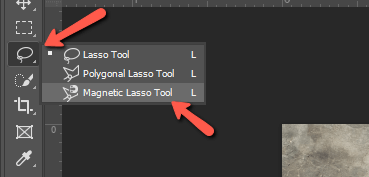
Choose the Magnetic Lasso tool from the list. Once you do this, the icon for the Magnetic Lasso tool will stay on top. To access it again later, all you have to do is press the L key on the keyboard.
You can also cycle through the Lasso tools by pressing L repeatedly (or Shift + L depending on how your preferences are set).
Magic Lasso Tool Settings
The Magnetic Lasso tool works by using sophisticated edge detection as you’re drawing around an object. This means Photoshop will look for edges, which it determines through the color and shadow differences between pixels.
It kinda seems like magic sometimes!
So, you could just start drawing loosely around your object and see what happens. However, you’ll find the tool works much better if you set it up for success first. And you’ll get less frustrated with this silly line that is now stuck to your cursor!
So let’s look at the Options bar.

Feather
Raising the feathering softens the line you’re working with. Most of the time when using the Magnetic Lasso tool, you’ll want this option set to 0.
Width
This option is extremely important. Photoshop limits its edge detection prowess to a certain distance around your cursor. This is what makes this tool more helpful than simply clicking the automatic subject selection button. Thus, you can direct Photoshop’s attention to specific areas.
Plus, you can control how big this area is with this Width box. A bigger area means you can be lazier with your line and Photoshop will still find the edges. But keep in mind it may also pick up other details you didn’t want to include in the selection.
To see how big the area is, press the Caps Lock key. This will change your cursor from the little lasso with the horseshoe magnetic icon into a circle matching the exact size of the detection area.
You can only set the circle’s width in this box before you start using the tool. Once your magnetic lasso is active, you can’t move the cursor up to select the box.
But if you need to change the circle’s size on the fly, you can use the bracket keys [ ]. The left one makes the circle smaller and the right one makes it bigger.
Contrast
The Contrast is another important piece of the edge detection function. If there is a lot of contrast between your edges, you can choose a higher value, be lazier with your line, and Photoshop will still find the edges.
However, if there is not a lot of contrast, you can bring this value down, which will help you be more precise.
Again, you can only set this value with your cursor before you start using the tool. But to change it while you’re working you can use the period key to increase it and the comma key to decrease it.
Frequency
As you draw around your object, the Magnetic Lasso tool will leave anchor points behind holding the line to the edge of the object. The Frequency setting controls how often the program will drop these points.
Again, you can only change this setting before you start using the tool. However, most of the time leaving it at the default setting of 57 is good enough. If you need more points in a particularly difficult spot, you can click as you’re drawing to drop extra points as you go.
How to Use the Magnetic Lasso Tool in Photoshop
So let’s give this a try. With our settings configured, let’s try to select one of these delicious ice cream cones I have here in my picture.
Click once to drop your first point. After this, it is not necessary to hold down the mouse button. Just keep dragging the cursor around the edge of your object.
As I drag along this edge, the line snaps to the edge of the ice cream cone, undulating a little with the texture of the waffle cone and hugging it closely.

Fixing Mistakes
It even does a great job as I move up into the ice cream, sticking around the rough edges of the cone. However, notice at the top it makes a mistake and the line starts following the reflection on the plate instead of the ice cream.
Do we have to start over? Nope! Simply press the Backspace or Delete key to remove the points in reverse order. Remove as many points as you need, then you can keep going with the selection.

This might be a good spot to reduce the contrast a little as the program struggles to find the white ice cream against the white reflection.
Zooming and Moving the Image
You can zoom in on the selection while the tool is active. Simply press Ctrl + + or Command + + to zoom in or Ctrl + – or Command + – to zoom out.
If you get to the edge of the screen as you’re working zoomed in, you can either hold the cursor still and wait for the image to shift in the direction you want to go. Or you can press the Space bar to pause the lasso tool and activate the hand tool so you can move the image.
Closing the Selection
Once you get all the way around your object, you’ll need to close the selection. If you don’t do this properly, the line stays stuck to your cursor and starts selecting a bunch of random stuff as you move your mouse away.
When you get back to your initial anchor point, you’ll notice a small circle appears on your cursor. This indicates that you’re in range to close the selection. Click once and the tool deactivates and the marching ants appear around the edge of your selection as normal.

Adding to or Subtracting From the Selection
What if you need to fix mistakes after closing the selection? Or maybe there are gaps inside the selection that need to be cut out. For example, if you were selecting a person and there is a gap between their arm and body.
You can do this with the add to or subtract from options in the Options bar.
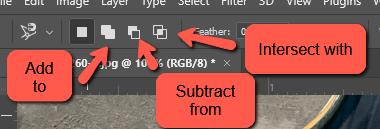
Simply select which option you want and use the tool as normal. You can add on parts that were missed with the Add to option or remove unwanted parts that were selected with the Subtract from setting.
Selecting with Ease
And that’s about it! Once you know how to use it, the Magnetic Selection tool speeds up your selection process on complicated selections quite easily. It gives you more precision and control than the Quick Selection tool, yet is not as time-consuming as the ultra-precise Pen tool.
So the next time you need to make a precise selection, reach for this handy tool and you’ll be done before you know it! Ready to take things to the next level? Learn how to use your precise cutouts in creating composite images here.
About Cara Koch