
Ever needed to save SVG files in Photoshop? Though Photoshop is often used for raster files, it is capable of handling vector files as well.
Hey there, I’m Cara! I’ll be the first to admit, I primarily use Photoshop for editing images. But occasionally, I need to work with more flexible vector files for logos and projects of that nature. Vector files allow you to scale your image up or down without quality loss.
Many people who work mostly with vector files will work in Adobe Illustrator rather than Photoshop. But for the occasional SVG file (Scalable Vector Graphic) it’s handy to know how to save SVG files in Photoshop as well.
Note: I use the Windows version of Photoshop. If you are using a Mac, the workspace will look slightly different from the screenshots displayed here.
Table of Contents
Method 1: Export PSD File As SVG
There are a few ways you can save your project as an SVG. The most straightforward way is to use the Export As feature.
When you’re ready to save your project, simply hop over to the File menu, hover over Export, and choose Export As.

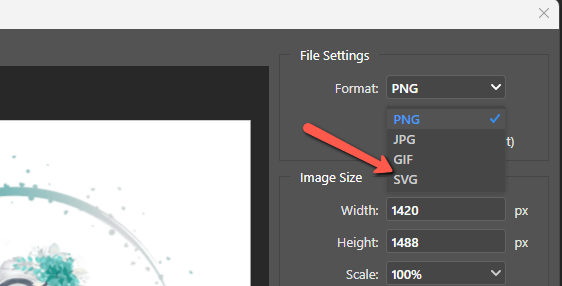
In the box that opens, click the dropdown menu next to the Format box and choose SVG. Then you can change any other settings you need to adjust and click Export.

But what if, when you open that dropdown menu, you don’t see the SVG option? In the newer versions of Photoshop, Adobe has removed the SVG option for whatever reason. I’m working with Photoshop 23.5.3 and as you can see, SVG isn’t there.

Luckily, there is an easy fix. Go to Edit, choose Preferences, and click Export.

This route will automatically take you to the Export tab of the Preferences menu. Just make sure it says Export on the left-hand side.
At the bottom of the window, you’ll find a box that says Use Legacy “Export As”. Check that box and press OK.

Now go back to the Export As window and voila! SVG now appears as an option!
Method 2: Save as an Image Asset
What if you want to save individual layers of your project as an SVG? Photoshop allows you to do this, but there are a few steps to get there. As with many things in Photoshop, it’s easy but you wouldn’t get there on your own.
Start by choosing your layer and renaming it with .svg at the end. Simply double-click on the layer name and when it is highlighted you can type in the new name. You can name it whatever you want, just make sure that the .svg part is there.

Now go up to File and go down to Generate, choosing Image Assets when it pops out.

At first, it will seem as though nothing happened. But if you look at the Image Assets again that you just clicked, you’ll see this checkmark next to it. That’s what you want.

Now go up to the File menu and click Save as normal.

Choose the file format you want, which will usually be PSD, and click Save.

Open the folder where you saved the file and you’ll notice it was saved with a tagalong.

That file with the Chrome logo is an SVG file that you can now use however you would use your SVG file.
Method 3: Using SVG Code
There is one other method you can use to save an SVG file. This is what you would use if you needed the SVG code to paste into your HTML. (If you have no idea what I’m talking about, don’t worry. This probably doesn’t apply to you and you can skip to the next section).
To get the code, simply right-click on the layer you want to save as an SVG. Look up near the top of that big menu that appears and you’ll find that it says Copy SVG.
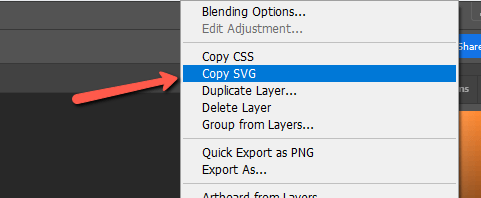
Click that to make a copy and then you can paste it into your HTML document.
A Note About Text Layers
That’s about it for saving a project as an SVG in Photoshop. But here’s one more problem you may run into that would be handy to know about.
If you try to save a text layer as an SVG you may find that it doesn’t work as you would expect. To fix this problem, convert the text layer to a shape layer before saving. The text becomes uneditable once you do this, but you’ll be able to save it as an SVG without problems.
To convert the layer, right-click on the text layer and choose Convert to Shape. It’s roughly in the middle of that big menu that appears.

Once the layer has been converted, you can save it as an SVG using one of the methods we’ve described here. Curious about working with other file types in Photoshop? Check out how to save as a PNG here or learn about working with PDFs in Photoshop here.
About Cara Koch