Photoshop has a reputation as the best image editor on the market, and many new users assume that it can do anything and everything you might possibly need in the world of digital images – but that’s not the case.
This is both a blessing and a curse, so bear with me for a second while I explain why.
There was a time when it seemed like Adobe was trying to stuff Photoshop with every feature they could think of, from vector shapes to video editing to 3D model support. This started to turn the already-cluttered Photoshop into a feature-bloated monstrosity (yeah, I said it).
I suspect that it also began to affect sales of their other programs because Adobe has now started removing some of these “extra” features from Photoshop.
Fighting back against this “feature creep” and re-focusing on Photoshop’s core functionality gives an improved overall experience for most users who only need to do image editing.
It also helps Adobe expand its software offerings by allowing them to create dedicated programs for specific graphics tasks instead of trying to cram everything into Photoshop (whether they fit properly or not).
As a result, Adobe seems to be slowly but surely removing vector graphics features from Photoshop.
The default Export As process no longer offers the SVG vector format unless you enable it specifically in the Photoshop preferences, and only Adobe knows how much longer this workaround will remain an option.
Adobe Illustrator is a far more effective tool for creating, editing, and saving vector graphics, although any program dedicated to vector graphics will produce better results than Photoshop.
If you’re not clear about the differences between raster and vector graphics, I’ll include a quick guide at the end of this post.
Table of Contents
The Trick to Saving An SVG Vector File In Photoshop
(Note: This guide is intended for Adobe Photoshop CC version. Previous versions of Photoshop may have different options and features. If you’re curious, you can read Adobe’s statement about discontinuing SVG support.)
Photoshop is not really intended as a vector graphics program, so it only has only very limited support for saving vector files.
The SVG (Scalable Vector Graphics) format is one of two vector formats that Adobe Photoshop uses, but you’ll have to specifically enable it before you can use it to save vector files.
Open the Preferences window in Photoshop and select the Export section. At the very bottom, you’ll find an option labeled Use legacy “Export As”. Check the box to enable it, and click OK to close the Preferences window.
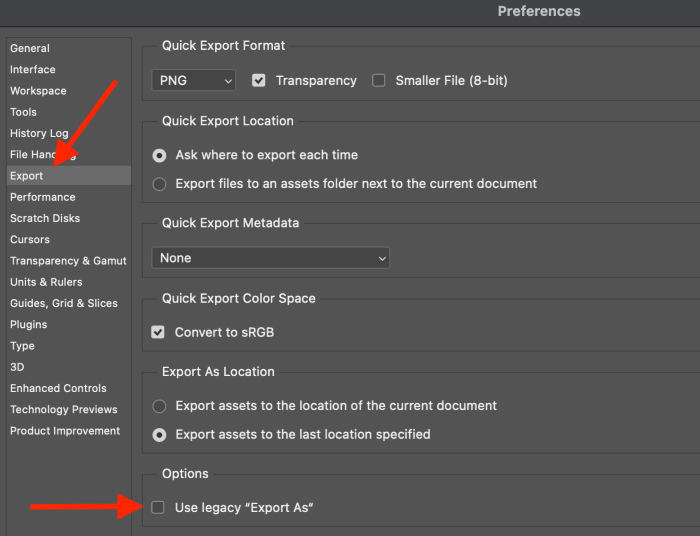
This will enable you to save SVG files using the standard Export As dialog. You might experience some performance hiccups, and there’s always the possibility that Adobe will remove this option in a future update, but for now, this is the best way to export a vector from Photoshop.

Once you’ve enabled the Use legacy “Export As” option, simply open the File menu, select the Export submenu, and click Export As. In the File Settings section, click the Format dropdown menu, and select SVG from the list.
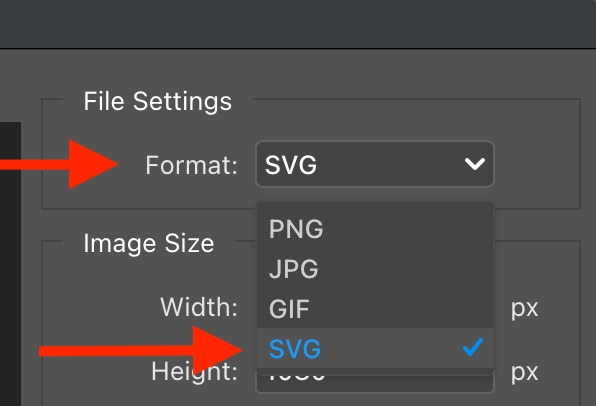
Customize any other settings you’d like for your image, and click Export.
That’s the simplest way to save a vector file in Photoshop! Keep in mind that Adobe may eventually remove this option, so it’s a good idea to start learning a dedicated vector graphics editor if you want to do any serious vector work.
Saving A Photoshop EPS File
It’s also possible to save your vector graphic as a Photoshop EPS file. EPS files are another widely-supported vector format, but Adobe has made some recent changes to the Save/Export process that confuse some users upgrading from older versions of Photoshop.
To save a Photoshop EPS vector file in Photoshop, simply use the Save A Copy command instead of the Save As or Export As commands.
The idea behind the change is that the Save As command should only allow you to use file formats that protect all of your document data, to prevent users from accidentally saving their files in a format that discards image data.
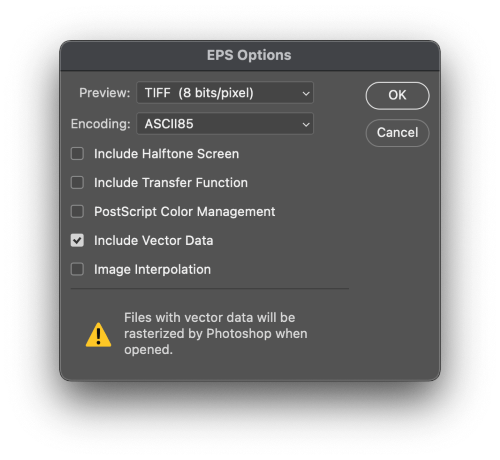
Just make sure the Include Vector Data option is enabled when you’re saving in the Photoshop EPS format.
However, the dialog now includes a warning to indicate why this is no longer a recommended practice since Photoshop will have to convert the vector data into pixel data when the file is re-opened, a process known as rasterizing.
That being said, EPS is still sometimes useful for exporting to other programs.
Exporting Paths to Illustrator
If you’ve got access to Adobe Illustrator, there’s one additional option for saving a vector file in Photoshop. It’s fairly basic, but it allows you to export vector path information to Illustrator’s native AI format.
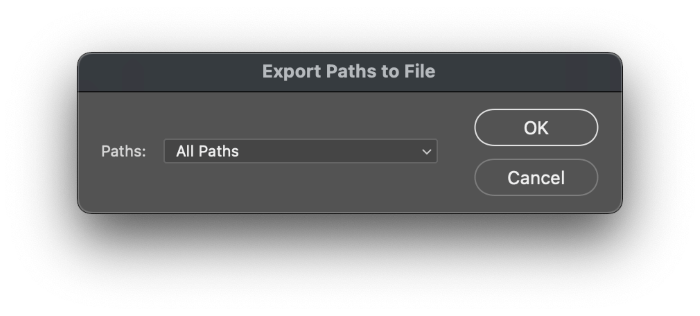
When your vector graphic is ready for export, open the File menu, select the Export submenu, and click Paths to Illustrator. In the Export Paths to File dialog box, open the Paths dropdown and select All Paths, or select any of your individual path layers – you did remember to name them, didn’t you? 😉
Click OK, then name your new .AI file and click Save. It’s now ready to open in Adobe Illustrator! Of course, if you’ve got Adobe Illustrator it makes more sense to just do all your vector work there from the start, but at least now you’re prepared for any situation.
What Are Raster Images And Vector Images?
If you’re not quite clear on the differences between raster images and vector images, here’s a simple guide that should help clear things up a bit.
Raster images are made up of individual pixels that are organized into a grid. Each pixel has a color value assigned to it, and when combined, they form the shapes and tones of your digital image. Most of the images you see on your computer and around the web are raster graphics.
The most common digital image file formats such as JPEG, PNG, GIF, and TIFF are all raster formats.
Vector images are constructed very differently. Instead of a simple grid of pixels, they use mathematical equations to define the anchor points, lines, and curves that are used to create all the different shapes that make up the image.
Vector graphics are rarely used outside of the design environment, as they’re not widely supported by operating systems or web browsers. Some websites use a type of vector image for logos and other simple interface elements, but this is still relatively rare. Instead, most vector graphics are converted into raster images when it’s time to finalize them for actual use.
A Final Word
Now you know the best ways to save a vector file in Photoshop! Remember that Adobe is probably going to be removing the SVG option in a future release, so it’s time to start getting familiar with a dedicated vector graphics editor if you do a lot of vector work.
Happy vectoring!
About Thomas Boldt
Iain Wilkie
Hello Thomas
Thank you for the above article, I’ve been having real difficulty with something and this has offered the best workaround so far. However, I wonder if you might be able to advise further, with regards to Adobe Illustrator?
I’m a self taught novice user who is attempting to make a golf yardage book. I’ve created the book template, complete with hole details and I’ve drawn each of the holes on separate Illustrator artboards.
The next step is to transfer the hole sketches into the main book template, but this is where my problem lies, as I need to cut each image in two so that the top (green) section of the hole and the bottom (tee) section of the hole can be placed on two different pages of the template.
So far I’ve done this by importing the AI files into Photoshop, cut and paste each section into a new image, saved as SVG and imported the SVGs into my template. This is fine but the pasted images show fine pixelation and don’t quite keep the sharpness if the original vector image.
Within Illustrator, is there a way I can cut and paste the top and bottom sections of an image when some sublayers traverse both sections. Perhaps by combining all the sublayers of each drawing to form a single layer image that would allow me to cut the vector across the middle. I’ve tried flattening and merging the sublayers in the vector but that hasn’t worked.
Any advice would be appreciated.
Thanks in advance,
Iain