In a perfect world, you could make a selection, cut it out, and it would immediately be ready for placement in the new project.
But this isn’t a perfect world. Most of the time you will have to resize the selection before it will fit.
Hello! I’m Cara and I’ll be your guide today as we learn how to scale selection in Photoshop. This is a simple technique and I use it all the time in my work as a photographer.
Let’s get to it!
Note that the screenshots below are based on the Windows version of Photoshop CC, if you are using the Mac or another version, they can look different.
Step 1: Create a Selection
Before we can resize a selection, we need to create one. If you need help with making selections check out our tutorials on how to use the Magic Wand tool or how to use the Pen tool.
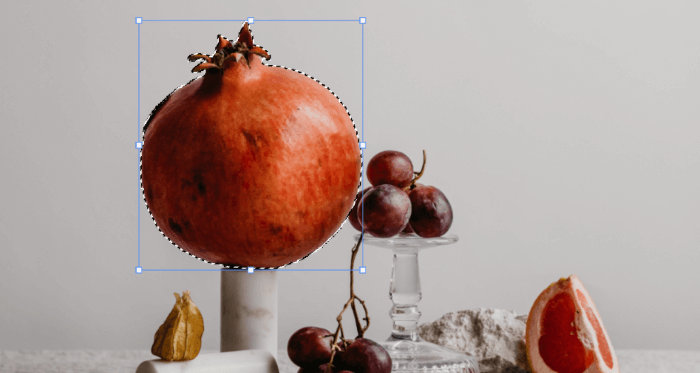
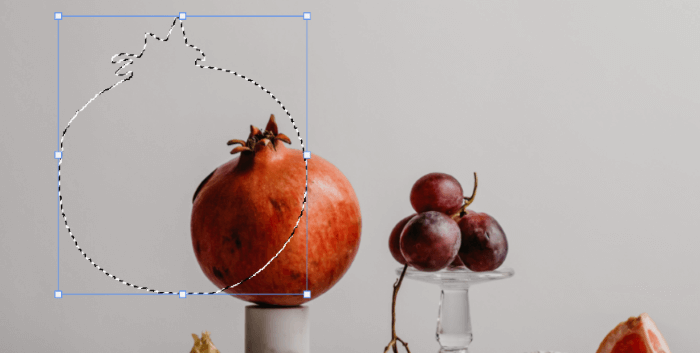
I’ll use the Object Selection tool to select the pomegranate in this image. With this tool, you can draw a box around the object you want to select and let Photoshop handle the rest.

It selected a tiny bit of the pedestal as well but that’s simple to clean up.
There are two ways you can resize a selection. First, you can resize the object in the selection. Second, you can resize the actual selection itself. Confusing? All will become clear, I promise.
Step 2A: Transform Tool
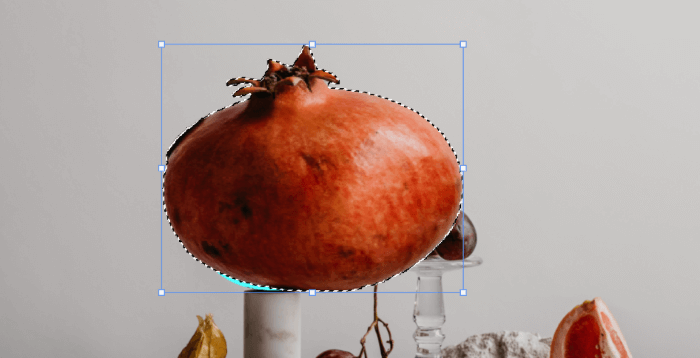
First, let’s resize the object with the Transform Tool. Press Ctrl + T or Command + T to access the Transform tool. Alternatively, you can go to Edit, and choose Free Transform.

Notice the box that appears around the pomegranate? Grab the handles and pull them to resize the pomegranate.
If you want to resize the pomegranate disproportionately (you don’t want to keep the same aspect ratio), hold Shift while dragging.
This is a feature that the developers of Photoshop reversed recently. Older versions of Photoshop required you to hold the Shift key to maintain the aspect ratio.
Now it’s the opposite. Thus, you might see older tutorials telling you to hold the Shift key, but you don’t need to.
Step 2B: Transform Selection
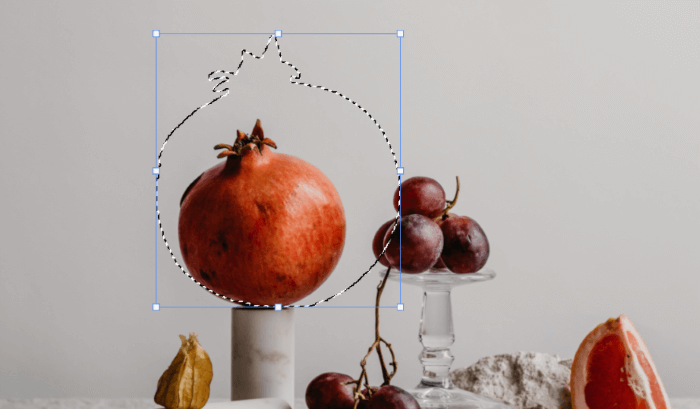
Okay, what if you want to resize the selection itself? Maybe you want to create a cutout of the object or put a shadow on the wall or something else to that effect.
Instead of using the transform tool, right-click on the selection itself. Choose Transform Selection.

What if you don’t see this menu when you right-click? You probably have one of the other tools active. You must have one of the selection tools active for this menu to appear. Choose any selection tool from the toolbar and try again.
Once you click Transform Selection, you’ll get the same blue box with handles around the selection. However, this time when you tug on the handles, the object stays the same, and only the selection itself changes size.
You can also click on the selection and drag it around to place it in a different spot.
Press Enter or Return to accept the changes. Or click on the checkmark in the Options bar.

Now, watch what happens when I press Ctrl + J or Command + J to place the selection on a new layer. Then I use the Paint Bucket Tool to fill it with black.

Intriguing, right? There are some interesting applications for this, depending on what you want to create. Let us know what you come up with in the comments below!

Wondering what other cool stuff you can do in Photoshop? Check out more of our articles, such as how to move a selection on our site!
About Cara Koch