
Resizing is an essential component of compositing images. It’s rare that you can copy an object from one image and drop it into another image and have it be the exact right size. And sometimes you might want to resize an object that’s already in the image.
Hello! I’m Cara and I’m so excited to show you how to resize an object in Photoshop! I use this trick all the time when working on both client and personal projects.
Come along and let me show you how easy it is to resize objects with either the Transform or Move tools.
Quick Note: the tutorial below is based on the Windows version of Adobe Photoshop CC. If you are using the Mac version, it can be slightly different.
Table of Contents
Step 1: Select the Object
First, you need to tell Photoshop what you would like to resize. You can do this in different ways depending on what your object is and where it’s coming from.
If you’re adding a shape to your project, it will automatically be added as an individual shape layer. If you are cutting an object out from another image, you’ll start by making a selection and copying the object onto its own layer in your document.
If you are resizing an object within the same image, you’ll still need to make a selection. Then hit Ctrl + J or Command + J to duplicate the object and place it on its own layer.
Once you get your object isolated on its own layer, you can select that layer and move forward with your changes.
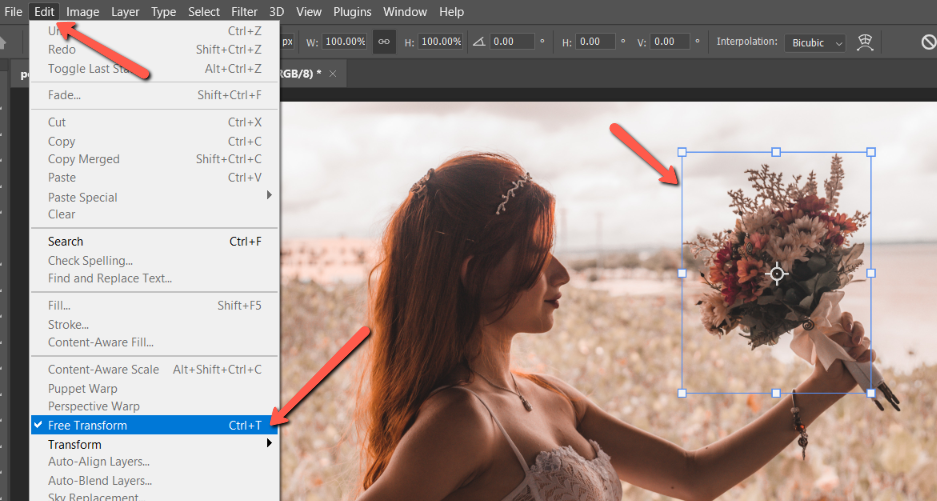
In this image, I selected the bouquet of flowers and have duplicated it to a new layer.

Make sure you highlight the layer you want to resize in the layer’s panel.
Step 2: Open the Transform Tool
Now open the transform tool by pressing Ctrl + T or Command + T on the keyboard. You can also access the tool through the Edit menu in the menu bar. Choose Free Transform.
If you are only resizing and not warping, skewing, or making perspective changes, you can use the Move tool instead. Press the V key on the keyboard to select the Move tool.
You can make the following changes with either the Transform tool or the Move tool active.
Now you’ll have two options for Step 3, you can resize by dragging the bounding box, or inputting the exact measure. So, choose either Step 3A or Step 3B.
Step 3A: Resize by Dragging
A blue bounding box will appear around your selection. To resize, grab any of the little square-shaped handles and drag. The selection will resize proportionately as you drag.

You may have to reposition the object as well. Just click and drag inside the bounding box to reposition the object.

If you want to resize disproportionately, hold down the Shift key while dragging.

Step 3B: Resize by Measurements
If you have specific measurements you’d like to use for your object, clicking and dragging can be tedious. The new dimensions will appear as you’re dragging, but getting them both exactly right at the same time is difficult with a mouse.
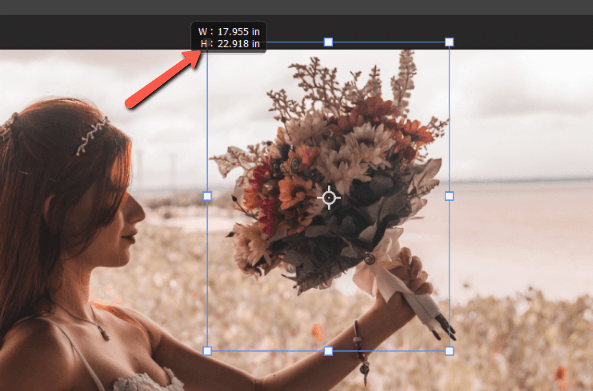
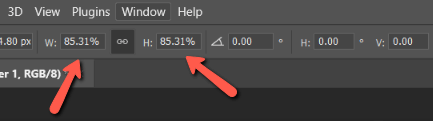
Instead, you can type the exact size you want as a percentage of the original height and width in the boxes up in the Options bar.
Tips for Resizing
Remember that when you scale an image down, Photoshop takes information away. If you scale that image back up again later, Photoshop has to make up information to replace what it took away, resulting in quality loss.
To avoid this problem, it’s a good idea to turn layers into Smart Objects before resizing. This protects the image layer from quality loss. You can scale a smart object down and up as many times as you like with no quality issues.
The Right Size in No Time
Resizing objects in Photoshop is a piece of cake. The hardest part is just figuring out the size you need!
Interested in learning more Photoshop tips? Check out our other tutorials such as how to add an image as a layer in Photoshop.
About Cara Koch