
Everything is about speed on the Internet. Nobody has time to sit around and wait for web pages to load, and they won’t. Thus, website owners are constantly searching for ways to speed up their websites so people are more inclined to spend time on their websites.
Hey there! I’m Cara and I’m here to tell you that Google, once again, has stepped in with a solution. They came up with WebP files. These image files are significantly smaller than PNGs but haven’t lost any visible quality.
Translation: the website loads faster yet still looks amazing!
What does this have to do with Photoshop? Well, you’ll want to be able to access these files in Photoshop or turn your images into WebP files so you can reap the benefits of your own website.
So let’s look at how to open WebP files in Photoshop.
Note: I use the Windows version of Photoshop. If you are using a Mac, the workspace will look slightly different from the screenshots displayed here.
Table of Contents
Can You Open WebP Files in Photoshop?
Previously, you would have had to download and install a plugin to open WebP files in Photoshop. But with new updates, you can now access them natively from Photoshop 23.2 onward.
My version of Photoshop is connected to Creative Cloud and is supposed to update automatically. Currently, I have Photoshop 23.5.3. You can check your version of Photoshop by going to Help in the Menu bar and choosing About Photoshop.
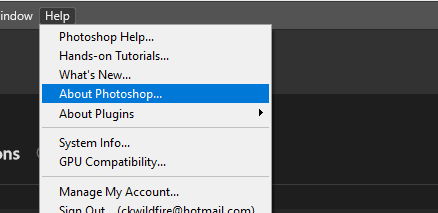
A window will open with information about Photoshop and the version is listed at the top.

How to Open WebP Files in Photoshop
Opening a WebP file is a piece of cake. Since the update allows Photoshop to open the files natively, there is nothing special that you have to do.
Simply open the file as you would any other file that Photoshop supports.
Go to File and choose Open.
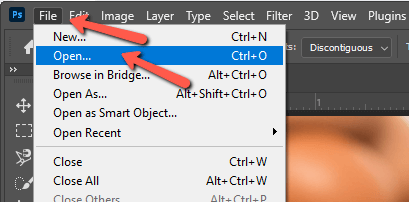
Navigate to your WebP file, click on it, and choose Open.

How to Save WebP Files in Photoshop
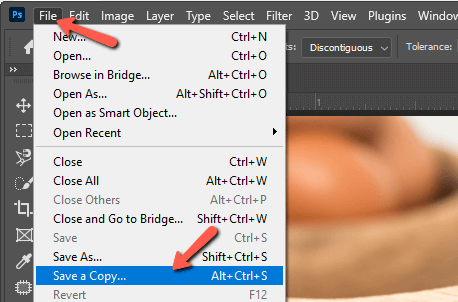
Saving an image as a WebP file in Photoshop is a simple task. With your image open in Photoshop go to File and choose Save a Copy.
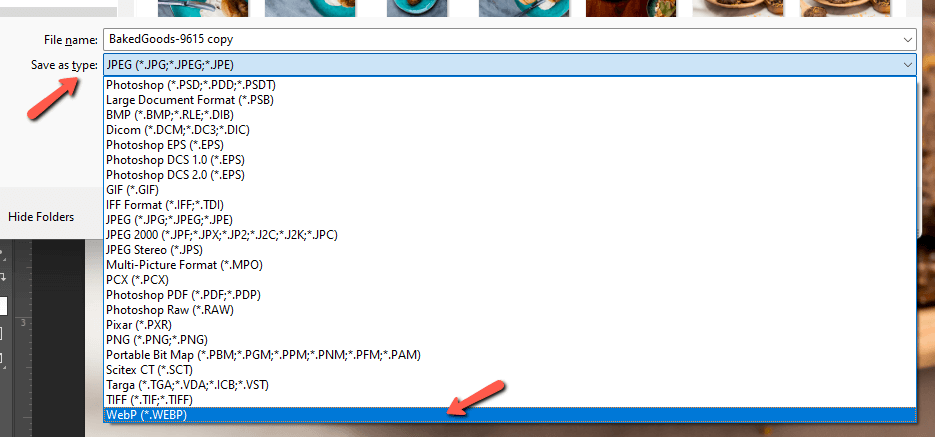
Click in the Save as Type box to open the available options. Scroll down to find and choose WebP from the list.
When you click Save, a little window with a few options appears. This allows you to control how the data is managed and how small the file ultimately ends up being.
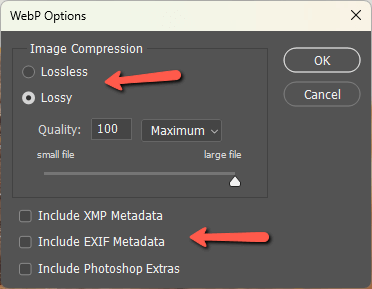
Lossless image compression keeps all the image data but compresses it to make a smaller file. Lossy compression lets go of a certain amount of non-essential data in addition to compressing to make an even smaller version.
When you choose the Lossy version, you can also choose the Quality on a scale from 1 – 100 or choose an option from the dropdown menu. You get five ranges including Minimum, Low, Medium, High, and Maximum.
At the bottom, you can choose whether to include XMP metadata (editing information), EXIF metadata (location, date, and other information), and Photoshop Extras (guides, grid paths, and other tools in Photoshop).
Press OK once you’ve configured these settings to your liking. Overall, the final image will generally be 25 – 34% smaller than the comparable JPEG depending on the settings you choose.
Curious about working with other file types in Photoshop? Be sure to check out our tutorials on PNGs, PDFs, and vector files!
About Cara Koch