What if you wanted to create a beautiful wall print of an image you’ve created, but it’s too small? In other words, it looks fantastic on your screen, but when you blow it up big enough for the print you want to make, it loses quality and is all pixelated.
Hey there, I’m Cara and if this is a frustration for you, I’m about to amaze you! Yep, the magic of Photoshop is here once again to save the day. With the help of its powerful artificial intelligence (AI) and machine learning (ML) features, you can increase the resolution of your images.
Let’s look at how it works!
Note: I use the Windows version of Photoshop. If you are using a Mac, the workspace will look slightly different from the screenshots displayed here.
Table of Contents
Why Do Images Lose Quality When They Are Enlarged?
Without getting too technical, let’s look at how images are created. You may already know that images are actually made up of millions of tiny colored dots called pixels.
Image resolution is defined as how many pixels per inch (PPI) are present in the image. As you might imagine, an image with 300 PPI will be crisper and clearer than one with 72 PPI.
However, where you are displaying the image also matters. A digital image at 72 PPI looks fine, but try to print that same image and it won’t come out with the same crispness. It is generally recommended to print images at a minimum of 300 PPI for best results.
Photoshop’s powerful analysis features can determine what color pixels need to be added to increase the resolution of the image (that is, add more pixels). You can increase only the resolution or increase both the physical size and resolution of an image at the same time.
Let’s look at how to do this.
Increase Image Resolution
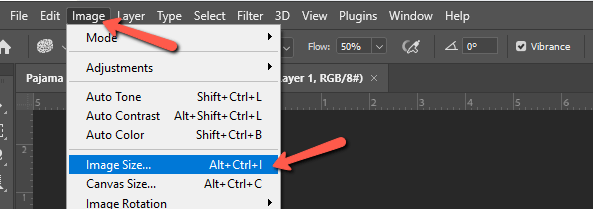
First, you’ll want to look at your photo’s size and resolution details. Go to Image in the menu bar and choose Image Size or press Alt + Ctrl + I or Option + Command + I on the keyboard.
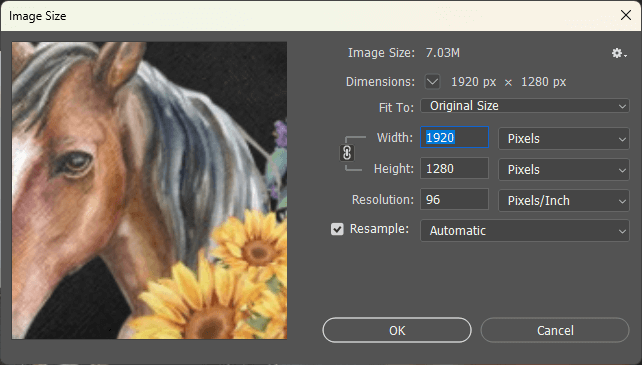
Looking at this, we can see that my image is 1920 px x 1280 pixels with a resolution of 96 pixels per inch.
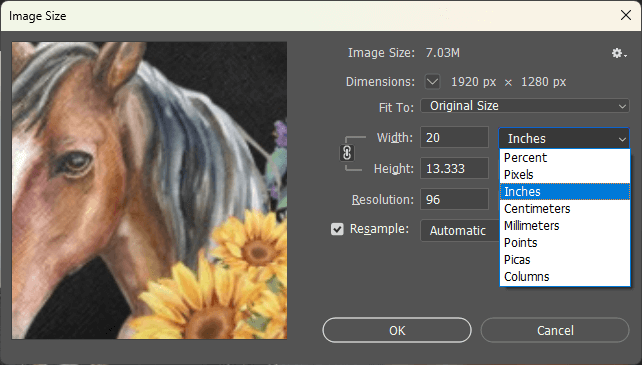
If you want to see what that translates to in physical size, you can click the dropdown menu and change it to inches (or centimeters).
My image will print up to 20 in x 13 in, but keep in mind that the minimum recommended resolution for printing high-quality images is 300. At only 96, my printed image will have disappointing quality.
So we need to upsample. This is the name for adding more pixels to an image and thus increasing its print quality.
To do this, type 300 in the Resolution box. Make sure the Resample box is checked. This is the feature that Photoshop uses to analyze and add pixels to the image. You can adjust how Photoshop does this by choosing an interpolation method in the dropdown box.
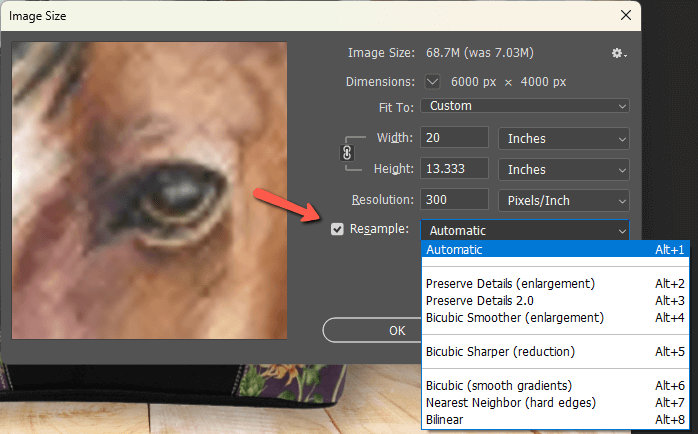
For the most part, you can stick to Automatic and let Photoshop choose the method it uses based on the type of image. However, you can prioritize details with the Preserve Details option or Bicubic Smoother is a good option for smooth results when enlarging images.
You may wish to try a couple of different interpolation methods to see which works best for your image.
You’ll get a preview in the box to the left of how the final image will turn out. By default, the preview shows at 100% but you can adjust this as needed to inspect your image.
Note: if you’re looking at the Width and Height in inches, it won’t change. However, if you’re looking at it in pixels, the values will change because you’re adding more pixels. The physical size of the image doesn’t change using this method.
When happy with the changes, press OK and let Photoshop work its magic!
How to Increase Image Size in Photoshop
What if you need the overall image to be bigger as well? Simply change the values in the height and width boxes accordingly.
For this example, I’ve set the resolution to 300 and bumped up the Width to 25. Since Height and Width are linked, the height changes proportionately. (If you don’t want this proportionate change, you can unlink them by clicking that little link icon).
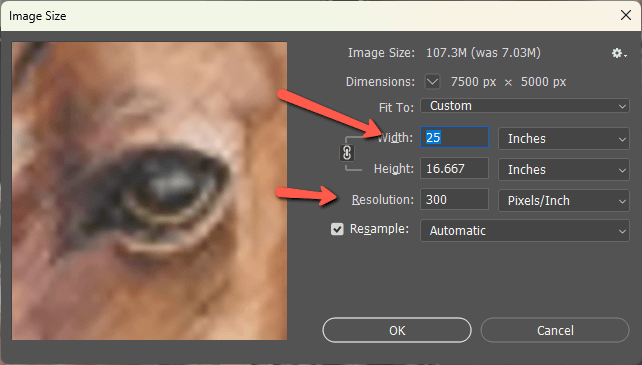
The final image will be both physically bigger as well as have a higher resolution.
Increase Resolution Without Adding Pixels
What if you want a higher-resolution image, but don’t want Photoshop to add any extra pixels? You’ll have to be happy with a smaller physical size, but you can get Photoshop to make the adjustments automatically.
Simply deselect the Resample box. Width, Height, and Resolution will all become linked. Now any changes you make will proportionately affect the other values.
Here I changed the resolution to 300 and the width and height become significantly smaller to accommodate. By doing this, we don’t lose any image quality at all, though the image must be printed smaller. If that works for your purposes, this will yield the crispest results.

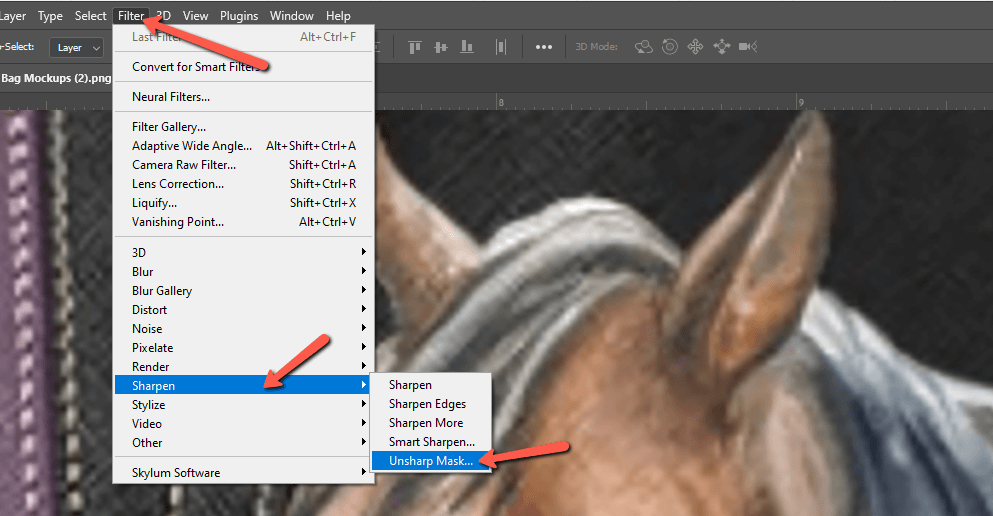
Add an Unsharp Mask
Now, though the AI and ML features in Photoshop are quite powerful, your image may still feel a little soft after increasing the size and resolution. A good way to counteract this is to add a touch of sharpening to the final image.
Go to Filter in the menu bar, hover over Sharpen, and choose Unsharp Mask.
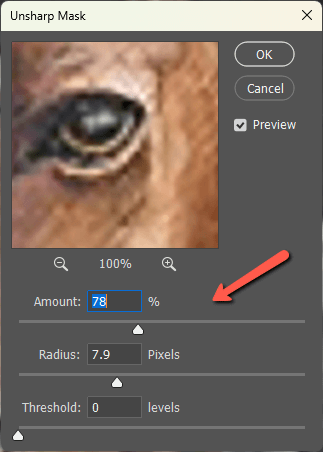
Adjust the sliders until you get a result you like.
And there you have it! Now your image has a high enough resolution to print or enlarge without pixelation or a low-quality look.
You’re welcome!
About Cara Koch