
Unless you’re passionately dedicated to pixel art (perhaps due to a misspent youth playing too many 8-bit video game consoles) feathering is one of the most useful features in a modern image editor like Photoshop.
Feathering allows you to create softened edges when working with a range of Photoshop tools from selections to any of the brush-based tools. Without it, you’d be trapped in a hard-edged world of images without any anti-aliasing or soft edges (looking right at you, original NES).
Table of Contents
Feathering Your Selections
The simplest way to feather a selection is to adjust the Feather setting in the tool options bar that runs across the top of the main document window.
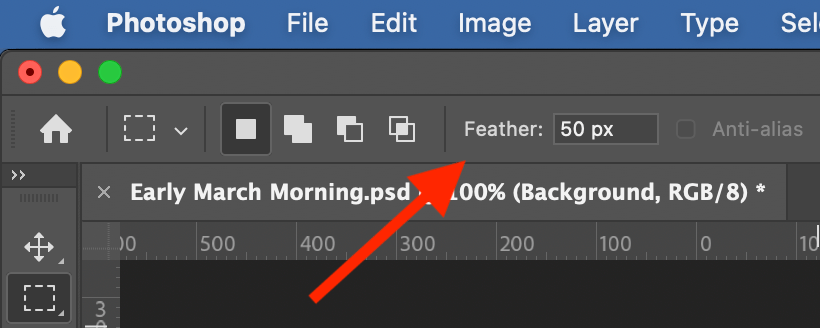
When you have any of Photoshop’s selection tools active, you’ll also have the option to enter a Feather value in pixels. This setting will only take effect on future selections, and it cannot be used to modify an existing selection, so take the time to configure it first if you need it!
Feathering an Existing Selection
If you’ve already made a complex selection and realized after the fact that you forgot to enable feathering from the start, don’t worry! You don’t have to start all over again.
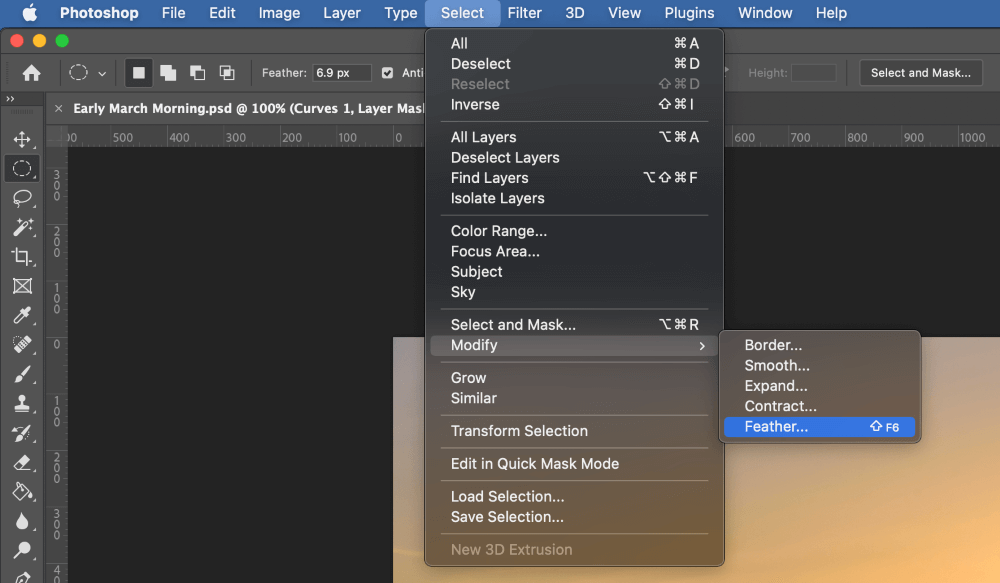
Open the Select menu, choose the Modify submenu, and click Feather. Photoshop will open a simple dialog box asking you to enter the amount of feathering you want to apply in pixels.
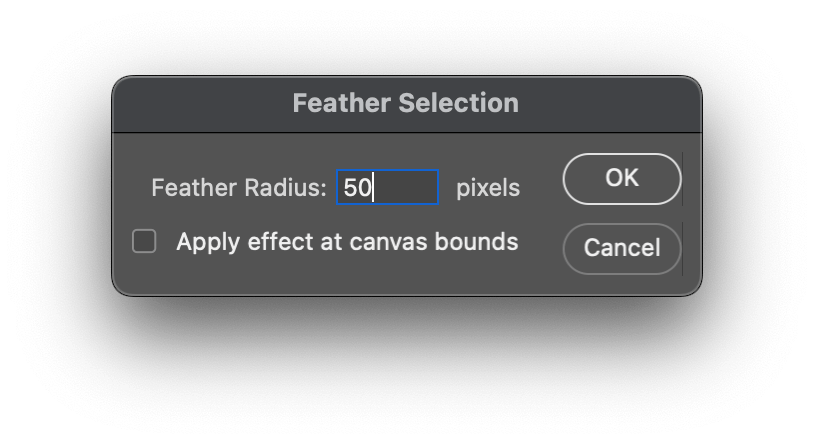
The Apply effect at canvas bounds setting controls whether or not your selection modification should stop at the canvas edges or not.
Unfortunately, there is no preview option, so you may have to apply feathering and view the results before deciding if you’ve used the correct radius setting or not. However, I’ve got a handy tip in the next section for getting a quick preview of your feathering effect.
Feathered Or Not?
Somewhat frustratingly, Photoshop has no consistent visual way of showing that an active selection is feathered or not until you actually apply an effect to it.
This has always seemed like a flaw in the system to me, but it is possible to do a quick check on the state of your selection by temporarily switching to Quick Mask mode.
Quick Mask uses a 50% red overlay to show the areas of your image that are NOT selected, but it does allow you to gauge the location and softness of your feathering effect.

You can launch Quick Mask mode immediately by pressing the keyboard shortcut Q, and then disable it again by pressing Q.
Feathering Your Brushes
If you want to soften your brush tool’s edges, you might start to tear out your hair trying to find the feathering setting. Stop yourself right now, because there isn’t one!
When it comes to brushes, Photoshop uses the term Hardness instead of feathering – although it’s not immediately clear why they’re inconsistent about it.
You can adjust your brush hardness using the tool options bar that runs across the top of the main document window. Find the current brush shape preview, and click the small arrow beside it to expand the brush properties panel (shown below).
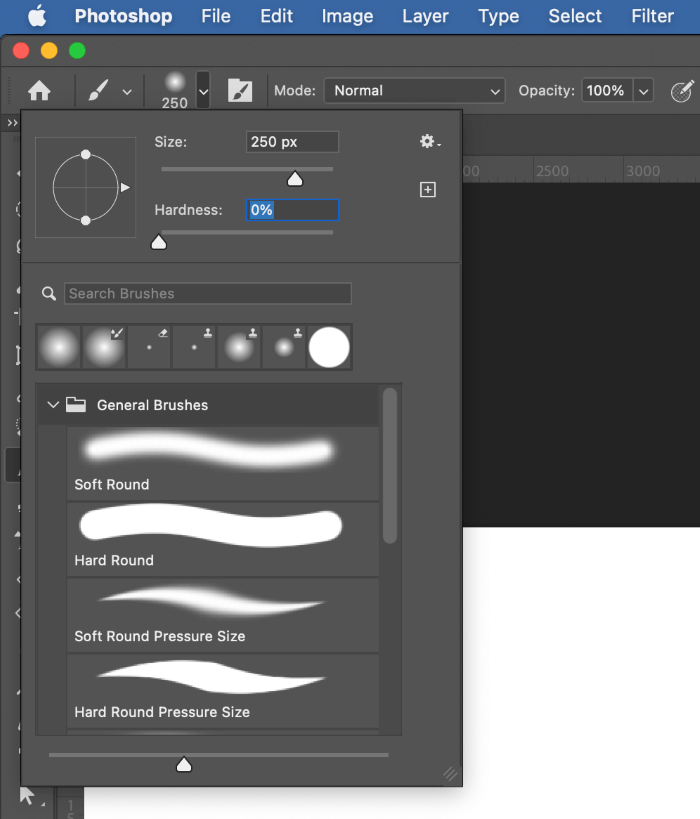
You can adjust the hardness setting from 0% to 100%. A setting of 100% will give you a brush with completely sharp crisp edges, while a setting of 0% will give you a completely soft brush with no visible edges at all.
If you want to switch your brush hardness quickly without breaking the flow of your current task, you can also use the keyboard shortcut Shift + [ to decrease brush hardness and use Shift + ] to increase brush hardness.
Using this shortcut makes the adjustment process much simpler, so be sure to practice it!
To get total control over your brush, you might want to open the Brush Settings panel for a deep dive into all the possible options. Open the panel using the keyboard shortcut F5, or open the Window menu and select Brush Settings.
Choosing the correct brush feathering can be the difference between a perfect Clone Stamp edit and one that every viewer can spot instantly. It will take some practice to get used to it, but it’s a necessary step on the way to becoming a better image editor.
A Final Word
That’s just about everything there is to know about feathering edges in Photoshop! Whether you’re feathering a selection or a brush-based tool, you’ll be able to create much smoother edges and blends once you are comfortable working with these settings.
Happy feathering!
About Thomas Boldt