
Do you work with a lot of images? Doing anything one by one is a real-time suck, but often necessary in Photoshop due to the nature of the edits. However, it’s a big win anytime you can speed things up by processing multiple photos at once.
Hey there, I’m Cara! Like most professional photographers, I love using Lightroom to edit images. The batch editing features make it easy to quickly edit dozens of photos at once.
Photoshop does not offer this ease of use. However, the advanced edits I make to my images in this program don’t lend themselves well to being copied to multiple images anyway.
But when I’m all done with a batch of images, it is handy to export them all at once instead of one by one. So let’s take a look at how to do that.
Note: I use the Windows version of Photoshop. If you are using a Mac, the workspace will look slightly different from the screenshots displayed here.
Table of Contents
Step 1: Open the Image Processor
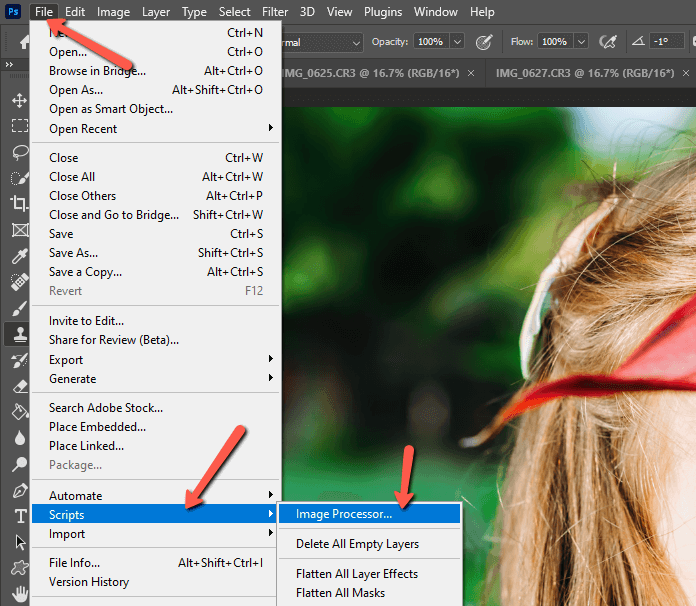
With several images open in Photoshop, go to File, hover over Scripts, and choose Image Processor.
Step 2: Set the Export Options
In the window that opens, you have several export options. Check the Use Open Image button to export the images you currently have open in Photoshop.
In the next box, you can choose to Save in the Same Location, which is where the images originally came from. Or you can click the radial button underneath and choose a folder where you would like to save them from the dropdown menu.
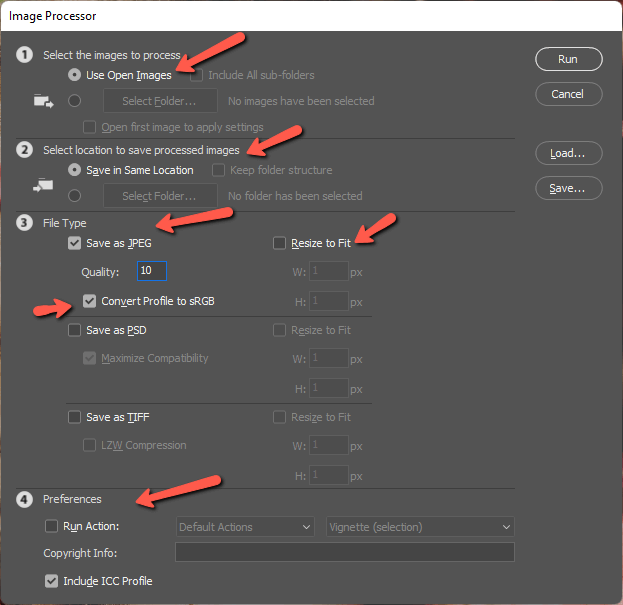
In the next section, you choose the file type – either JPEG, PSD, or TIFF. Check the Resize to Fit box if you want to resize the images upon export.
If you’re saving them as JPEGs, as I am in this example, you can choose the quality level by typing a number in the box. I’ve put 10 to retain the highest quality in my images. You should also check the Convert Profile to sRGB box to help keep the colors the same across various devices.
Finally, at the bottom of the Preferences section, you can run an action or include copyright info. For example, you may want to run an action that adds a watermark to all the images.
Step 3: Export the Images
Once you have this box set up correctly, press Run. Depending on how many images you’re exporting (and the actions you might be running) Photoshop may take a few seconds or longer to think.
Once the program has finished processing, you should find the images in the location you chose to save them.
Occasionally, you may run into errors when trying to save images in the same location. If that happens, try saving them to a different folder. You can always reorganize them later using your computer’s file management system.
Easy peasy! Now you don’t have to waste time painstakingly exporting images one by one from Photoshop.
Curious about how to batch edit images in Photoshop? It isn’t quite as easy as batch editing in Lightroom, but there are ways to speed things up – and that is always a handy trick!
About Cara Koch