
What are the building blocks of a photograph?
Color.
Every photograph is made up of millions of tiny colored dots. Yes, even black-and-white images. They’re just varying shades of gray. Channels are a method in Photoshop of accessing only the dots that contain a certain type of color information.
Thus, channels are a powerful tool in the hands of someone who understands how they work. Read on to learn how to access this incredible information and take your Photoshop skills to a whole new level!
Table of Contents
Where to Find Channels in Photoshop?
Channels are pretty easy to find. They show up in almost all of the preset workspace configurations in Photoshop. Most of you will be using either the Essentials or Photography options.
To see or change which workspace configuration you’re using, go to Window and hover over Workspace.

The workspace you’re using will have a little checkmark next to it. To switch workspaces, simply click on one of the other options.
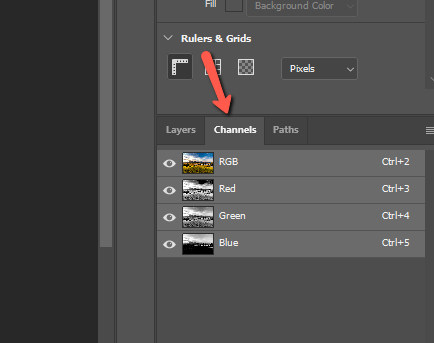
Once in the correct workspace, you’ll notice the Layers panel down in the bottom right corner. If you’ve done any work in Photoshop, you’ve likely used this panel extensively.

But, have you ever noticed the Channels tab right next to the Layers one? Click the tab to open and view the channels that Photoshop has automatically created for your image.
How Does Photoshop Create Channels?
The channels that automatically appear are based on the color mode you are using. Currently, my image is set to the RGB color mode. Thus, Photoshop has created individual Red, Green, and Blue channels plus an RGB composite channel.
However, if you change the color mode of your image, you’ll see a different result here.
Go to Image, hover over Mode, and let’s choose Grayscale.
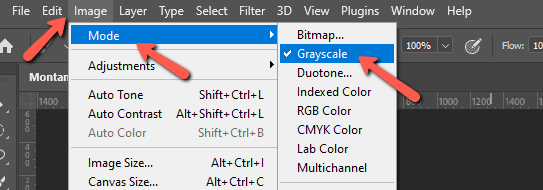
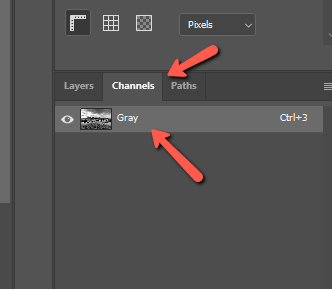
Your image will turn to black and white and only one channel will appear. Only one color channel is needed because black and white images are simply varying shades of gray.
Changing to Grayscale is a destructive change that discards the image’s color information. Undo this change to get the color back and let’s see what happens when we change to CMYK.

Here we see there are Cyan, Magenta, Yellow, and Black channels.
What is the Purpose of Channels?
Each channel highlights a particular set of color information in the image. Let’s switch back to RGB and look at this a bit closer.
Here is the original image with no channels selected. (By the way, isn’t this scenery stunning? I took this image while visiting my folks in Montana last month).
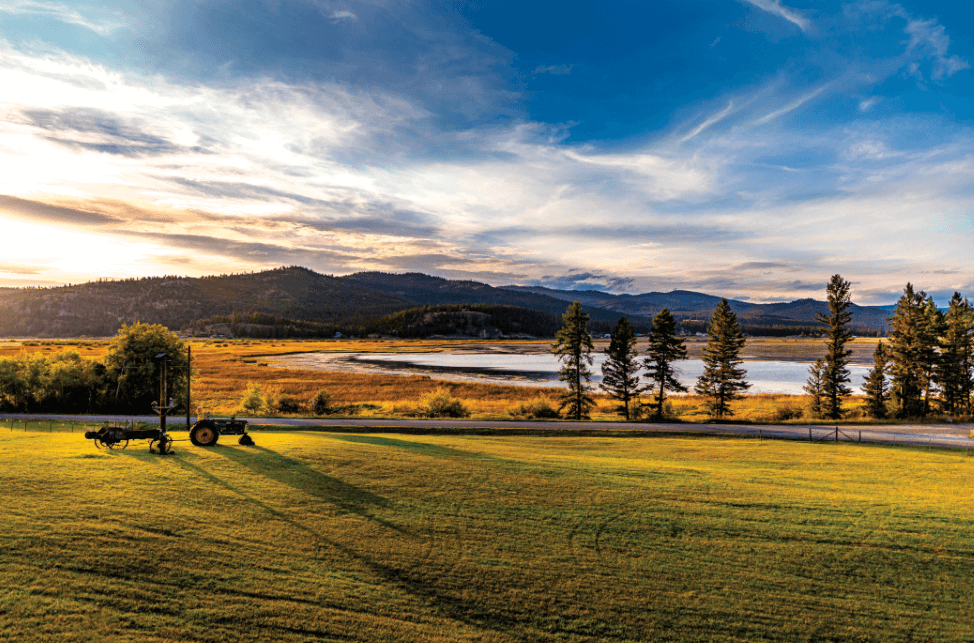
Notice there is a lot of blue in the sky, green in the grass, and oranges and yellows in the middle.
Now let’s see what happens when we select the Blue channel. Keep in mind that when working with channels, white represents the selected area, and black is unselected. The grays in between are partially selected.

The sky is the bluest part of the image so it is the lightest or most selected part. But if we switch to the green channel, the opposite occurs.

Finally, let’s take a look at the red channel. The area in the middle with the oranges and yellows is the brightest part of this image.

Of course, these are just the automatically created color information channels. You can also create alpha channels that allow you to create and store masks. These are useful for protecting or manipulating certain parts of the image.
Another type of channel is called the spot channel and these are used for printing with spot color inks.
An image can have up to 56 channels.
What Can You Use Channels for in Photoshop?
Understanding what channels are is only half the battle. To put this information to use, you have to understand what it can be used for. Let’s take a look at some of the most common ways editors will use channels.
Making Complicated Selections
Have you ever tried to cut out a furry animal or a person with curly hair from a busy background?
If you were using conventional selection tools like the Quick Selection or Magic Wand tools, you may have gotten okay results. However, it’s unlikely that the fur was cut out well and there was probably a fringe with the background color.
Channels allow you to hone in on the specific color you want and make complicated selections like these with relative ease. It’s just a matter of choosing the channel with the most contrast.
Then you brighten the lighter areas and darken the darker areas until you have a well-defined mask.
There are several methods of doing this. Usually, you’ll start by making a copy of the channel and pushing the colors to extremes to create as much contrast as possible. Then you can finetune with the dodge tool, burn tool, and other techniques.
Store Selections
Has this ever happened to you? I know it’s happened to me.
After spending several minutes painstakingly creating a detailed selection, I realized I needed to do something else first. If I do that step first, my selection is gone and I can’t use the undo command to get it back.
Instead of redoing all of it, I can simply save my selection and come back to it later.
This is a handy tip and I’m sure you’re dying to know how to do it. Go to Select and choose Save Selection. Name your selection and it will be saved as a new channel.

Then you can deselect, do the missing step, and reselect your selection from the Channels panel without having to do it all over again.
That’s pretty cool!
Manipulate or Protect Certain Areas
Alpha channels can be used to create and store masks as well. This allows you to specifically target certain parts of an image for editing, even when making global changes.
The opposite is true as well. You can protect certain parts so they are not affected by your changes.
The Power of Channels in Photoshop
What do you think?
Maybe you’ve run across the Channels tab before, but had no idea why you were seeing different grayscale images of your image. Or maybe you’d never even heard of channels.
They aren’t as complicated to understand as you might think at first. Once you understand them, the doors are opened to possibilities in Photoshop you might not have considered before!
Interested to learn more advanced Photoshop techniques? Check out how to select pixels here!
About Cara Koch