Making selections is one of the most fundamental elements of image editing in Photoshop. Selections define specific areas of your image for editing, allowing for complex and detailed adjustments without having to apply them to the entire image as a whole.
Because selections are so essential to image editing, Photoshop has a huge number of different selection tools for almost any occasion. It can be quite bewildering to learn all the different methods at the beginning, but using the right tool for the job can make your work much easier!
Since there are so many different ways to select pixels in Photoshop, I’ll start out with the simplest selection options and work toward the more complex and specialized selection tools.
I won’t go into too much detail for each tool or we’ll never get through this post, but this should give you a good overview of how to select pixels in Photoshop.
Table of Contents
The Basics of Selecting Pixels
Photoshop uses selection marquees to indicate active selections in your document. Sometimes known as “marching ants”, these selection marquees are displayed as animated dashed lines that surround your selection area.

An example of a selection marquee.
While it’s not technically part of the selection process, it’s helpful to know that you can remove any selection using the keyboard shortcut Command + D (use Ctrl + D if you’re on a PC) or opening the Select menu and clicking Deselect.
Last but not least, it’s important to remember that selections are restricted to the layer that is currently selected in the Layers panel!
Making Manual Selections
To select all the pixels in the active layer at once, the fastest way is with the Select All command. On a Mac, use the keyboard shortcut Command + A. On a PC, use the keyboard shortcut Ctrl + A.
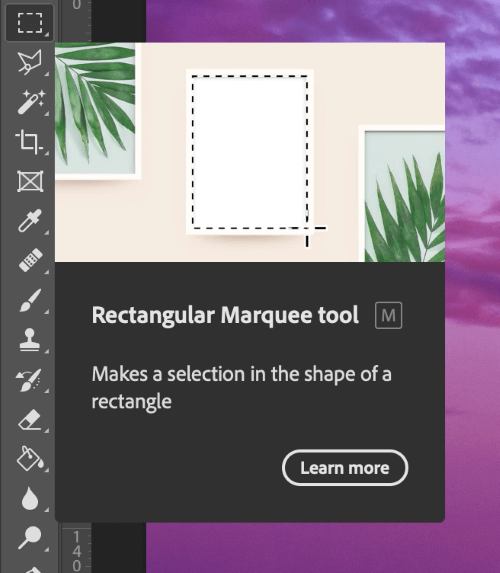
The Rectangular Marquee Tool and Elliptical Marquee Tool create basic shape selections, but they don’t provide a lot of flexibility. As you might guess from the name, you can only create square/rectangular and elliptical/circular pixel selections, respectively.

You can even customize the Rectangular Marquee tool using the Options panel above the main document window to select an area 1 pixel by 1 pixel, allowing you to select individual pixels in Photoshop.
To get a bit more specific with manual selections, you can use the Lasso tool for creating freeform manual selections and the Polygonal Lasso for creating polygonal selections.

The Magnetic Lasso gives you a bit of automatic assistance to follow edges within your image, but I find it to be more trouble than it’s worth.
If you want Photoshop to give you some additional assistance in creating your selection, you’re probably better off using one of the semi-automatic tools listed below.
To actually use one of these manual tools, simply select the appropriate tool from the toolbox and then click and drag in the main document window to begin creating a selection marquee.
Creating Selections With Quick Mask
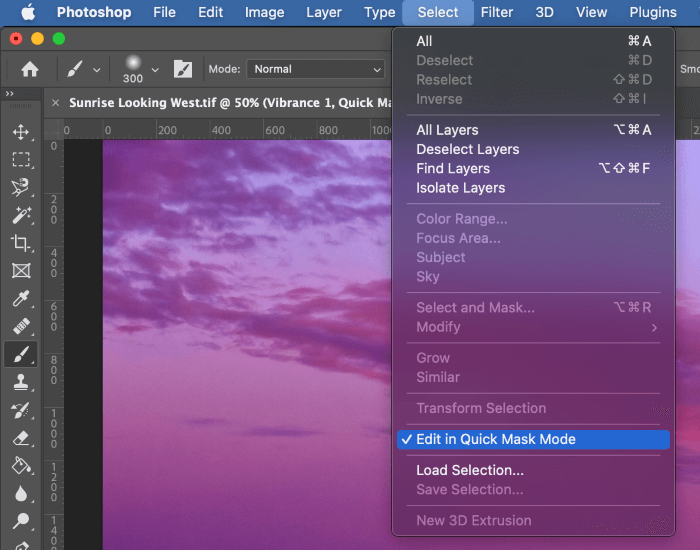
Another method of manually creating a basic mask is using Quick Mask mode. Despite the name, Quick Mask also allows you to create quick selections using brush tools.
To activate it, press the keyboard shortcut Q or open the Select menu and choose Edit in Quick Mask Mode.

Switch to the brush tool using the keyboard shortcut B, and then draw anywhere on your image. Photoshop will highlight the areas that will form the selection in a transparent red overlay, and you can edit and modify the selected areas until you’re satisfied.
Then simply press Q again to exit Quick Mask mode, or use the Select menu again. The pixels that you highlighted in Quick Mask mode become your active selection.
Semi-Automatic Selections
Photoshop also includes a few useful semi-automatic selection tools, which are grouped together in the same place in the toolbox. You can see them all by right-clicking the current icon or you can cycle through them by repeatedly pressing the keyboard shortcut W.

You’re probably already familiar with the Magic Wand tool, which automatically selects connected pixels that are similar in color to the pixel you first click.
You can control which additional pixels will be selected by the Magic Wand by adjusting the Threshold setting in the Options panel.
In addition to this useful tool, Photoshop also includes the Quick Selection Tool, which uses a familiar brush-based system combined with automatic object selection to make (you guessed it!) quick selections.
I find this tool a bit too eager for use with most photographs, but for high-key images with sharp tonal divisions, it can be useful.
Last but not least is Photoshop’s almost entirely automatic Object Selection Tool. With this tool, you simply need to draw a rectangular marquee around the object you want to select, and Photoshop will take care of the rest.
Using the Select And Mask Workspace
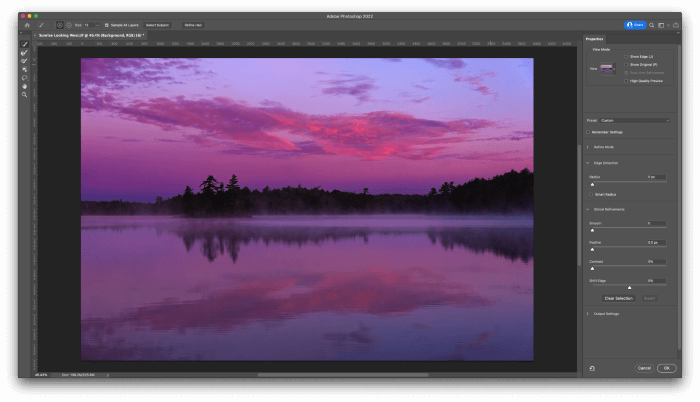
Adobe recognized that creating selections is one of the most common tasks performed by image editors, and created the Select and Mask tool as the primary catch-all method for creating selections in Photoshop. It’s still fairly new and it’s not always the best choice, but it can streamline the process of making complex semi-automatic selections.
The Select and Mask tool really deserves its own tutorial to properly explore all the different options available, so I’ll just give a quick overview here to whet your appetite. If you want a more in-depth tutorial, be sure to let me know in the comments!
Launch the Select and Mask workspace by opening the Select menu and clicking Select and Mask. You will also find a shortcut button in the Options panel at the top of the document window when you have one of the manual or semi-automatic selection tools active.

Essentially, Select and Mask brings together a range of popular brush and selection tools and gives you additional control over how they’re applied. If you want the ultimate balance between control and automatic assistance, Select and Mask should be your go-to option.
Once you’re finished creating your selection in the Select and Mask workspace, you can output the result as a normal selection, a layer mask, a separate pixel layer, or even use them to create a completely new document.
Creating Specialized Selections
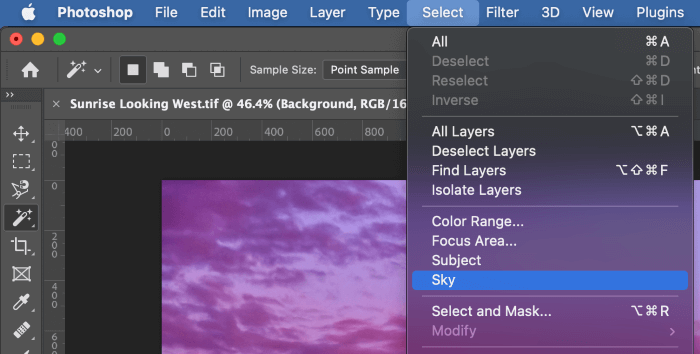
Recent versions of Photoshop have begun including some impressive new automatic selection features with very specific usages. Located in the Select menu, you’ll find four very specific options: Color Range, Focal Area, Subject, and Sky.
As you might guess from the names, each tool is intended for a very specific use. Powered by Adobe’s Sensei machine-learning system, each one uses an algorithm that has been refined on huge numbers of images to automate the selection process.

My personal favorite of the bunch is the Select Sky option, which makes landscape photo editing a lot simpler. In my experience, it works quite well, although it’s not quite flawless yet around more complex subjects such as distant tree lines.
If you’re a portrait or product photographer, you’ll love the Select Subject option which can make extremely complex selections in a single click.
Like all these automatic tools, the selections are not always perfect, but they can save a huge amount of time for masking famously difficult high-detail objects like hair and fur.
A Final Word
As I said at the beginning, there are far too many ways to select pixels in Photoshop to cover them all in a single post, but this should give you a good introduction to the various options that are available to you.
Selections are one of those tasks that are easy to do poorly and tough to do well, but they’re also essential to improving your skills as an image editor. The better you are at selections, the more seamless and impressive your edits will be – at least until the AI algorithms outperform us all!
Happy selecting!
About Thomas Boldt