Color modes can be a confusing part of image editing, especially for new editors who are just starting to learn the technical side of things. Even many experienced editors can spend the vast majority of their time working in the standard RGB color mode used for on-screen display.
Changing the color mode of an image in Photoshop is quite easy – it takes far more time to learn the differences between each image mode (more on that later).
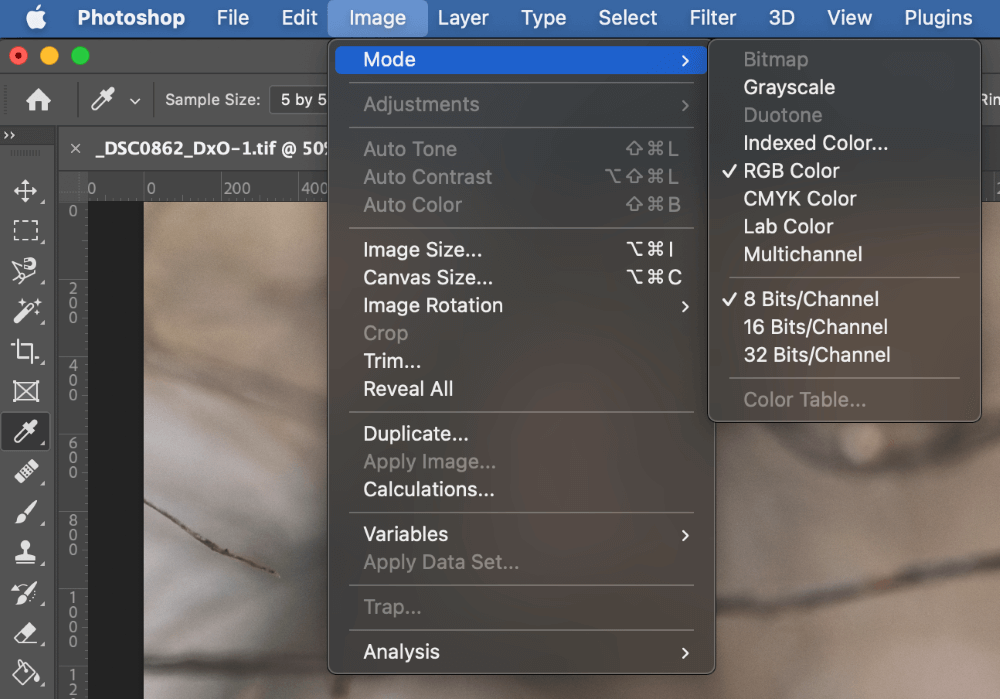
Follow the steps below to change color profiles/modes in Photoshop.
Open the Image menu, select the Mode submenu, and then click the color mode that you need. Photoshop will convert the image from the current color mode to your newly selected color mode.
To use certain color modes such as Bitmap and Duotone, you have to change your color mode to Grayscale first in order to discard all the color information, and then you will be able to switch to your desired mode.
That’s all there is to it! But if you want to learn more about the different color profiles available and when each one is useful, read on. I’ll try not to get so technical that it all becomes nonsense jargon, but color modes are a very technical subject, so please forgive me in advance.
Table of Contents
3 Common Color Modes/Profiles
I’m not a technical color specialist, but I’m familiar with the most common options that you’ll need to use in your daily editing, so let’s take a closer look at the three most common color modes used in Photoshop.
RGB Mode
This is the most commonly-used color mode in Photoshop by far. Not only is it the default color mode used to create new documents, but RGB mode is also used for all on-screen graphics, whether they’re digital photographs, website graphics, or UI elements for your newest app.
RGB stands for Red Green Blue, and each RGB image is made up of three color channels: a Red channel, a Green channel, and a Blue channel.
Each channel is actually a grayscale image, but pure white pixels in the Red channel are treated as pure red, pure green in the Green channel, and pure blue in the Blue channel.
The three channels are combined to create any color your monitor is capable of displaying (and maybe even a few that it can’t!).
CMYK Mode
CMYK mode is the other commonly-used color mode in Photoshop since it is used by commercial printers for all print documents. If you’re converting a photo or graphic for printing, using the CMYK color mode (along with a properly calibrated monitor) will ensure that your printed results look just as good as they do on-screen.
A different color mode for printed graphics is necessary due to the differences in the way colors are created.
In the RGB model used for on-screen graphics, your device is actually emitting different colors of light in combination to create the colors you see, known as an additive color model.
But when you’re looking at a piece of photo paper, there’s only reflected light from your ambient light source, which requires that you use a subtractive color model like CMYK to accurately represent colors.
I’m much more comfortable working with colors in RGB mode, but that’s because I don’t do a lot of print-based work. While I don’t think ‘print is dying’ as everyone used to say, it’s definitely taken a backseat when compared to all the exciting things happening in the digital world.
Grayscale Mode
Grayscale mode does more or less what it says on the tin: images are stored without any color information whatsoever. Changing your color mode to Grayscale will discard all the color information from your existing image, so use it carefully!
It’s often necessary to switch your image to Grayscale mode first before switching to one of the more specialized color modes described below because they handle colors very differently than the more standard RGB and CMYK modes.
Specialized Color Modes
In addition to the common color modes above, there are several other color modes that are highly specialized and only suited to very specific situations. Most are used for printing, but there are a couple of technical modes that are commonly used for color conversions.
I won’t go into too much detail, because if you need to use these modes, you probably already know how they work, but if you’re really curious you can learn more about each color mode from Adobe.
Bitmap Mode
Bitmap mode is the most basic color mode that Photoshop can handle. It discards all color and tone information and simply uses pure black and pure white pixels to create the image.
Duotone Mode
Imagine a grayscale image, but instead of using gray tones, the image uses a different color instead: that’s a duotone.
Duotone mode is typically used for printing with specific spot colors which are pre-selected and pre-mixed instead of being created by combining CMYK inks the way printers usually do.
Duotone mode actually supports monotones, duotones, tritones, and quadtones, but you’ll have to switch your color mode to Grayscale first before you can use any of these options.
Indexed Color Mode
As you might partially guess from the name, the Indexed Color mode is used for images that contain a limited set of up to 256 colors that are stored in an index.
The main advantage of this color mode is that it can reduce file size, but it also limits your editing abilities and the overall image quality due to the restricted colors.
Lab Mode
Lab mode, more properly known as L*a*b mode or even CIE L*a*b, is based on human perception of color differences. This is starting to get more technical than I’m familiar with, so I’ll let Adobe explain it better:
“Because Lab describes how a color looks rather than how much of a particular colorant is needed for a device (such as a monitor, desktop printer, or digital camera) to produce colors, Lab is considered to be a device-independent color model. Color management systems use Lab as a color reference to predictably transform a color from one color space to another color space.” (source)
It’s highly unlikely that you’ll need to use this mode unless you’re doing specialized color conversion work, in which case, you’ll probably already know how to use it!
Multichannel Mode
I’ve never used this mode, but from what I understand, it acts as a sort of technical catch-all mode that can be used to switch between color modes while still keeping the original channel data intact. According to Adobe, this is commonly used in specialized printing processing, but they don’t offer any additional explanation about when, why, or what types of printing they mean.
A Final Word
Phew – I think we managed to get through that without getting overly technical! If you’re a casual Photoshop user, the odds are good that you’ll never use more than the RGB and CMYK modes, so don’t worry too much about understanding more technical modes like Lab mode and Multichannel mode.
Happy editing!
About Thomas Boldt
Muthees
I am Photoshop 5.5 Used my Family Photo Editing and review app is very super