In Adobe Photoshop, there is a 3D effect modification tool called the vanishing point. By altering the image’s angle and planes on several 3D axes, it is utilized to generate a three-dimensional perspective.
You can resize and rotate the components of your image to match the viewpoint with the Vanishing Point tool.
While editing inside the new plane, it gives your photographs a three-dimensional effect. This created plane serves as a workspace for additional editing.
The linear perspective is optimized by this tool at the point where the regressing parallel line becomes less obvious. It allows you to create two-dimensional illustrations with a three-dimensional perspective.
My name is Aly, I have been using Adobe Photoshop for over five years now, and I have even been Photoshop certified. In this article, I will be showing you how to use Photoshop’s vanishing point.
Key Takeaways
- The main function of the vanishing point is to transform 3D plane workstations into editing and illustrative tools when one is positioned on a chosen parameter.
- You must first choose or create an illustration of a picture that will serve as a subject for the creation of angled planes.
How to Use Vanishing Point in Photoshop
Photoshop requires that you choose a target topic with or without edges in order to use the vanishing point. Your image needs to have a perspective plane.
In my image example, I will be using a blank wall that’s cornered and show how I can add a picture to the wall to make it look like the viewpoint is correct.
Step 1: Have Photoshop open and ready, open your image(s) by going to File > Open and selecting your files.
Step 2: Go over to your other tab, where your second image resides, and copy the image by Command + C. Then come back to the main image and paste the image by Command + V.
Using the transform tool (keyboard shortcut T), scale your image to the size you would like it to be if you were looking at it from the front of the wall. Hold Alt while doing this to limit the image.
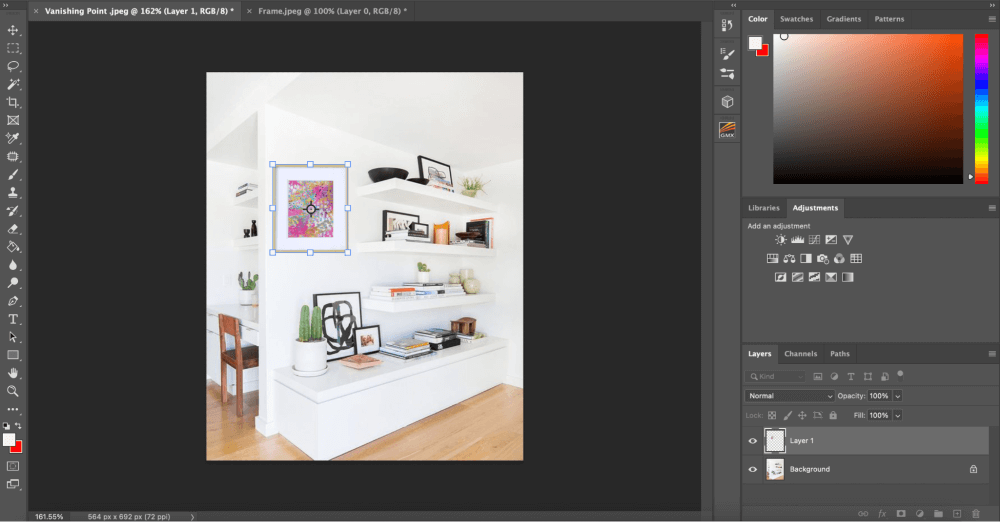
Step 3: Click back to your Background layer and right-click on it and find Duplicate Layer this will add a Background Copy to your layers panel. Select the eye icon to the left of layer 1 to hide the layer.
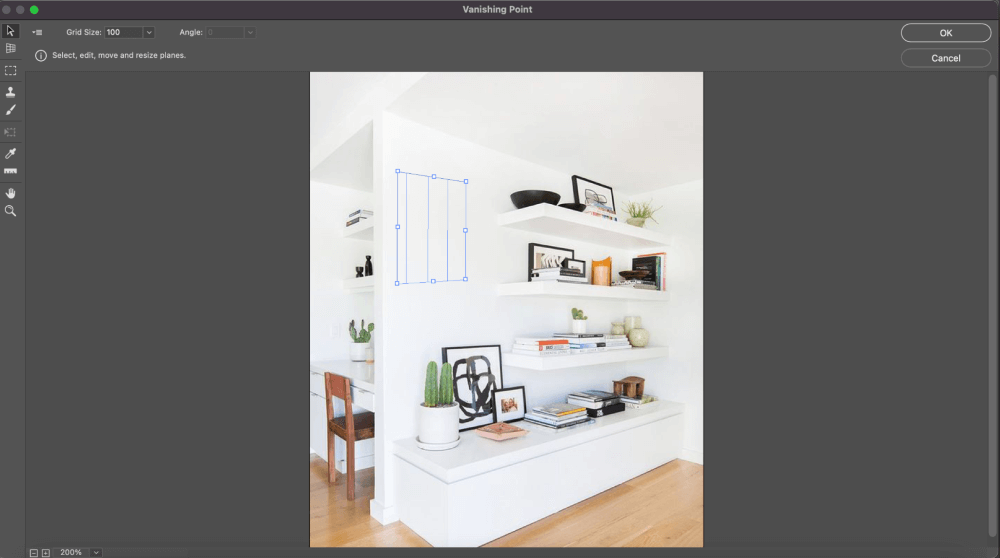
Step 4: With the duplicate background layer selected, go to Filter > Vanishing Point.
Step 5: The vanishing point menu box should now appear on your screen. Choose a perspective plane to edit as your initial step. Make sure that the Create Plane tool is chosen. The shortcut is C. Click the four points of the perspective plane where you think your image should go.
You can see where I choose my four points on the wall to place my image. These points can be altered by clicking and dragging them. If it appears red, you can also move it around; however, you want the Blue Grid to display so that you can see that you’re basically spot on.
If you need more than one plane simply select another area of the image to start over and create a new plane.
The second plane must be split from the first if you want your two planes to be joined. Drag one of the edges while holding down the Ctrl or Command key to make the next plane.
Once you have your sizing figured out, go ahead and select OK.
Step 6: Now you need to paste the image, you can do this by pressing Command + V. Drag the image into the blue frame and adjust the size to your liking by pressing T and using the Transform tool.
Once your finished hit Enter. Now you have an image that is in perspective.
Pro Tips
- If you notice the transform tool isn’t getting to the size you need, try making the create plane box bigger.
- You can also create more than one plane box in an image.
Final Thoughts
Figuring out the vanishing point may be a little tricky at first, but this tool is very useful if you continue to work in Photoshop. I have used this tool many times and it comes in handy for those tricky perspectives where you need to place an image.
Any questions about how to use vanishing points in Photoshop? Leave a comment and let me know.
About Aly Walters
Subodhi
How to ad curve staircase to vanishing point
June
You could try to add the staircase first and then use the perspective tool to change the perspective.
Griffin
How do you deal with a situation where the plane has more than 4sides? Forexample a pentagon
June
Hi Griffin, the idea is the same. The only thing you need to change is the shape that you want to distort. So instead of having your artwork on a rectangle, create your artwork within a pentagon and then use the method in the tutorial to make it.