Changing the color of something in Photoshop is one of the most common edits you will make as an image editor, and it really shows off the power of Photoshop to make photorealistic edits. A color change can be completely invisible to the viewer if it’s done carefully, easily turning a good image into a great one.
As we say in almost every post here at PhotoshopBuzz, there are usually lots of different ways to perform the same task in Photoshop. Let’s take a look at some of the most popular and effective methods, as well as a couple of the more complex and interesting ones.
Table of Contents
Method 1: Changing Colors with the Replace Color Tool
The Replace Color tool is one of the newer color adjustment options in Photoshop. It’s not my preferred method, but many Photoshop image editors swear by it, so it’s worth exploring if you’ve never used it before.
The main advantage of using the Replace Color tool is that you don’t have to create a detailed mask by hand in order to specify what areas of color should be adjusted.
Instead, it’s possible to use a few quick clicks of an eyedropper tool to create a color mask entirely within the Replace Color tool dialog box.
Here’s how to use it:
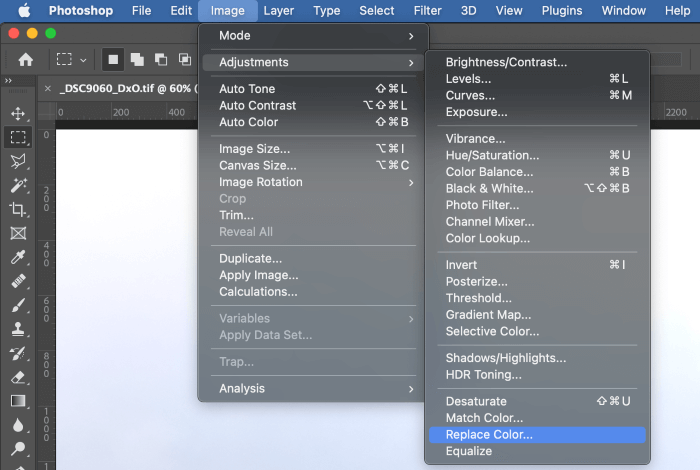
Open the Image menu, select the Adjustments submenu, and choose Replace Color. Photoshop opens the Replace Color dialog box, which you’ll use to specify which colors should be adjusted, and what their new color should be.
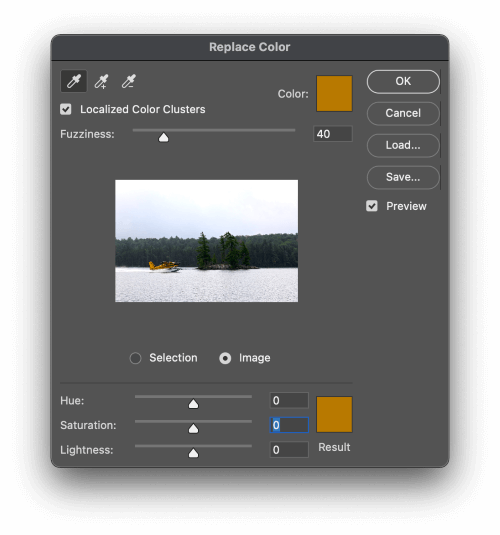
In the top left corner of the window, there are three eyedropper tools, which you’ll use to select the colors to be replaced.
The + eyedropper allows you to add more colors to the selection, while the – eyedropper allows you to remove colors, simply choose a tool and click the appropriate area of color in the main image window.
You may need to check the box labeled Localized Color Clusters, which restricts the eyedropper tools to connected areas of color, preventing your eyedropper from selecting similar colors across the entire image. It all depends on what you want to achieve and the contents of your image.
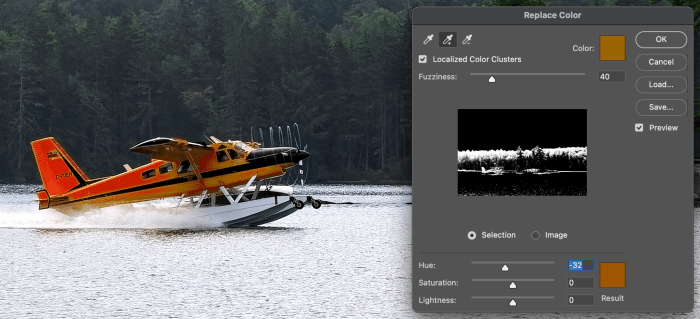
In my experience, the mask view shown in the Replace Color window can be confusing and inaccurate when working on photos, which is part of why I don’t like this tool for most color adjustments.
This tool works best on images with simple color areas such as graphical illustrations and photos with distinct areas of solid color. In more complex and colorful photos, areas of color often overlap too closely to create a good mask with the Replace Color tool, so the Hue/Saturation adjustment layer method is usually a better choice for those situations.
Method 2: Changing Colors with Hue/Saturation Adjustments
This is my preferred method for changing the color of an object in Photoshop, no matter what it is. While you get much better control over the result, the unavoidable tradeoff is that it can often take longer to set up, although this can vary a bit depending on the content of your image.
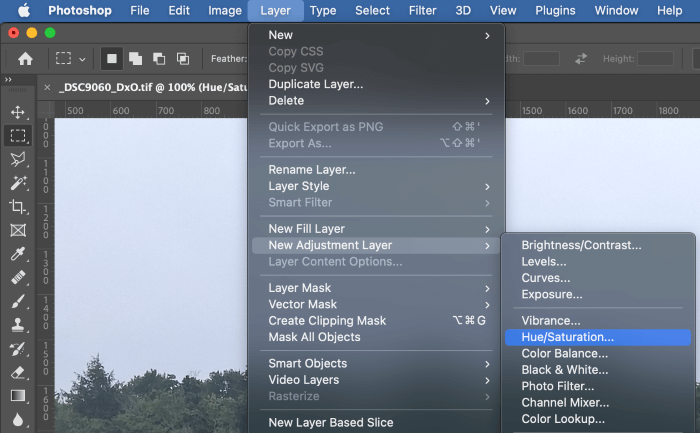
To use it, open the Layer menu, select the New Adjustment Layer submenu, and click Hue/Saturation.
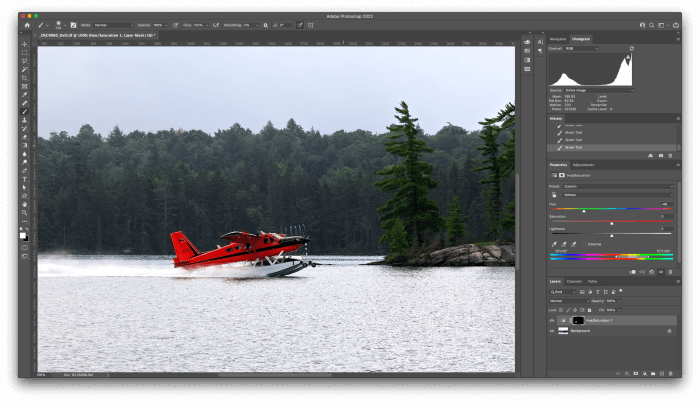
A new adjustment layer appears in the Layers panel in the bottom right corner along with a layer mask, and the Properties panel will display the Hue/Saturation adjustment settings.
You can then use the Brush tool to paint white and black pixels on the layer mask, showing or hiding the Hue/Saturation effect.
It can sometimes be faster to create a selection of the object you want to adjust before adding your adjustment layer, as the selection will be used automatically to create your layer mask.
I like the flexibility and control that you get from using a layer mask to apply the effect, but it’s also possible to target the Hue/Saturation adjustment tool to only adjust a portion of the colors within an image.
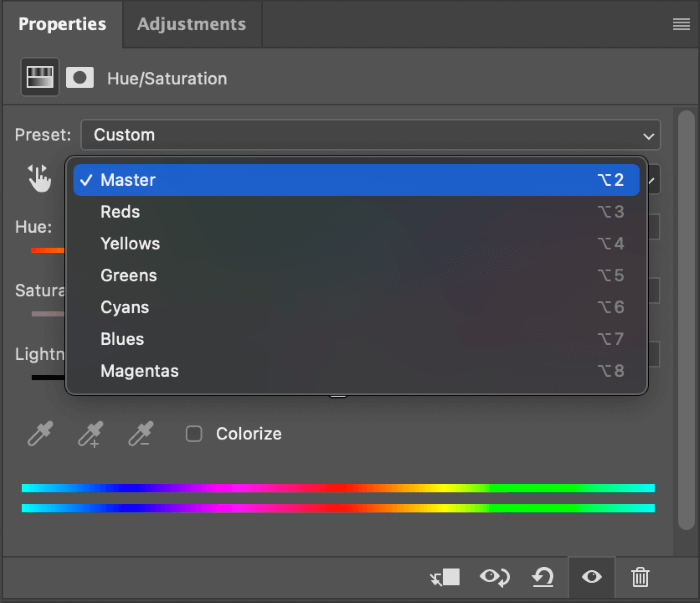
Instead of painting on the layer mask to target a specific image area, leave the mask completely white. Make sure the Hue/Saturation adjustment layer is selected in the Layers panel, and then switch to the Properties panel.
Click the Master dropdown menu, and select one of the color ranges to begin changing it.
If you want a more detailed explanation of how to use the Hue/Saturation tool, I’ve written up a full guide on how to change hue in Photoshop.
Method 3: Changing Colors with Curves
This is an extreme option for die-hard color correctors, but it is also (arguably) the most powerful way to change the color of something in Photoshop.
You may be familiar with using the Curves tool from some of the other articles here on PhotoshopBuzz, but there’s a trick that’s rarely mentioned: using Curves on individual color channels.
As many of you already know, digital images are usually made from three different color channels: a red channel, a green channel, and a blue channel, creating an RGB image.
Each color channel is actually a black-and-white image, but in the red channel, pure white pixels are expressed as pure red, and in the green channel, pure white is pure green, and the same applies to blue.
The three channels are combined to create any color your eye can see (or rather, any color that your monitor can display).
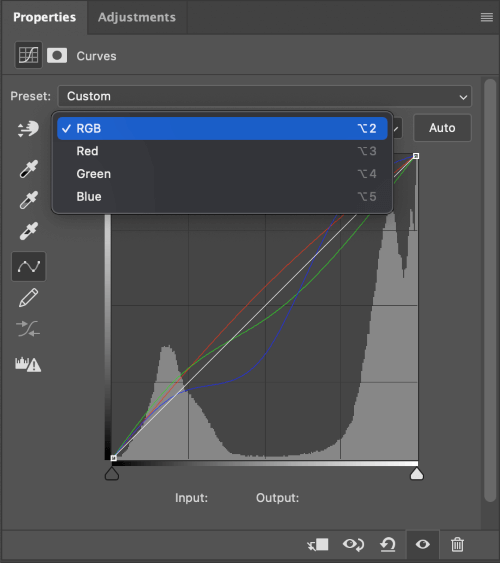
Using the Curves tool on individual color channels allows you to modify the way these color channels appear, which gives you the ultimate degree of control over color in your image.
But if you think that using the Hue/Saturation method is time-consuming, just wait until you try doing color corrections using Curves.
If you’re serious about learning the best color correction methods, you’ll need to be fully familiar with how the Curves tool works, so be sure to check out the guide that Cara posted explaining how to use Curves in Photoshop.
A Final Word
Those are the most popular methods to change the color of something in Photoshop, although I still recommend that you explore the Hue/Saturation adjustment method first. But just because they are the most popular and effective techniques doesn’t mean they’re the only ones.
If you’re not after a specific color change result, there are a bunch of other ways you can change the color of something in Photoshop. Many filters will change the color of objects, and there are also various blending modes that can be applied to new layers that modify how colors appear. You can even invert the colors of your image to create a film negative effect!
Happy color-changing!
About Thomas Boldt