Few internet phenomena have survived quite as long as the GIF. While it can technically be used as a still image format, the feature that enshrined the GIF in the hall of internet fame is its ability to display multiple frames within a single file, allowing it to become a quick way to share short video clips.
Photoshop is one of the most powerful image editing tools ever created, and for a long, strange time in its development, Adobe was adding every single feature they could think of, from 3D model painting to video editing.
After a while, Photoshop became a bloated mess, and Adobe finally began to remove some of these additional features and split them off into their own dedicated editing apps.
While GIFs are often used to display videos, they’re still technically an image format, not a video format, which means that Photoshop still has the ability to edit GIFs.
If you’ve got a favorite GIF that you want to edit, Photoshop is a great tool for creating seamless edits (or utterly ridiculous ones, if that’s more your style).
Note: for this tutorial, I’m going to assume that you want to edit an animated GIF. Editing a GIF that’s just a still image works exactly the same way as editing any other image, and doesn’t require any special instructions.
The GIF used in this tutorial is from Giphy.com by Luis Ricardo.
Table of Contents
Step 1: Opening A GIF For Editing
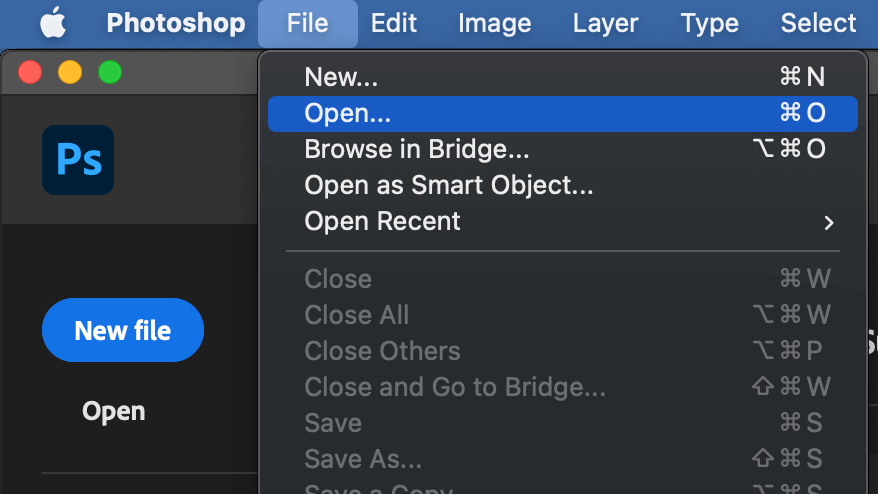
This is definitely the easy part! To open an existing GIF for editing, just use the standard process for opening any image in Photoshop: Open the File menu, click Open, and then browse to find the GIF file that you want to open.
Click the Open button, and Photoshop will load your GIF file.
You’ll notice that Photoshop splits each frame of the animated GIF into a separate layer in the Layers panel.
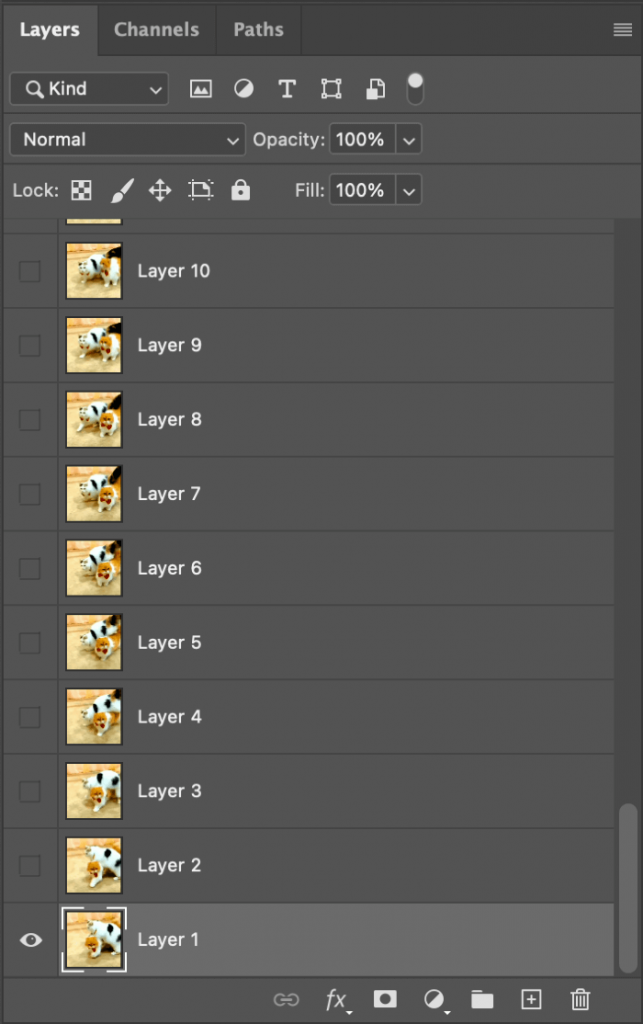
You can use the Layers panel to select and edit individual frames, but you’ll find yourself constantly toggling layer visibility on and off in order to see one frame at a time, and there’s a better and faster way to do it: the Timeline panel.
Step 2: Set Up Your Workspace
Unless you skimmed past the intro, you’ll remember that Photoshop has some video editing capabilities, and that’s what you’ll need to use to complete the editing process.
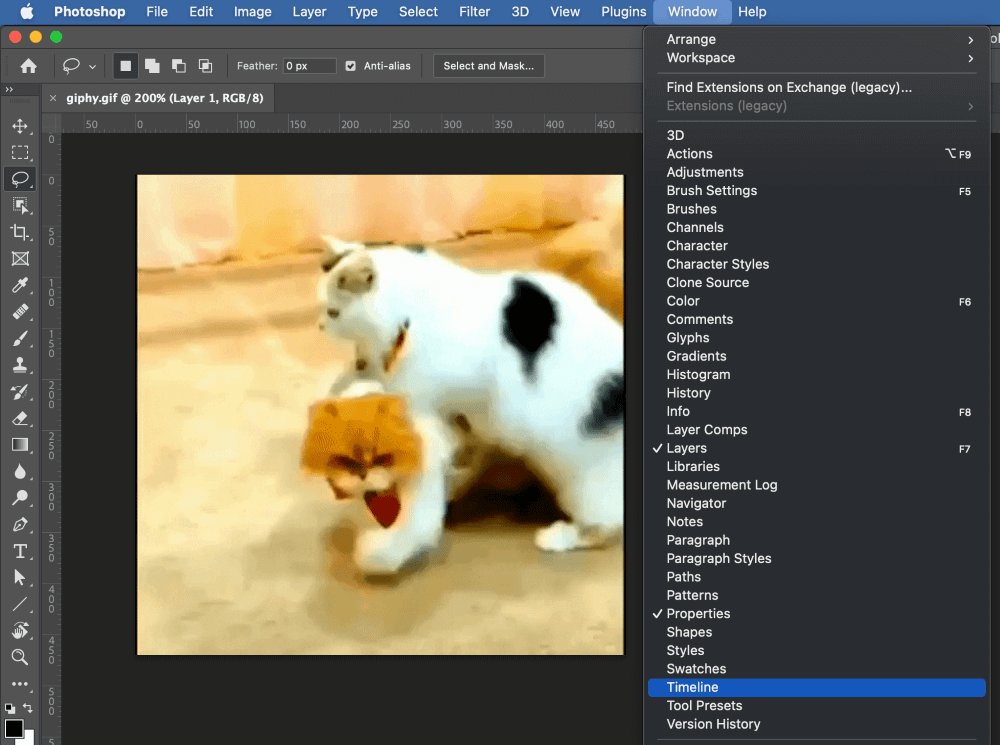
Open the Window menu and select Timeline. Photoshop will open a new panel along the bottom of the main document window.
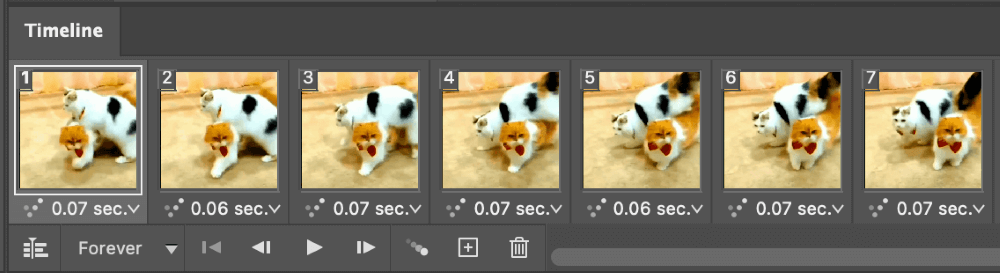
If you’ve ever used a video editing app, the concept is probably quite familiar to you, but for those of you who aren’t veteran video editors, it’s still an easy idea to pick up. In essence, the Timeline is a horizontal, time-based layer stack that runs from left to right.
Just think of it like the progress bar that you see when watching a streaming video, except that instead of a simple colored line indicating your position in the video, you see a row of thumbnails displaying each frame instead.
Selecting a frame to edit within the Timeline panel allows you to automatically display it in the main document window without having to mess around with the layer visibility in the Layers panel.
The Timeline panel also allows you to do some other important jobs, such as controlling the length of time each frame is displayed, quickly changing the order of your frames, and getting an animated preview of your file.
Step 3: Applying Your Edits
Applying Photoshop concepts to an animated video can be a bit difficult to grasp at first, but you’ll get the hang of it. Here’s a quick explanation of some of the more common Photoshop edits that you can apply to an animated GIF.
Unfortunately, because of the nature of how each frame is constructed, it’s not always possible to apply these edits non-destructively, but it is sometimes.
Adding Adjustment Layers
If you want to adjust the entire GIF using an adjustment layer, you can simply create a new adjustment layer at the very top of the layer stack in the Layers panel.
Scroll up to the top of the Layers panel, select your last frame (which is shown at the top of the layer stack), and then add your adjustment layer. This will apply the effect to every frame/layer listed below it.
You can also apply adjustment layers to individual frames. Select the frame you want to edit using the Timeline panel, and then scroll to find the corresponding frame in the Layers panel and click to select it there too.
Open the Layer menu, select the New Adjustment Layer submenu, then select your chosen adjustment type. In the New Adjustment Layer dialog box, make sure you check the box labeled Use Previous Layer to Create Clipping Mask.

You can also create an adjustment layer using the Adjustments panel, but it doesn’t offer you the same checkbox option.
Instead, once you’ve got your adjustment layer added in the right place, hold down the Option key and place your mouse cursor over the line between the adjustment layer and your target layer in the Layers panel.
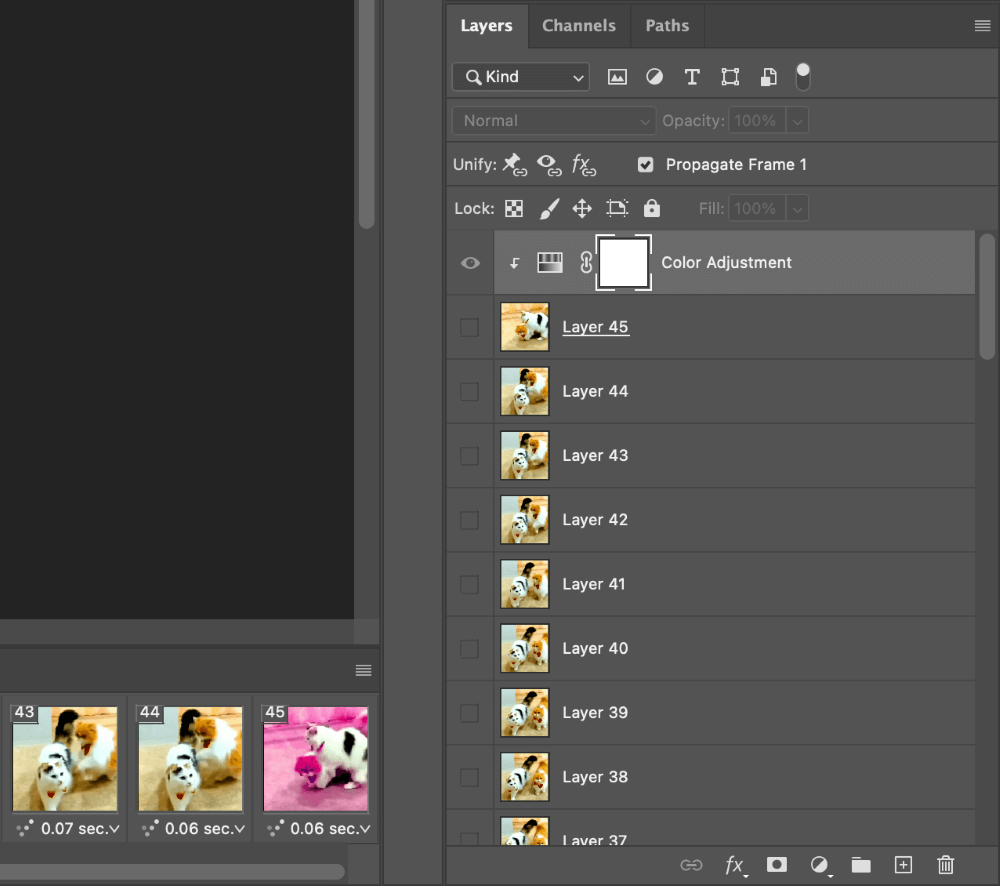
You’ll see the cursor change, indicating that you can convert the layer mask into a clipping mask, which effectively restricts the adjustment layer to the single layer below it. As you can see in the screenshot above, only layer/frame 45 has its color modified.
Other Edits
When I said that you can do any Photoshop edit you want to your image frames, I meant it! You can use the clone tool, artistic filters, or just about anything else that you can imagine to spice up your GIFs. Just remember – because layers are treated as frames, you won’t be able to use the non-destructive image editing techniques that are standard practice for editing still images.
Step 4: Exporting Your GIF
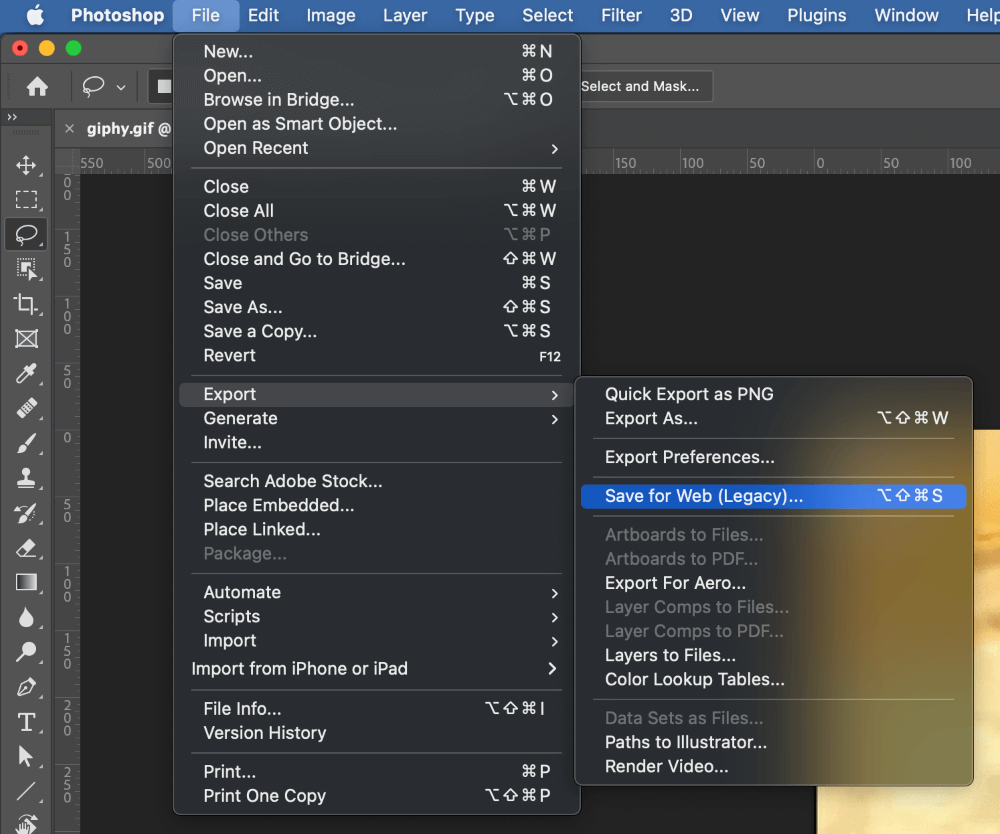
This is probably the trickiest part of the GIF editing process in Photoshop, but it’s easy enough to do once you know what to look for. The only real trick is to use the Save For Web (Legacy) exporting method instead of the newer and more streamlined Export As method.
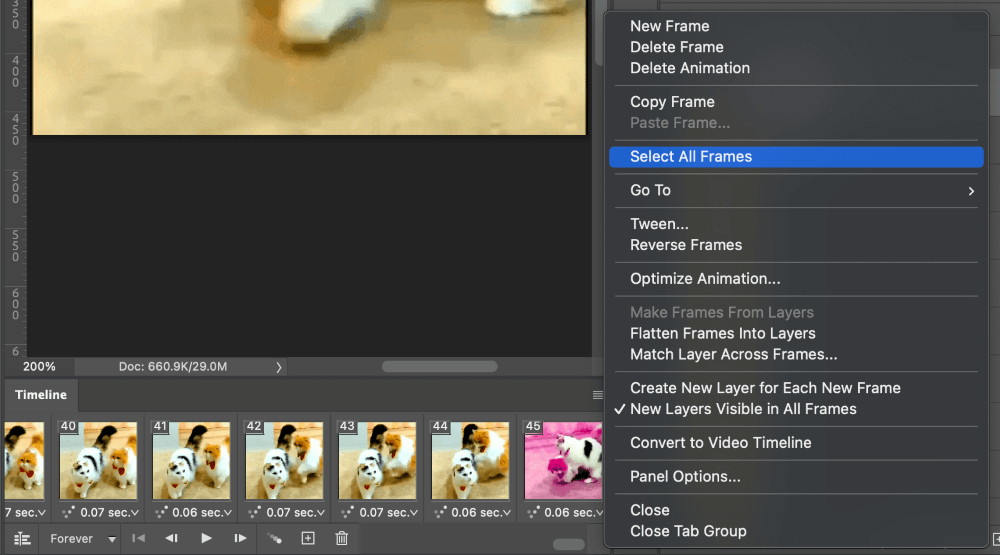
First, make sure that you’ve got all the frames of your animation selected in the Timeline panel, or Photoshop will only export your currently selected single frame and your animation will turn into a static image.
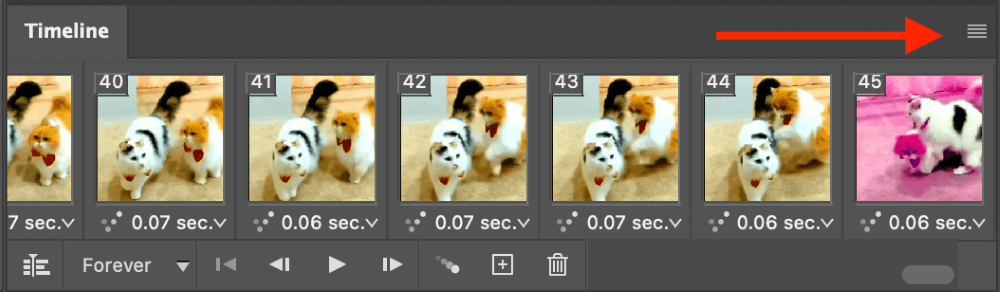
You could select each frame manually, but there’s a helpful popup menu hidden in the upper right corner of the Timeline panel (shown above). Open the menu and click Select All Frames.
Next, open the File menu, select the Export submenu, and click Save For Web (Legacy). You can also use the difficult keyboard shortcut Command + Option + Shift + S (use Ctrl + Alt + Shift + S if you’re working on a PC).
The Save For Web dialog can be a bit overwhelming at first glance, but there are only a few things you’ll need to confirm before you export your newly-edited GIF.
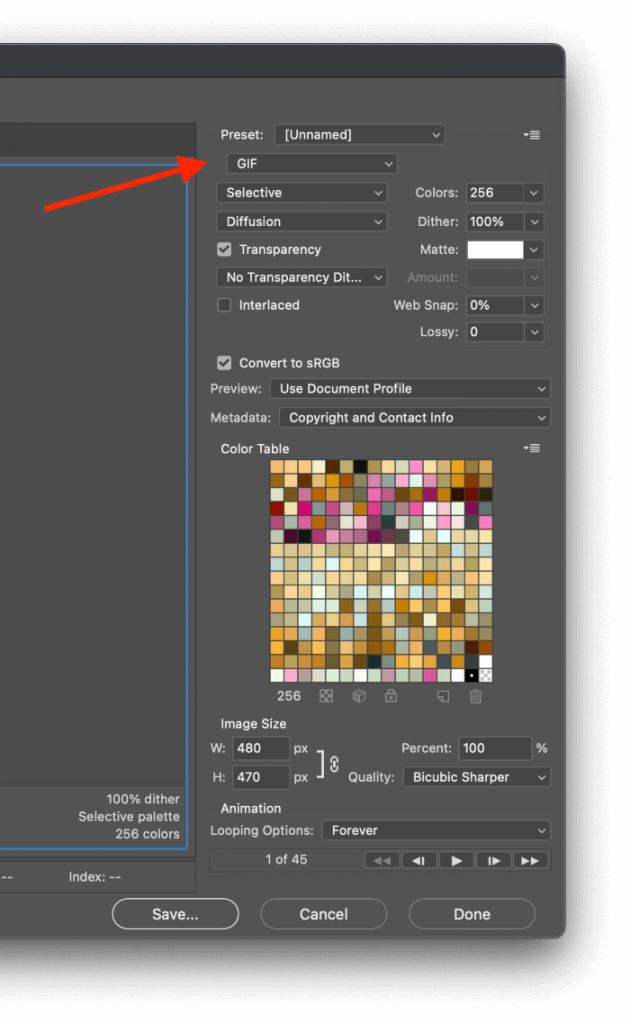
First of all, make sure that the Save For Web dialog is set to use the GIF file type. It may be set there by default because it knows you’re editing a GIF file, but sometimes presets or past usage can interfere with that.
The top section of the dialog allows you to customize all the color export options for your GIF animation. GIFs can support a maximum of 256 colors, so you’re probably going to want to keep it that high or you’ll lose some image quality.
However, because animated GIFs contain multiple frames, your file size can easily grow very large, and nobody is expecting a GIF animation to be cinematic quality. The current size of your GIF file can be previewed in the bottom left corner of the preview window.
You’ll have to experiment with the settings a bit to find the right balance of image quality and file size.
Last but not least, make sure to customize the Animation section to control the looping aspect of your animation. Most GIFs that are spread around the web loop continually, but you can disable it or set it to loop a specific number of times only.
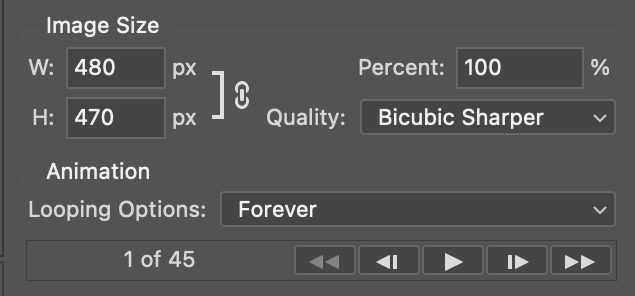
Oddly, I find that the animation preview controls don’t work properly on my PC: the Play button doesn’t do anything, but the frameskip buttons all work, so you can still get a stop-motion preview of your final animation.
It all works perfectly when using Photoshop on my Mac, but perhaps your experience will vary a bit (even though it shouldn’t).
Once you’re happy with the final settings, click the Save button. Enter a filename in the Save dialog box, click Save one last time, and Photoshop will export your GIF to the location you specified.
A Final Word
Congratulations, you’ve just edited a GIF in Photoshop! If you’re serious about editing GIFs regularly, you might want to find a program that’s dedicated to editing animated GIFs and other types of video, but for the occasional fun editing project, Photoshop is a great choice – especially if you’ve already got it installed.
Happy animating!
About Thomas Boldt
George Sino
Thanks for this