At some point in your photography journey, you switched from shooting in JPEG to shooting in RAW. If you haven’t yet, then definitely stay tuned because I’m about to open a whole new amazing world to you.
But when you make the switch, you need a photo editing program that can keep up with you. Preferably one that doesn’t have a huge learning curve (ahem…Photoshop). That’s where Camera Raw comes in. The fact that it is a plug-in directly in Photoshop makes it even better.
So let’s dive in to answer the question of what is Camera Raw in Photoshop and learn the amazing things you can do with it to edit your images!
Table of Contents
What is Camera Raw?
Let’s start with the basics. Camera Raw is a photo editing software by Adobe designed to work with RAW files from your camera. It is not a stand-alone program but comes as a plug-in to Photoshop, After Effects, and adds functionality to Adobe Bridge.
Camera Raw is designed to work with RAW files. When you take photos with your digital camera, you have the option of shooting in RAW, JPEG, or both.
A RAW file contains all the information the camera captures. This is extremely useful in post-processing to enhance the images. You can even “rescue” images that might otherwise be too dark etc.
However, a RAW image is not very pleasing to the eye. The initial image actually looks rather flat, dull, and boring.
Whether you’re shooting in JPEG or RAW, the image you see on the back of your camera is a JPEG preview that your camera automatically creates. This gives you an idea of what the final result can be.
If you’re shooting in JPEG, the information not used for the preview is discarded. But if you’re shooting in RAW the information is retained so that you can use it later in editing.
In order to process RAW files, you need a special photo editing program that can handle them. Camera Raw is one such program and so is Lightroom, another of Adobe’s extremely popular programs.
If you’re familiar with Lightroom, you will find yourself quite comfortable in Camera Raw right off the bat. But even if you haven’t used Lightroom much, Camera Raw is a very user-friendly software that is somewhat easy for beginners to figure out.
Though Photoshop is amazing…the same can’t be said for it.
The program has a few panels of tools. Many of them are aptly named sliders that you can simply slide up and down and see how they affect your images. There’s a lot to learn, of course, but things aren’t quite as difficult to find as they can be in Photoshop.
Why Use Camera Raw in Photoshop
Assuming you’ve spent some time here on Photoshop Buzz, you’ve probably played around with Photoshop to some extent. Thus, you know that the program has many amazing capabilities.
In fact, the list seems almost endless. You can replace backgrounds, composite entire images, add text and other graphics, change colors, and so on. The tradeoff for this wealth of capability is that it takes a bit of work to understand how to use it.
This brings us to some reasons why you might want to use Camera Raw.
Ease of Use
The basic stuff in Photoshop is a little clunky to use. For example, to adjust the contrast, you have to add a Curves adjustment layer or maybe open the Levels panel and play around.
But you have to know this stuff, you wouldn’t stumble upon the Curves feature as a beginner and know you could adjust the contrast with it.
However, in Camera Raw, you can stumble upon the Contrast slider and immediately know you can use it to adjust contrast.
No Confusing Layers
Furthermore, Photoshop’s use of layers is awesome because you can be so precise with your edits. But it’s also confusing and takes a bit to get the hang of working with them.
Plus, nearly every basic edit you want to make requires a new layer. Thus, not only is it a little clunky to apply basic edits but also the number of layers adds up quickly. Unless you’re really organized, this can get confusing later on when you want to go back and make final tweaks.
There are no layers in Camera Raw, just a bunch of sliders. If you want to go back and adjust the saturation, you can simply go to the Saturation slider and adjust it.
You don’t have to sort through all your layers to find the Hue/Saturation adjustment layer you added 15 layers ago only to discover it’s the wrong Hue/Saturation adjustment layer.
If you’ve used Photoshop at all on a major project you know exactly what I’m talking about.
Non-Destructive Editing
Camera Raw edits non-destructively. You can go back and make adjustments to anything at any time because nothing has been permanently changed.
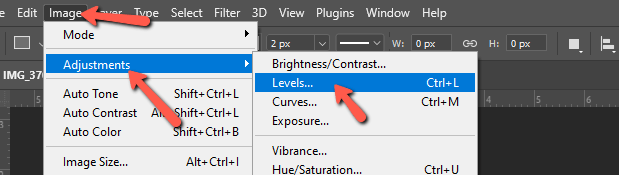
You can make nondestructive edits in Photoshop as well. But again you have to know what you’re doing. For example, if you use the Levels feature by going to Image, Adjustments, and Levels, the edits you’ll make are destructive.
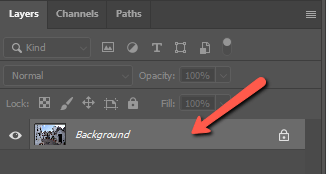
Notice that when you add changes, nothing new appears in the layers panel.
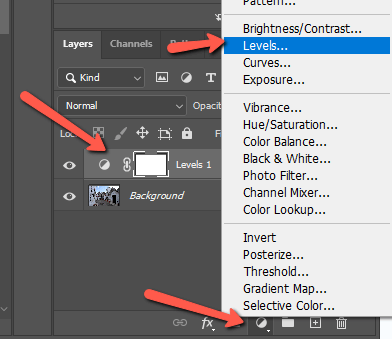
But if you click the adjustment layer icon and choose Levels from the list, Photoshop automatically creates a new layer and puts your adjustments on it. So, you can come back later and make adjustments.
But in Camera Raw, there is no monkeying around. The edits are simply non-destructive and you can make adjustments, remove edits, or revert the entire image to its original state with one click whenever you like.
Batch Editing
Photoshop is also clunky at editing multiple images at once. It’s possible to batch edit in Photoshop, but there are a few steps and it almost feels like a workaround.
In Camera Raw, you simply open several images at once. Then they will all be in your filmstrip and you can select images and apply edits to them simultaneously.
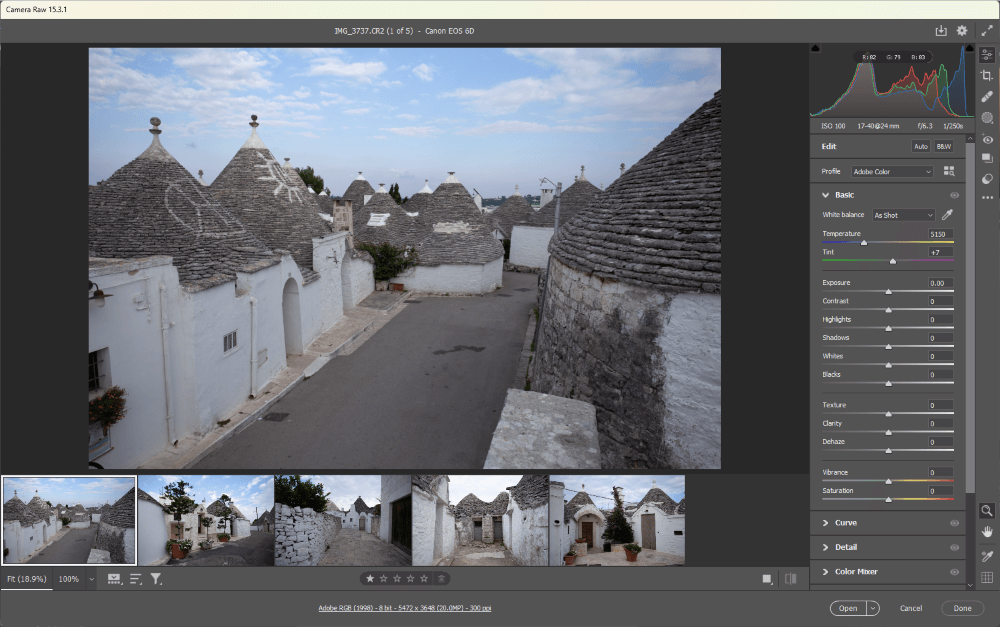
Notice there are several images in the filmstrip below the main image. You can work on the main image by itself or select images from the filmstrip for the edits to be applied at the same time. Hold Ctrl or Command while clicking to select multiple images.
The edits are only applied to the selected images. I didn’t select the last two images in the filmstrip so they remain unchanged.
How to Use Camera Raw in Photoshop
Using Camera Raw is pretty simple, especially if you’re already familiar with Lightroom. It basically feels like using Lightroom inside of Photoshop.
Opening Images in Camera Raw
There are a couple of ways to get images into Camera Raw. The first happens automatically. When you try to open a RAW file in Photoshop, the program will open it in Camera Raw first.
To do this, click Open and choose your photo(s). Photoshop will take you to the Camera Raw workspace first. If you don’t want to work in Camera Raw, you can click Open to immediately open the photo in the Photoshop workspace without making edits in Camera Raw.
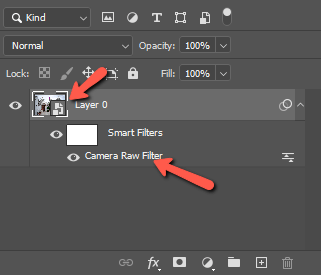
The second way to get to Camera Raw is helpful when you’ve already been working on an image in Photoshop. You can apply it as a filter to any layer you choose.
To get there, go to Filter in the menu bar and choose Camera Raw Filter.
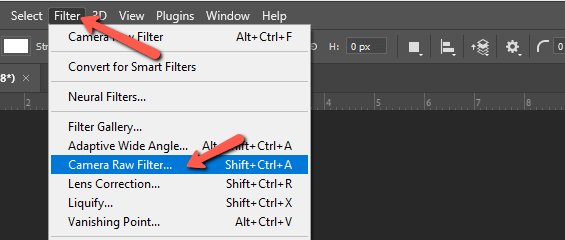
Your active layer will open in the Camera Raw workspace allowing you to make edits. If you want to edit file types other than RAW, such as JPEG, this is the route you have to use to access them.
Keep in mind that when you finish working in Camera Raw and accept the changes to go back to Photoshop, the edits become permanent. To avoid editing destructively, click the Convert for Smart Filters first to change the active layer to a smart object.
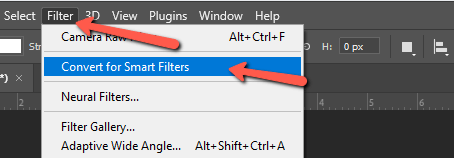
Then, when you add the filter it will be added as a smart filter. You can simply double-click on the Camera Raw filter to reopen the program and make adjustments.
Working in Camera Raw
As mentioned, working in Camera Raw is super easy if you’re already familiar with Lightroom. But even if you aren’t, the program is far more beginner-friendly than Photoshop.
Take a few minutes to browse through the panels and sliders and see how they affect your image.
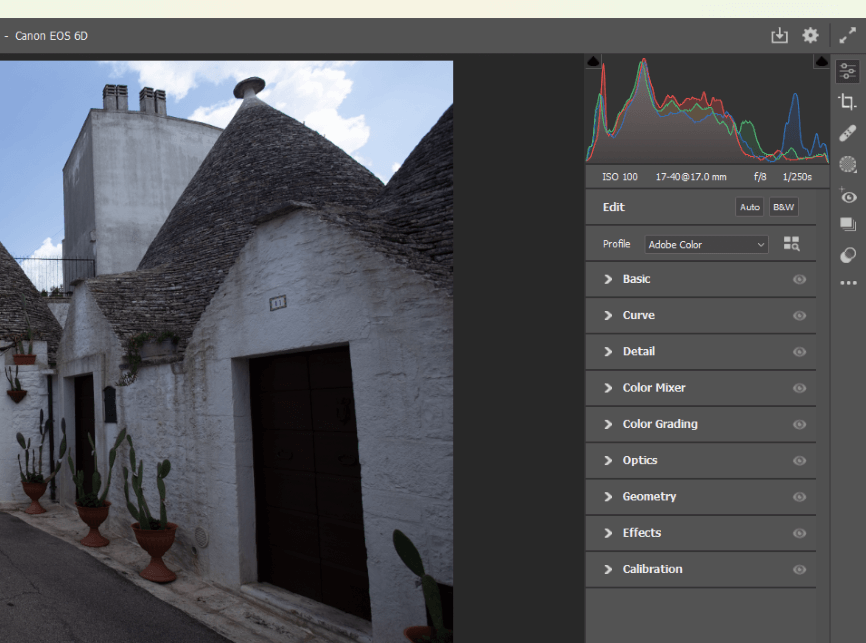
You can also use the Crop and Healing tools that work pretty much like those in Lightroom. The AI editing masks are also available to select the Subject, Sky, or Background and make adjustments independently.
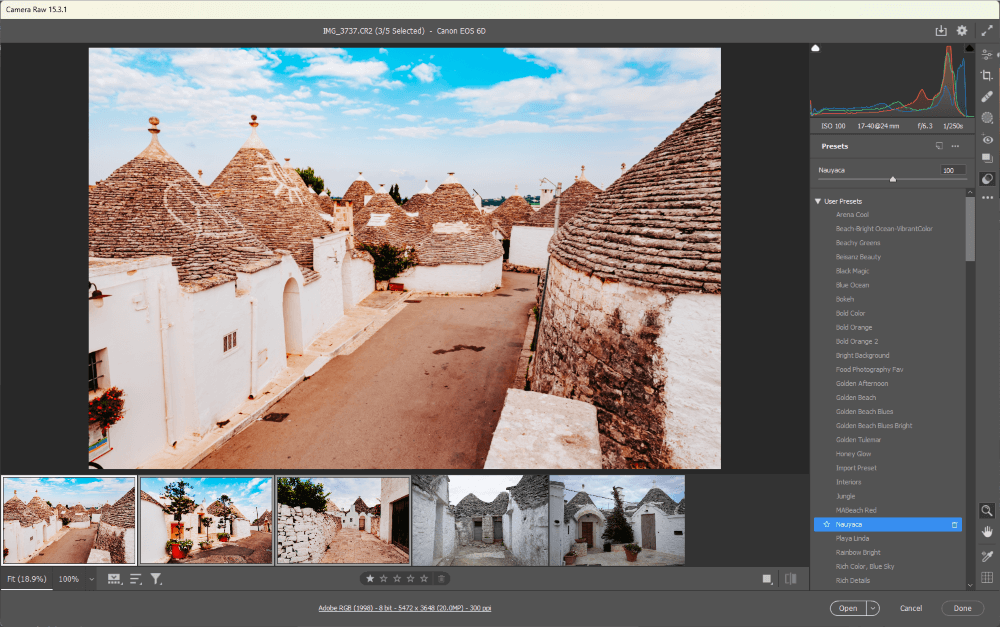
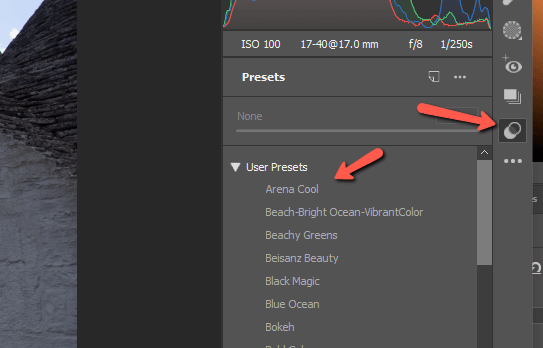
You can even access your Lightroom presets and use them here. Click the double-circle icon to open the Presets panel. The .xmp presets you have in Lightroom should appear here and you can apply them with one click!
Ready to Rock Camera Raw?
What if you are frustrated by Photoshop’s clunkiness for basic edits, but need the advanced editing tools for tasks like changing backgrounds, merging images, or removing objects? Camera Raw will become your new friend!
By opening your images here first (or applying the Camera Raw filter later), you can use presets and simple editing tools to quickly edit your images. Then seamlessly flow into Photoshop for the heavy editing work that other photo editing software like Lightroom can’t handle.
Curious about other plugins for Lightroom? Check out how to install plugins in Photoshop here to open up new and exciting editing worlds!
About Cara Koch