Photoshop is a truly impressive piece of software. It provides the ultimate creative freedom when it comes to image creation and editing, and it’s one of the few pieces of software that has ever had its name turned into a verb in popular culture.
While it’s exceptional all by itself, one of Photoshop’s most useful aspects is the ability to extend its features using third-party plugins.
Plugins are extra pieces of software that integrate with Photoshop to provide additional features, ranging from small things like improved brush organization all the way up to complete HDR compositing workflows.
There are several ways to install Photoshop plugins, so let’s take a closer look at the different methods you can use to expand your Photoshop horizons.
Table of Contents
Installing Photoshop Plugins Automatically
One of the best features of the Creative Cloud app is that it provides an extremely simple way to get new content for your Adobe apps, including Photoshop. It offers an experience that’s similar to the app stores found on mobile devices, which makes it easy to find and install new Photoshop plugins.
This also means you will automatically have all your plugins available when you switch devices. I use Photoshop on both Mac and PC depending on the project I’m working on, and it’s nice to have the same features available no matter where I’m working.

If you already have Photoshop running, you can open the Plugins menu and click Browse Plugins. The Creative Cloud app will open and display all the Photoshop plugins that are currently available.
Many of the plugins are free, although some of the more professional and feature-packed plugins have to be purchased.

Once you find a plugin that you’re interested in trying, click the Get button. The app will give you a notice that the plugin is from a third-party developer and not subject to Adobe’s policies. Assuming that the plugin is from a trustworthy source, click the OK button to continue the installation.
You can also access the marketplace yourself without running Photoshop by opening the Creative Cloud app, clicking the Stock & Marketplace link, and then selecting Plugins from the submenu (highlighted in the screenshot below).
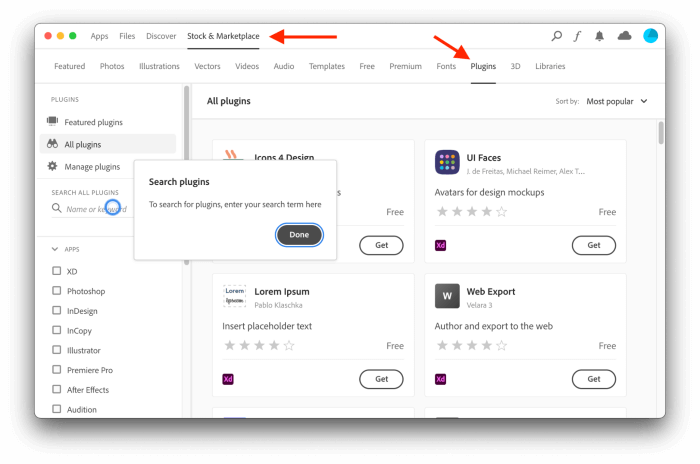
Once the plugin marketplace has loaded, look at the filters on the left pane of the app and check the box marked Photoshop to display only plugins that are compatible with Photoshop.
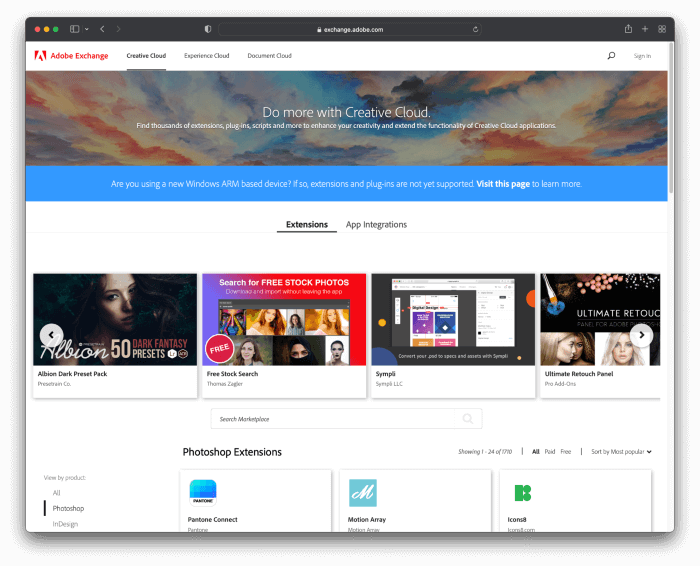
If you’d prefer not to browse plugins using the Creative Cloud app, you can also explore your options on the web by visiting the Adobe Exchange App Marketplace.
Installing Plugins By Hand
The Adobe marketplace system is still fairly new, and there are quite a few plugins that aren’t listed there.
If you’ve downloaded a plugin directly from a website, installation is a bit more tricky – but not by much! If you’re comfortable moving files around on your computer, you shouldn’t have any problems installing plugins by hand.
The general principle is the same for both Macs and Windows PCs: download the plugin files and place them in Photoshop’s plugins directory. The location of the plugin directory will change depending on which version of Photoshop you’re using and which OS you’re using, but otherwise, it’s easy!
For Windows users, the Photoshop plugin folder can be found here:
C:\ > Program Files > Adobe > Adobe Photoshop 2023 > Plug-ins
For macOS users, the Photoshop plugin folder can be found here:
Applications > Adobe Photoshop 2023 > Plug-ins
Note that your Photoshop folder name may be slightly different, depending on which release of Photoshop you’re using.
Photoshop usually checks the Plug-ins folder for changes and initializes all plugins when the program first launches, so you may have to close Photoshop and re-open it to start using your new plugins.
Special Exceptions
Some downloaded plugins come with their own completely self-contained installation process. This method is typically used for the more complex and professional-level plugins that are created and maintained by a software development company, such as the Nik Collection of filters and plugins.
You may also find that some plugins are only supported by older versions of Photoshop. Unfortunately, this often happens with plugins that are created by a single developer working alone, who no longer has the time or inclination to maintain compatibility for their work.
Finding Your Installed Plugins
The last (and perhaps most important) step to installing Photoshop plugins is finding them within Photoshop! Depending on the plugin, it might appear in a variety of different places. Sometimes they’re located within the Filters menu, while others can show up in unexpected places.
Ideally, any plugins that you install from the Creative Cloud marketplace should appear in the Plugins menu in Photoshop, but this isn’t always guaranteed. The Nik Collection plugin suite, for example, opens its own window every time I load Photoshop but has no listing in the Plugins menu.
A Final Word
That’s all there is to know about how to install Photoshop plugins! Now that you understand the process, it’s time to get out there and see how you can boost your Photoshop capabilities to new heights.
Happy Photoshopping!
About Thomas Boldt