
Wouldn’t it be nice to cut something out of your photo and let Photoshop magically fill in the hole? You can basically do that with the Patch Tool – and a few other things as well!
Hey there, I’m Cara. As a photographer, I love delving into photo manipulation and playing with images. Today, I’m going to show you how you can play with images using the Patch tool in Photoshop.
Check it out!
Note: the screenshots below are taken from the Windows version of Photoshop CC. If you are using the Mac version, they will look slightly different.
Table of Contents
Find the Patch Tool
In the default layout of Photoshop, the Patch Tool is hidden on the toolbar. Remember, there are 70 tools in Photoshop, so they don’t all fit at once!
The default tool on top of the Patch Tool is the Spot Healing Brush Tool. Other tools in the category include the Healing Brush, Content-Aware Move, and Red Eye tools.
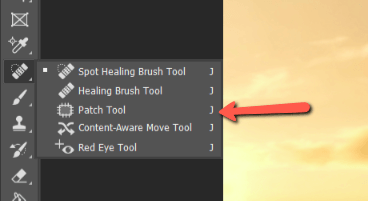
The Patch tool is the third one down. Once you select this tool, it becomes the icon on top. Now when you press J on the keyboard, the Patch tool will open instead of the Spot Healing Brush tool by default.
Removing Objects With the Patch Tool
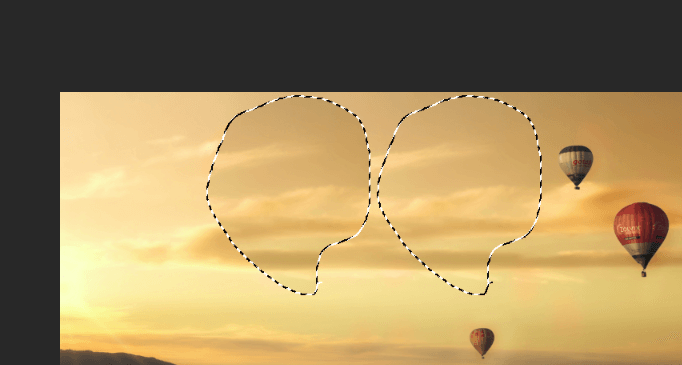
The Patch tool begins as a selection tool and ends as a healing one. To see what I mean, notice I’ve drawn a selection around the hot air balloon with the Patch tool. It works just like the Lasso tool in this respect.

Now I click within the selection and drag it to the section of the image I want to source.
I lined up the clouds there pretty well, but you can see that it’s not perfect. However, I haven’t let go of the mouse yet. Once I let go and hit Ctrl + D (Command + D) to deselect the selection, I get this.

I just have to smooth out the clouds a bit, but the tool matched the color and lighting quite nicely.
Content-Aware Option
I have one other option that may get me a better result. Instead of sticking with Normal in the Options bar, I can choose Content-Aware.
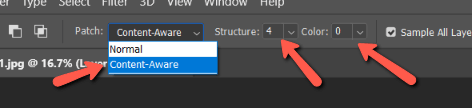
I can then play with the Structure and Color values to adjust the end result. A bigger number in structure means the program will try to match existing textures. A bigger number in color means it will apply more color blending.
Here’s what I get. Much better!

Note: The Content-Aware setting also allows you to work on empty layers on top of the image. This is helpful for creating masks, blending, etc.
Adding Objects With the Patch Tool
Other than removing objects, the Patch tool also gives me a pretty powerful tool for adding objects. Check it out.
In the Options bar, you’ll see that you can choose Source or Destination. Source is the default setting and was selected during the previous example because I was making a selection and choosing a source to fill it.
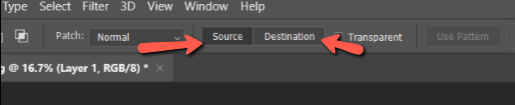
Now, I’m going to make the same selection, but choose the destination for it instead. So when I select the balloon and drag it to a new location, it makes a copy of the balloon.

Notice how the program tries to account for the lighting and scenery changes as well? Pretty cool!
With just a few clicks, I can fill the sky with balloons. They need a tiny bit of adjusting, but the heavy lifting is done.

Have fun with it! There are lots of useful applications for the Patch tool. Be sure to let us know how it goes in the comments. If you liked this article, check out more of our tutorials, such as how to use the Clone Stamp tool.
About Cara Koch