
A fresh perspective is helpful when working with digital images, just as when working on paper. But picking up the computer to rotate the screen would be rather impractical.
Thanks to the Rotate View Tool you can do this easily in Photoshop itself.
Hey there! I’m Cara, a photographer who loves to explore the potential of her photos in Photoshop.
I’m very visual (as you might imagine) and as such, I have a hard time visualizing images from different angles. But Photoshop makes it easy for me to rotate the canvas so I don’t have to imagine.
In this tutorial, you’ll learn how to rotate Canvas in Photoshop using the Rotate View Tool.
Note: the screenshots below are taken from the Windows version of Photoshop CC. If you are using the Mac version, they will look slightly different.
Table of Contents
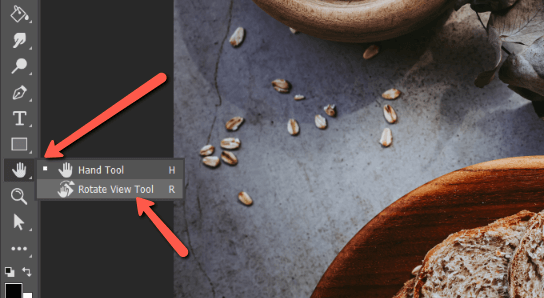
Step 1: Find the Rotate View Tool
The Rotate View tool isn’t always easy to find. If your toolbar is set to the default settings, this tool is hidden behind the Hand Tool on the toolbar. You can also get to it by pressing R on the keyboard.
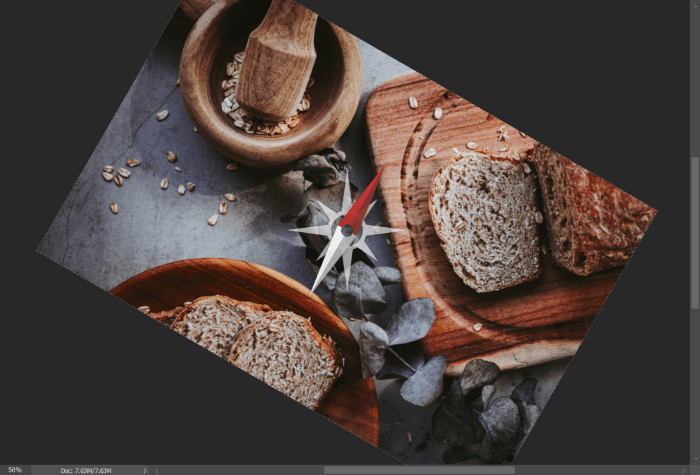
Step 2: Click and Drag
With the Rotate View tool active, click on the image and drag the mouse to the left or right to rotate the image. The red arm of the compass that appears in the center of the image always points to the original top of the image so you won’t lose it.
Hold down the Shift key while dragging and the image will rotate in 15-degree increments. This makes it easier to pop back to a straight image. It’s hard to be as precise by just dragging the mouse.
Other Ways to Change Image/Canvas Orientation in Photoshop
If you want to rotate to an exact angle, it will be easier to use the Rotation Angle box in the options bar. A negative angle rotates the image to the left, while a positive one rotates it to the right.

To pop back to the original orientation without messing around, hit the Reset View button.
You can also change the angle with the Scrubby Slider. If you hover over the words Rotation Angle, the cursor will turn into a pointing finger with arrows pointing to either side.
Click and drag to the left or right and the canvas will rotate in 1-degree increments. Hold the Shift key to turn that into 15-degree increments.
Match Rotation
What if you want to rotate multiple images to the same angle? You can easily do this with one simple command.
Make sure all the documents you want to rotate are open in Photoshop. Choose the one with the rotation angle you want to match.
Go to Window in the menu bar and hover over Arrange. Now choose Match Rotation. The other images will jump to the same rotation angle.

Why Use the Rotate View Tool?
This tool rotates the canvas behind the image, not the actual image itself. You can imagine it like rotating the paper underneath the drawing, not the drawing itself.
Why is this distinction important?
Because rotating the image (not the canvas) is a destructive edit. Every time you rotate the image, Photoshop has to redraw the pixels to accommodate the new look. This leads to a loss of information. Do this enough times and the quality of the image will suffer.
However, rotating the canvas behind the image doesn’t do a thing. You can rotate it as many times as you want without affecting the image.
If you want to rotate a layer, such as a background layer, read my tutorial on How to rotate a layer in Photoshop.
About Cara Koch
Olympia
Hi, do you know how to get rid of the compass? I can’t stand it, it’s blocking my view.
Many thanks,
Olympia
June
Hi Olympia,
Which Photoshop version are you using? The new version shouldn’t show the compass as you rotate.