
How to what in Photoshop? That might be your first reaction to this strange word – rasterize.
But, have you ever gotten this message? “This type/shape layer must be rasterized before proceeding. Rasterize the type/shape?” If yes, you’re probably wondering how and why to do it. I was confused by this message the first few times of seeing it too.
Hello! I’m Cara, and today I’ll show you how to rasterize your image in Photoshop and explain why you need to. Let’s dive in!
Note: the screenshots below are taken from the Windows version of Photoshop CC. If you are using the Mac version, they will look slightly different.
Table of Contents
Why Rasterize in Photoshop?
Rasterizing the layer is easy, but understanding why is a bit trickier. So let’s start from there.
There are two types of graphic elements in Photoshop – vector images and rasterized images.
Vector images can be manipulated (enlarge, rotate, etc.) without quality loss. Rasterized images are made up of pixels. Any changes require Photoshop to rewrite pixels, resulting in a tiny loss of quality.
Shapes and text by default are created as vector layers. However, there are some tools in Photoshop that only work on rasterized layers. If you try to use them on a vector layer, the message we just mentioned will appear.
But, should you rasterize it?
You won’t always have to even when you want to use tools that require a rasterized layer. We’ll talk about a couple of workarounds below.
First, in the cases where you do have to rasterize, there are a couple of things to think about.
Make sure that any text is the way you want it as you can no longer edit it after rasterizing it. Plus, changing the scale of a rasterized element will result in quality loss. Make sure everything is the size you want it before you rasterize.
Finally, it’s a good idea to duplicate the layer before rasterizing. Then, you can go back to that point to make changes instead of starting over.
How to Avoid Rasterizing
What if you’d prefer to avoid rasterizing? There are a couple of ways you can get around the need to do this.
Work on an Empty Layer
Who says you have to paint or draw directly on the vector layer? You can create an empty layer on top and make your changes there instead.
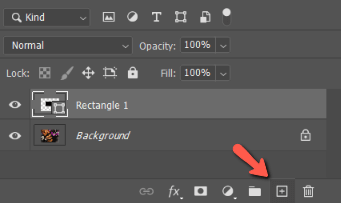
Create the new layer by hitting the New Layer icon at the bottom of the Layers panel. Or hit Shift + Ctrl + N (Shift + Command + N).
Pro tip: If you want to keep your brush strokes contained within the shape, use the magic wand tool to select it first. Then changes won’t be made outside the boundary of the selection.
Use the Vector Layer’s Properties
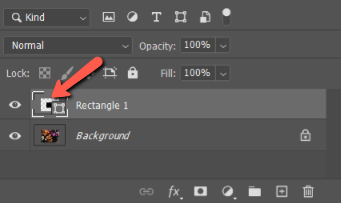
Instead of using the Paint Bucket tool to color in a shape, use the vector layer’s properties.
With the vector layer selected, double-click on the layer icon to open the color picker panel.
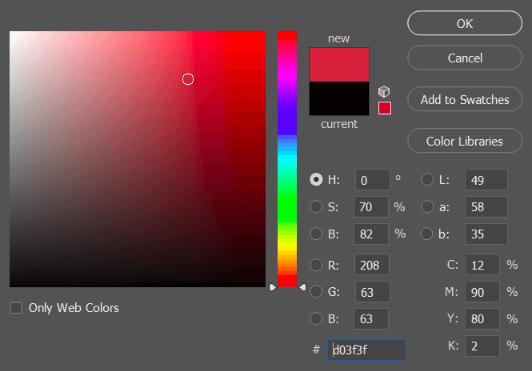
Then, pick the new color you want and hit OK.
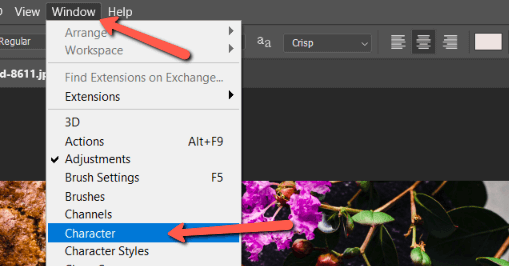
To color the text, the method is slightly different. Double-clicking on the layer icon won’t open the color picker, but it will highlight the text. Then go to Window and click Character to open the text properties.
Double-click in the color picker, select the color you want and hit OK.
Layer Mask Instead of Eraser
The eraser tool is another one that requires a rasterized layer. Instead of using this tool, you can simply create a layer mask. With the vector layer highlighted, click on the layer mask icon at the bottom of the Layers panel.
Now you can brush through with black as the foreground color for the same effect as the eraser without having to rasterize the vector layer.
How to Rasterize a Layer in Photoshop
Now that you understand what rasterizing is and how to avoid it, you’ll find there are sometimes it is unavoidable. Let’s look at how to rasterize in Photoshop for those occasions.
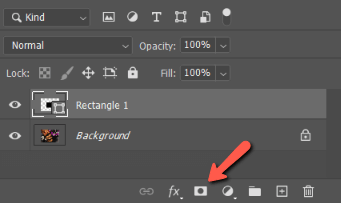
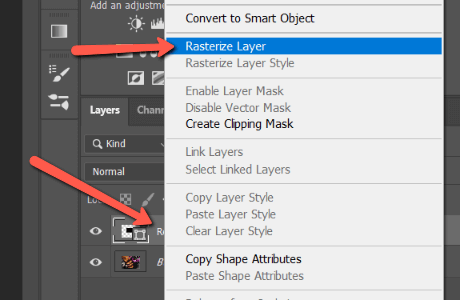
The quickest way to rasterize is through the Layers panel. Right-click on the layer you want to rasterize and choose Rasterize Layer in the menu that appears.
How to Rasterize Part of a Layer in Photoshop
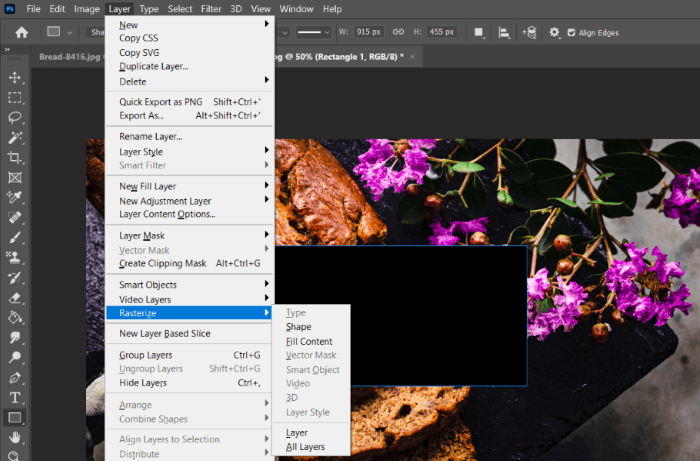
What if you only want to rasterize part of a layer that has multiple vector effects? For example, you may wish to rasterize layer effects, but still be able to edit text.
For this ability, go to Layer in the menu bar. Hover over Rasterize and choose the type of layer you want to rasterize.
If you want to rasterize the entire layer, choose Layer near the bottom. Alternatively, you can rasterize all your layers at once by choosing All Layers.
Happy rasterizing!
Looking for more tips and tutorials on how to use Photoshop? Check out more of our stuff.
About Cara Koch