
So you want to draw a perfect circle in Photoshop? How hard can it be?
Hello! I’m Cara and it’s kind of funny to admit, but I learned how to do a whole lot of complicated stuff in Photoshop before I learned how to draw a perfect circle.
Why?
As a photographer, I was focused on photo editing and manipulation more than the graphic design side of things. And figuring out how to make a perfect circle in Photoshop, though easy, isn’t obvious.
So for those of you who haven’t stumbled across this technique yet. Here we go – how to make a perfect circle in Photoshop!
If you’ve ever grabbed the Pencil tool and tried to draw a circle, you probably ended up with something like this.
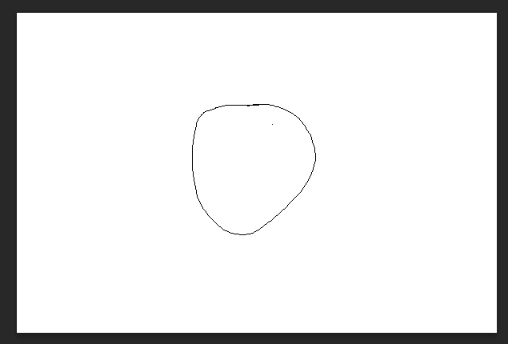
Underwhelming, to say the least.
No matter how hard you try, you just won’t be steady enough with a mouse or even a graphics pad to draw a perfect circle.
So follow the steps below to make a perfect circle in Photoshop.
Table of Contents
Step 1: Choose the Elliptical Marquee Tool
Let’s use the Elliptical Marquee tool. It is located second from the top on the toolbar to the left.
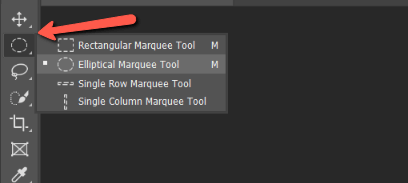
It might be hiding behind the Rectangular Marquee tool. Right-click to open the menu and choose the elliptical one.
Step 2: Make a Circle Selection
With the Elliptical Marquee tool active, click and drag to draw a circular shape. You’ll quickly notice that it still takes a steady hand to get a perfect circle. While it is possible, it is frustratingly difficult.

An easier method is to hold the Shift key while dragging. This will limit the shape to a perfect circle.
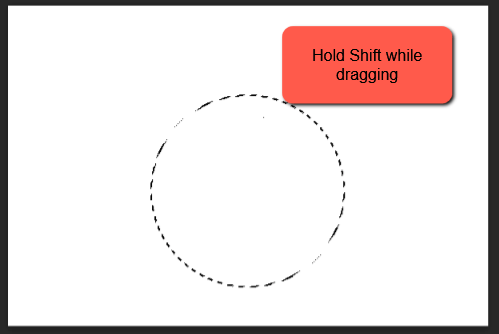
So much easier!
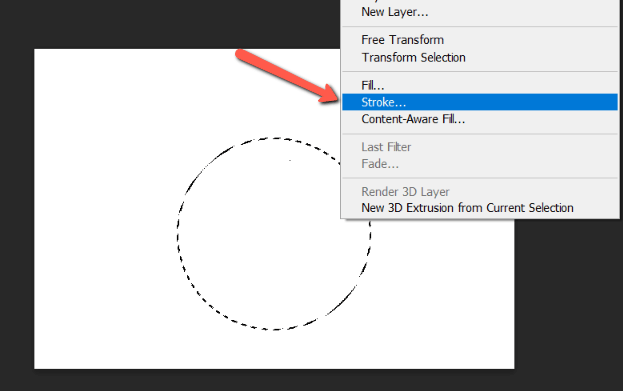
Step 3: Draw the Circle
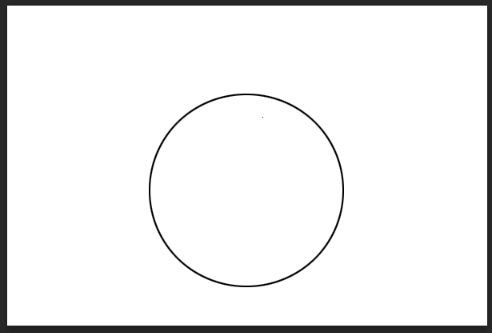
Notice that we haven’t actually drawn a circle yet. We’ve made a circular selection but that’s not the same as drawing one. If I were to save this file or print it, no circle would appear.
To draw the circle, right-click somewhere inside the selection. Choose Stroke from the menu that appears (or Fill if you want to fill the circle with color).
In the box that opens, you have some options about how you want to draw the circle. The width is how many pixels wide the line will be. Click on the color swatch to pick a color for your line.
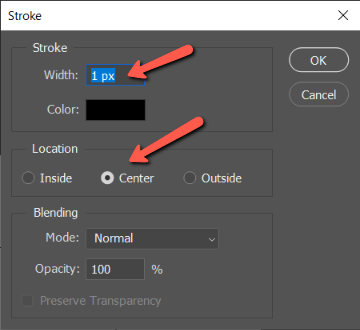
The location determines where the line will sit on your selection. Inside means the line will be drawn on the inside of the selection line. Center means the line will straddle the selection line and Outside means the line will sit on the outside of the selection line.
Choose your settings and press OK.
Press Ctrl + D or Command + D to deselect the selection and boom! There’s your perfect circle!
See? It might not be obvious how to draw a perfect circle in Photoshop, but it is easy. Once you know, it only takes a couple of seconds to whip it out.
Curious to learn more great stuff you can do in Photoshop? Check out how to align layers here!
About Cara Koch
Reuben Fraser
Hi. It didn’t work at the final step. Instead of a circle, there is four triangle shapes where a rectangle would be, except that it conforms to the circle in the 45 degree angle of the triangle being a curve. This is despite it being a circle following the steps that you have provided. It is very frustrating that even a simple thing like drawing a perfect circle often doesn’t work on Photoshop, even when following detailed step-by-step instructions.
Reuben Fraser
I figured it out. I had what was the remnant of patches in the corners from when I made it transparent. Though invisible, this was in one layer, while I had erased those patches from another layer. So I simply needed to change the layer that I was making into a circle.
June
Hey Reuben, there should be the Ellipse Tool in Photoshop. But glad you figured it out 🙂