
If you’ve ever seen a film photography negative, then you already know what inverted colors look like. Playing around with color is one of my favorite things to do in Photoshop, so it seemed only natural that this was one of the first things I did when I started experimenting with Photoshop all those years ago.
In this tutorial, I’m going to show you two easy ways to invert colors in Photoshop.

Table of Contents
Method 1: Old School
Amusingly enough, the basic process for inverting colors in Photoshop hasn’t actually changed at all since Photoshop version 5.5 (if not even earlier), but this method makes destructive edits to your image so Method Two is usually a better choice.
To invert colors in Photoshop, open your image and press the keyboard shortcut Ctrl + I on Windows, or use Command + I if you’re using Photoshop on a Mac.
You can also open the Image menu, select the Adjustments submenu, and click Invert.
That’s all there is to it!
Method 2: Inverting Colors the Modern Photoshop Way
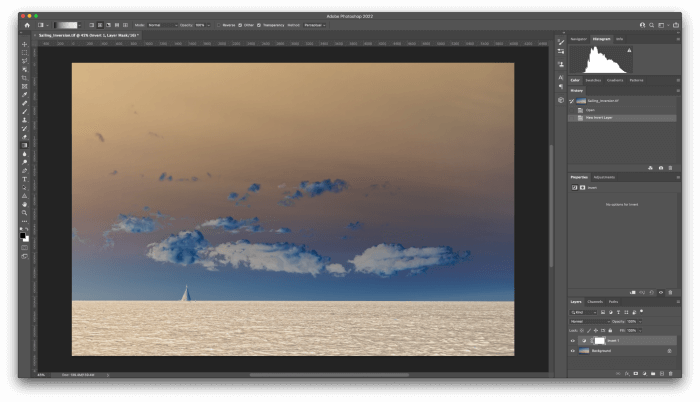
Non-destructive editing is one of the biggest advancements in Photoshop workflows over the last decade, and Adobe didn’t leave color inversion out of the adjustment layer system. Here’s how to invert colors in Photoshop using the modern non-destructive method.
With your image open in Photoshop, locate the Adjustments panel. If it’s not visible in your current workspace, you can bring it back by opening the Window menu and selecting Adjustments.

Click the Invert icon in the Adjustments panel to instantly add an Invert adjustment layer to your image, complete with its own layer mask. The icon is a bit hard to spot thanks to Photoshop’s inexplicably tiny adjustment layer icons, but it’s located in the bottom left corner of the icon list.
That’s all it takes to invert colors in Photoshop the modern way! It’s just as simple as the old destructive method, and it has a lot of advantages.
As with all adjustment layers, the layer mask can be edited to control the location and intensity of the adjustment using brushes, gradients, or any other tools you want to use. By painting in grayscale across the layer mask, you can reduce the opacity of the effect anywhere you want.
The layer mask will be filled with white pixels by default which applies the color inversion adjustment at full opacity across the entire image, while anywhere you add black pixels will make the effect fully transparent, and gray tones provide smooth transitions between the two.
You can also invert your layer masks using the Ctrl + I or Command + I shortcut – just make sure you’ve selected the layer mask in the Layers panel, and not the adjustment layer as a whole.
Bonus Project: Inverting Color Channels in Photoshop
Most digital images are composed of three separate color channels – Red, Green, and Blue – which are combined to make any color your monitor can display. Each color channel is actually a grayscale image, and Photoshop lets you adjust each one separately using the Channels panel.
For example, in the image below, I’ve selected the sky for inversion using a rectangular marquee, but I opened the Channels panel and selected only the Blue channel before applying the command. This creates a surreal color palette in the sky that pops a lot more than the original.
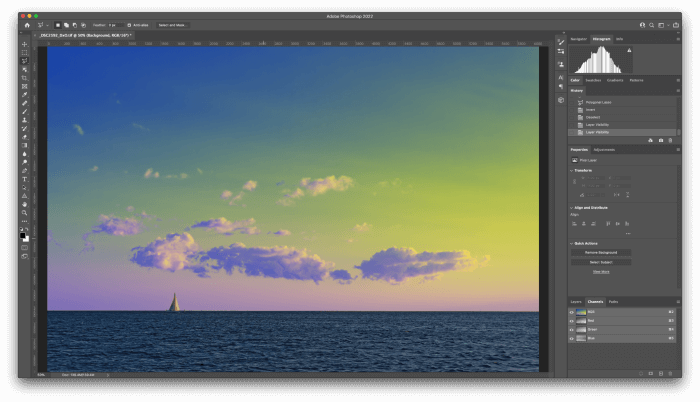
The technique has its limits, mostly because you can’t use the adjustment layer method for inverting colors on a color channel, only on a normal pixel layer. This forces you to use the destructive “all-or-nothing” method, with no way to apply a gradient or partial inversion except by feathering your selection.
It takes a bit of practice and experimentation to spot which images could benefit from this technique, but it can produce some very interesting results – and you might even get a better understanding of how color channels work along the way.
A Final Word
That’s all there is to know about how to invert colors in Photoshop! Whether you’re correcting scans of your film negatives, working on a surreal art piece, or just having fun experimenting, inverting colors in Photoshop can be done quickly and non-destructively in just a few clicks.
Always remember: non-destructive edits are best!
About Thomas Boldt