
Whenever you post a photo online, you send it out into the world. Anyone can, and some people will use your work without your permission. To some extent, consider it a compliment that someone likes your work enough to steal it, and try not to let it bug you.
Hey there, I’m Cara and I totally understand the paradox. You want to be able to share your work with others but by doing so, you’re giving up control over your images. People can and will use your images and it gets frustrating.
However, you don’t have to send out your images completely unaccompanied.
Today I’m going to show you how to use Photoshop to embed copyright information into your images. It won’t stop somebody from stealing your work but at least your name and contact information go along for the ride.
So let’s look at how to embed copyright in Photoshop!
Note: I use the Windows version of Photoshop. If you are using a Mac, the workspace will look slightly different from the screenshots displayed here.
Table of Contents
Step 1: Open Your Image and Access the File Info
Open the image in Photoshop to which you want to add copyright information. We’ll go through the process here as well as save our work as a template you can use to apply to future images. It would get tedious going through all the steps every time!
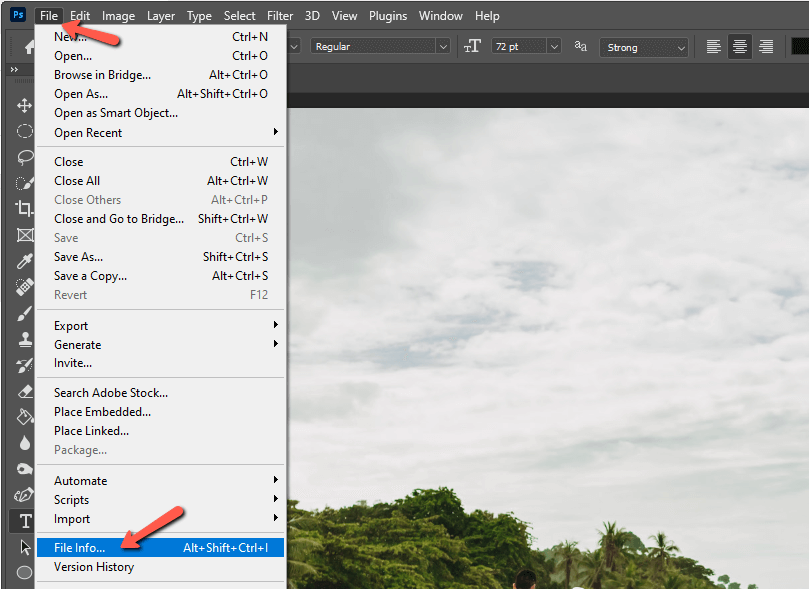
Once your image is open, go to File and choose File Info.
Step 2: Add Copyright Information
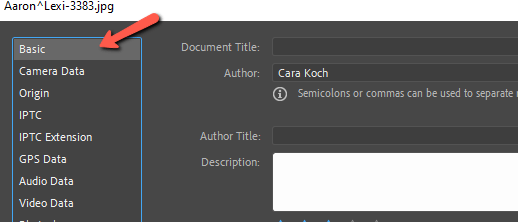
In the Basic tab, you’ll see boxes that you can fill out with your information. For copyright protection purposes, your name, copyright status, and contact information are the most important boxes.
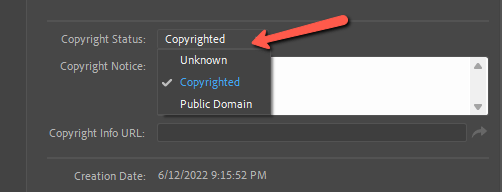
Put your name in the Author box, then click the dropdown menu in the Copyright Status box. You have the option to leave it as Unknown, or change it to Copyrighted or Public Domain.
The public domain means you’re giving anyone permission to use your images however they like. Let’s choose Copyrighted.
Then in the Copyright Notice box, we can add who the copyright belongs to. Start by typing the copyright symbol. On a PC, hold Alt while typing 0169. On a Mac, hold Option and press G.
Then add your name and perhaps your business name and whatever other information you want to add.
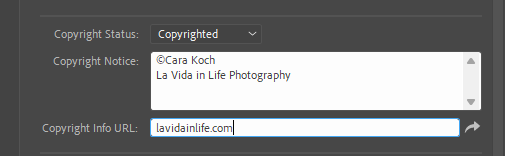
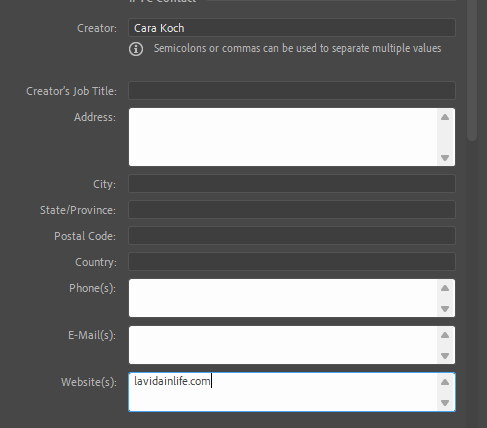
In the Copyright Info URL box, you can put your website. If you have a copyright information page on your website, you can link directly to that. Or if you don’t have a website, you can put your social media link or something that would lead back to you.
Above this box, there is space for other information you can add if you choose. You can name the image, add a description, give it a rating, and add keywords. This can be helpful if you’re planning to submit to a stock website where the image will require this information to be found.

Step 3: Add Contact Details
Before we save this and move on, let’s look at one more screen where we can add more specific contact information. Click the IPTC tab on the left.
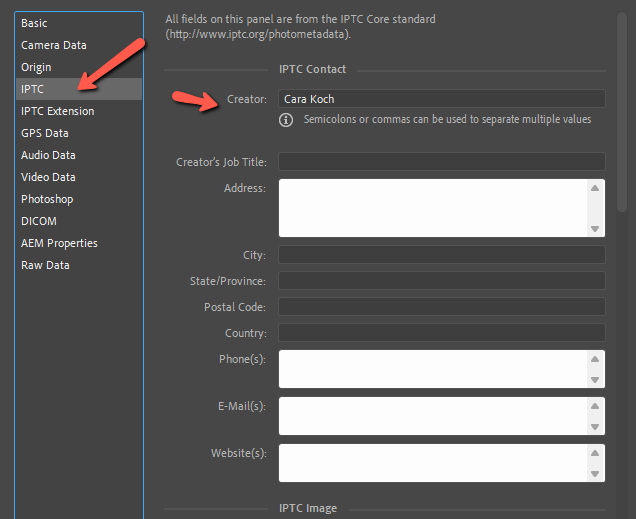
You can be as specific as you want here. There’s a box for most of your personal information, but you don’t have to fill them all out if you don’t want to.
The main thing is to give people a way to contact you. So if you have a website with a contact form, use that. Or you can put your email address.
Step 4: Create a Template
That was easy! But before we click the OK button, let’s create a template that we can use to apply this information to other photos without having to fill it out every time.
At the bottom of your screen, you’ll see a box that says Template Folder next to the Preferences button. Click on it to open the menu and choose Export from the list.
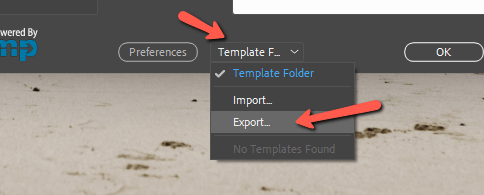
You can choose a file name and you’ll notice the information is automatically saved as an XMP file. These are sidecar files that get embedded into your image files. The default location is Photoshop’s metadata folder but you can save it wherever you would like. Press Save.

Then press OK to close out of the File Info box.
With that, you can now apply this template to other images. To try it, open a second image in Photoshop. Open that Template Folder menu at the bottom and choose Import this time.
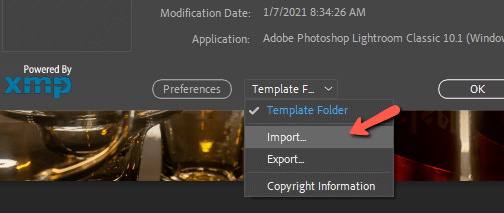
Choose the file we just created and click OK.
IMPORTANT!
This box will then appear. Make sure to choose the middle option, Keep original metadata, but replace matching properties from template.
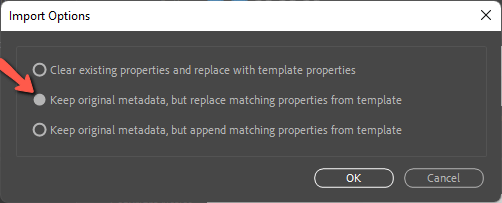
If you choose the top one, Photoshop will erase the existing properties and replace them with those from the template. This means information that is already embedded in the file will be erased.
For example, the creation date of the image will be replaced with the creation date saved in your template. Obviously, that will cause some issues.
And with that, you’re all set!
Now, at least, when people share your images online, your information goes with it. And those who want to contact you about your images have a way to get in touch! Curious about other technical aspects of Photoshop? Learn about the best image formats to use when posting to the Internet here!
About Cara Koch