Why does my printed image look soft?
Have you ever run into this? Perhaps your image looks fantastic on the screen, but it doesn’t look so sharp on paper. Don’t throw out your printer just yet, you probably just had the DPI set incorrectly.
Hey there! I’m Cara and I feel your pain when it comes to understanding image resolution for printing photos. However, as a professional photographer, I needed to learn how to get my images to print as crisp and clear as they look on my screen.
Having the right image resolution is a huge part of that equation. So let me show you how to check and change your DPI resolution in Photoshop!
Note: the screenshots below are taken from the Windows version of Adobe Photoshop, if you’re using the Mac version, the navigations may look slightly different.
Table of Contents
DPI vs PPI and Why It Matters
Before we go changing anything, let’s make sure you understand what you’re doing. If you already understand DPI feel free to skip down to the next section.
DPI stands for Dots Per Inch and PPI is Pixels Per Inch. There is a 1:1 ratio between the two, but they are not exactly interchangeable. DPI governs printed images whereas PPI has to do with digital ones.
You only need 72 PPI for a digital image to look great on a screen. However, you should aim for 300 DPI for printed images. Because of that 1:1 ratio, the printed size of your image is limited by how many pixels are present in the image.
What if your image doesn’t have enough pixels to produce the size print you want? You can cut back the DPI based on the photo’s intended use.
If the viewer will be holding the photo, stick to 300 DPI or no lower than 250 in a pinch. However, if the photo will be used for a framed print on the wall, you may be able to get away with as low as 200 DPI. Billboards are often printed at as low as 20 DPI!
Note: you have to be working with high-resolution images to make quality prints. Simply changing the DPI of a low-resolution image won’t produce the desired result.
I hope DPI is making a little more sense. Now let’s look at how to change it in Photoshop.
How to Change DPI in Photoshop
What if you don’t know what your image’s DPI is? You can find this information in the same place you can change it.
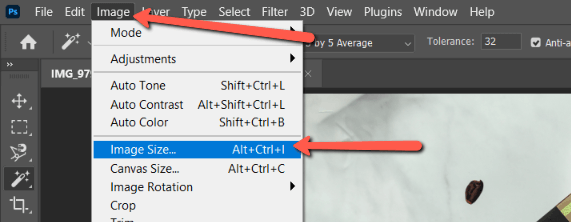
Step 1: Check the Image DPI
With your image open in Photoshop, go to Image in the menu bar and select Image Size.
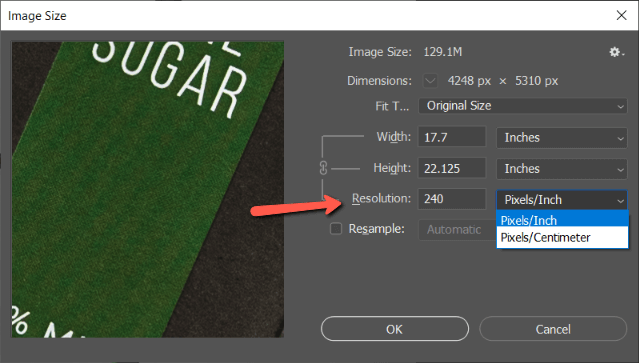
In the box that opens, you’ll see your image’s size information, including the DPI. You can set this measurement to either Pixels/Inch or Pixels/Centimeter. My image resolution is 240 DPI.
Step 2: Change the DPI (Resolution)
Changing the resolution is simple. Just click on the box and put in the desired amount. But watch what happens when I bump my image resolution up to 300.
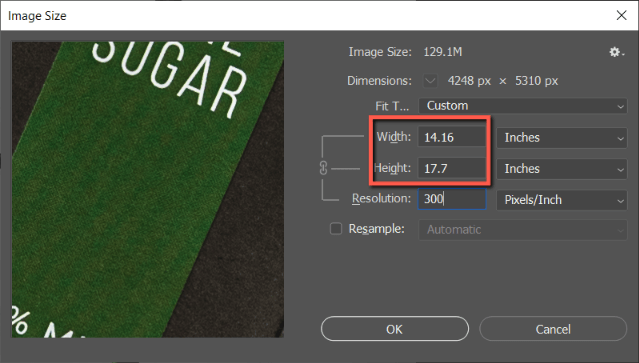
Notice that the height and width of my image changed? These are the maximum dimensions that this size image can be printed at 300 DPI. Look at what happens if I try to increase the image resolution by setting the width and height larger. The resolution drops to 177.

If you need to print the image larger, you have two choices.
You can accept the lower resolution. If the image is intended to be viewed from a short distance away (as opposed to in your hand) the final product will still look great. The human eye can only distinguish so many dots per inch at a distance anyway.
If you need a higher resolution, you can use Photoshop to scale the image up by checking the Resample box. Photoshop will analyze surrounding pixels and add pixels to the image to increase the resolution. Learn more about this in our post on resizing images without losing quality.
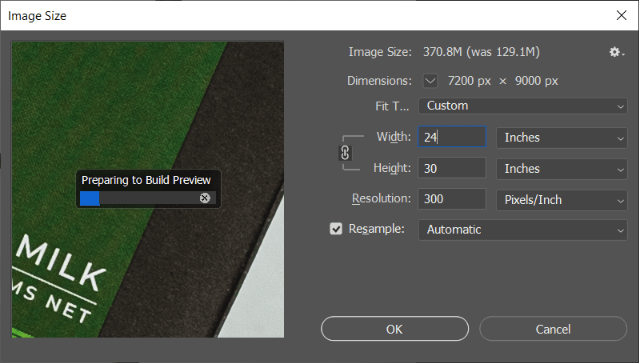
With this box checked, you can choose whatever image dimensions you want and the resolution is not linked to them. Photoshop will also generate a preview in the box to the left of what the scaled-up image will look like.
Prepare to Print
You don’t really have to worry about DPI too much unless you’re planning to print images. However, it is handy to understand the relationship between image size, DPI, and PPI as well as how to change DPI in Photoshop.
Did you enjoy this article? Check out more of our tutorials such as how to rasterize in Photoshop for more great info!
About Cara Koch