Most people think of Photoshop as a program for editing images and creating digital artwork that doesn’t move. However, you can also create short animations and export them as GIFs – or Graphics Interchange Format. In other words, a format in which the graphics can move.
Hey there! I’m Cara and in my work as a product photographer, I’ve made a few short stop-motion videos in Photoshop. When I’m done, I need to export them as GIFs that can be put on a website or shared on social media.
Let me show you how to export your project as a GIF so you can play with this functionality too!
Table of Contents
Open the Export Settings
Once you’re happy with your animation, go to File, hover over Export, then click Save for Web. Alternatively, you can hit Alt + Shift + Ctrl + S (Windows) or Option + Shift + Command + S (macOS) on the keyboard.
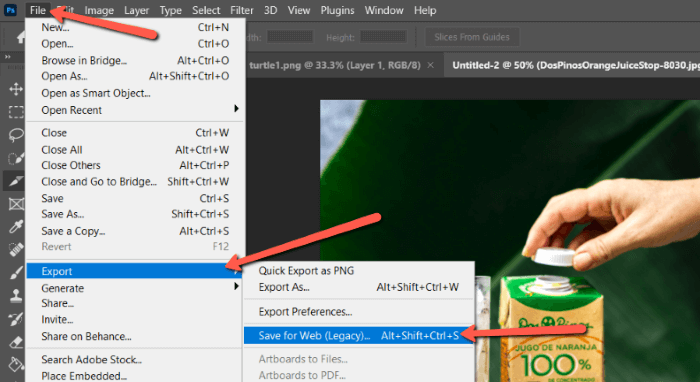
In the window that opens, choose GIF from the dropdown menu near the top. The settings for how you want to export your GIF will appear.
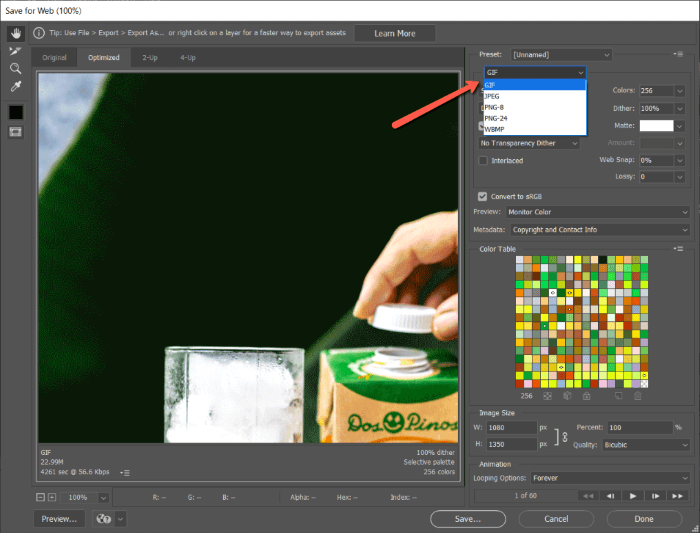
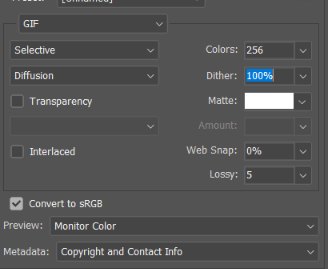
GIF Settings
What I’ve just described is the basic procedure for exporting a GIF. However, there are various export settings that will affect the quality of your final project.
More information in your GIF means a higher quality final product but it also means a bigger file size. Unfortunately, heavy file sizes can cause problems when you want to put them on a website, for example.
This is where the settings come in handy. They let you control aspects of the GIF that will change the file size to fit your needs.
Let’s go over them to help you understand what you’ll want to choose for your GIF.
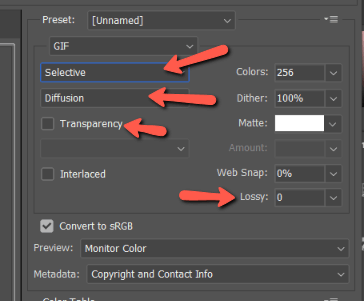
Selective
This is the color reduction method. Selective is the default option but you can also choose Perceptual, Adaptive, Restrictive, or Custom.
Selective favors broad swaths of color and preserves web colors and is the best option most of the time. Perceptual builds a custom color table that emphasizes color that the human eye prioritizes.
Adaptive changes with the image. It works when most of the colors in the image are concentrated around a single area of the color spectrum. Restrictive provides the best visual optimization for web use but can make the file size bigger, which isn’t always ideal.
Diffusion
Diffusion is the default option under the dithering method. The random pattern is less noticeable in most GIFs. You can change it to Pattern for a halftone-like square pattern or Noise.
Transparency and Matte
Check the transparency box to make fully transparent pixels transparent.
What if you want to put a color behind the GIF and fill the transparent spots? Un-check the transparency box and choose a matte color to go behind it. Click the Matte color swatch and use the color picker to choose your color.
Interlaced
Check the box so that a low-resolution version of the GIF appears in the browser while waiting for the full image to download. This can make download time feel shorter, but it also increases the file size so there’s some give and take.
Lossy
A higher number in the Lossy box will reduce the file size by up to 40% and sometimes more by discarding data. However, it comes with a stiff drawback as turning Lossy up close to 100 will virtually destroy the image’s quality.
About 5-10 is usually good, though some GIFs may allow you to go up to 50 without too much visible loss.
Colors
Fewer colors mean a smaller file size but it also means a reduction in quality. Most of the time you’ll want to leave this at 256.
Choose Your Settings
This quick overview should help you decide on the settings you want for your GIF. If you’ll be placing it on a website, you want to keep the file size as low as possible so it doesn’t bog down the site. However, you have to make careful decisions about which settings to skimp on.
For this GIF, I will stick with Selective and Diffusion, set the Dither to 100%, and leave Transparency and Interlaced unchecked. Set Lossy to 5 for fun.
Once you’re happy with your selections, click Save at the bottom. Choose where you want to store it and you’re all set! Now you can enjoy creating and sharing little GIFs with your friends and followers!
One good thing about saving the gif is that if at any point you want to go back to edit the gif, you can!
Want to learn more about the wonders of Photoshop? Don’t hesitate to check out how to save images as PNGs!
About Cara Koch