
Photoshop is arguably the most powerful image editor in the world, but it’s not the only way to edit images. If you want to remove text from a picture without using Photoshop, there are a lot of great options, but for quick projects like this, the best option is to use an online image editor called Photopea.
If you’ve read any of the other articles on this site about making edits without using Photoshop, then you may already be familiar with Photopea, since it’s currently my favorite alternative option. Here’s how to use it to remove text from a picture without Photoshop.
Table of Contents
How to Remove Text from Image in Photopea
Get the process started by going to photopea.com. No registration is required to use the site, although there are some very large ads if you’re not using an ad-blocker in your web browser.
Typically, they would be in the empty light-gray area on the right side of the screen, but Firefox has blocked them for me automatically.
To get started, click the Open from Computer button and browse to find your image, or drag and drop your image file onto the interface to load it.
Keep in mind that because all of this is done in your web browser, it’s better to stick to smaller projects with low-resolution images. If you try to edit a 30-megabyte RAW image file from a digital camera, you might run into some issues, although it should technically be possible.
Once you’ve got your image loaded, the interface will be immediately familiar to anyone who’s used Photoshop, and you’ll get a decent blend of speed and power from the editing tools.
At this point, you’ll have a couple of different ways you can remove the text from your image. If your text is on a solid background color, the edit will be easy using just the Brush Tool, but if there’s a complex background, you’ll have to do some cloning with the Clone Stamp tool.
Removing Text From a Solid Background
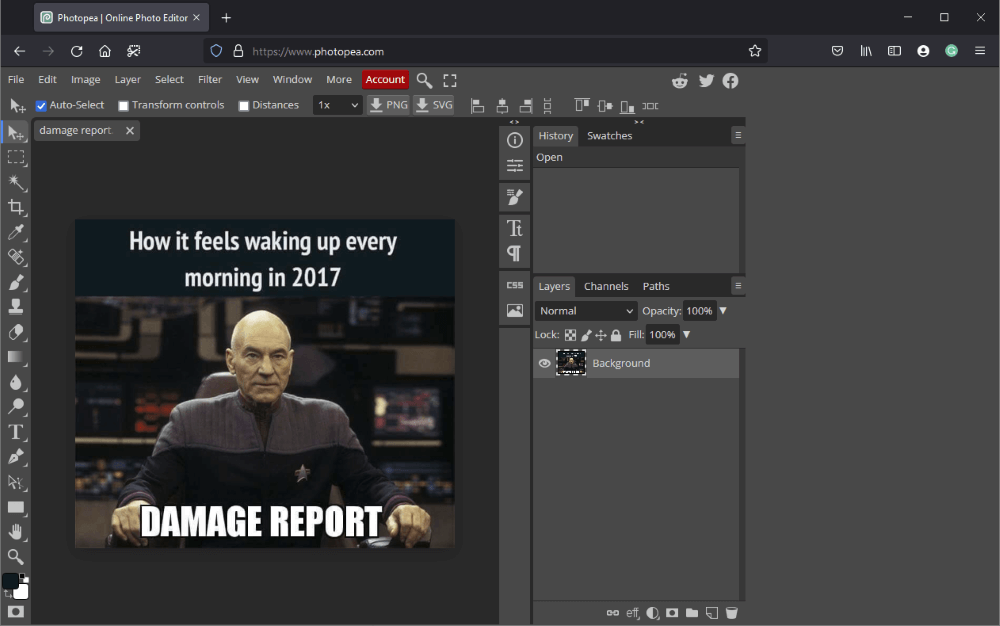
In the example above featuring Captain Picard, I want to change the year to 2022, since the message of grim tension still feels as relevant as it did in 2017.
Because that part of the text is on a plain dark background, the easiest way to remove part of the text is to paint over it using the same background color.
First, we’ll need to select the background color so that our coverup is seamless. Select the Eyedropper tool from the toolbox on the left, or you can even press the keyboard shortcut I.
With the Eyedropper tool active, click anywhere on your background color to make it the active painting color. You should see the color swatch at the bottom of the toolbox change to match the color you clicked on.
If you click and hold, you’ll see the Sampling Ring (shown below) that gives you a preview of the color you’ve selected.

Next, switch to the Brush Tool using the toolbox or the keyboard shortcut B. Then simply paint over the text you want to remove, and it will seem to disappear!
If you just wanted to remove text from the picture, then you’re already done! I chose to add some text back in, although it was hard to match the font correctly since I didn’t want to take the time to use a font identifier to match it perfectly.

Have fun!
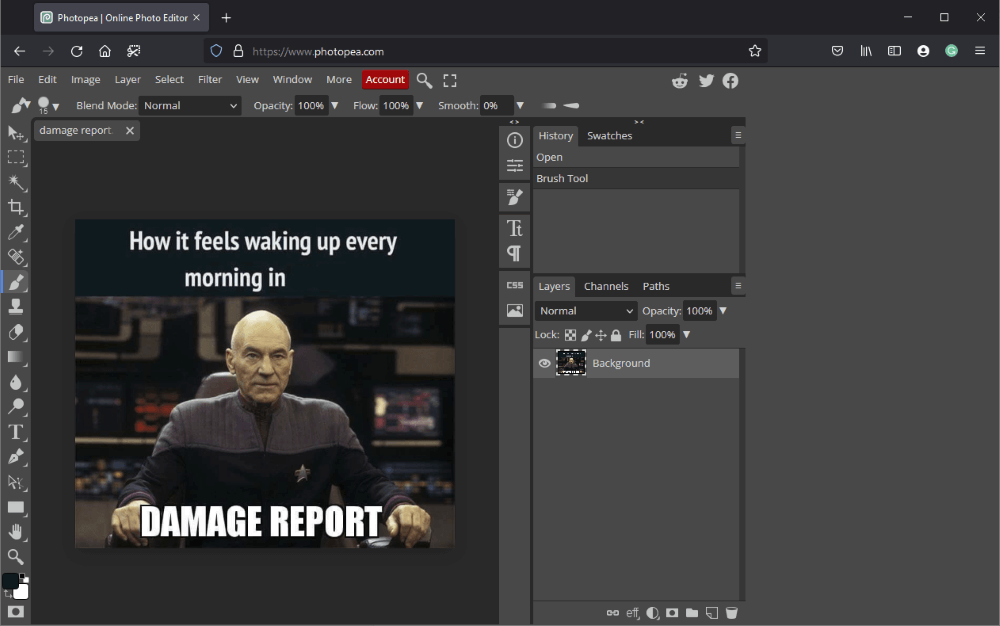
Removing Text From a Complex Background
If you’re not so lucky and the text you want to remove is on a complex background instead of a solid color, such as the ‘DAMAGE REPORT’ text in the image above, you’ve got a couple of different options.
If you don’t care about creating a seamless edit, then you can simply place a block of color over the text that you want to remove.
If you want the final image to look as though there was never any text at all, things get more difficult. You’ll have to use the Clone Tool to cover up the text, and the Clone tool deserves an entire article just to itself (or maybe even a series of articles).
Simply put, the Clone Tool allows you to paint the pixel data from one part of the image onto another part. This sounds easy enough – until you try to match everything up perfectly so that the results look seamless, which is when things get difficult.
To use the Clone Tool in Photopea, activate the tool using the toolbox or the keyboard shortcut S. To start cloning, you’ll have to set a source point by holding down the Alt key and clicking on a spot in the image that you want to use as a patch to cover up your text.
This gets very tricky very quickly, but practice makes perfect! You’ll rely on the Undo command a lot, and it’s often a good idea to do all your cloning on a new layer.
For example, the text overlapping Captain Picard’s hands in the example image would take quite a while to remove, since there isn’t a lot of relevant pixel data to use as a patch. You’d basically have to re-draw his right hand, and that would be very difficult to do well.
Sometimes, you have to make difficult decisions about how to make your edits, no matter what program you’re using!
Alternative Options
If you don’t want to use Photopea to remove text from your picture, or if it’s simply too large for a web-based image editor, then there are a few other great image editors that may be able to help.
Typically, image cloning requires a fairly advanced program – you’re not going to have much luck trying to use a basic image editor like Paint 3D or Viewer, although they may be able to help you remove text from a picture if the text is on a solid background. Here are some better options!
GIMP
GIMP, also known as the GNU Image Manipulation Program, is the open-source world’s premier image editor. While the development team resists comparisons to Photoshop, GIMP is essentially the closest you’ll get to Photoshop for free.
GIMP is extremely powerful and capable, although it’s starting to show its age a bit. The user interface could use some polish, and many new users consider it a difficult program to use, but it’s a great option for image editors who don’t want to use Photoshop.
Removing text from a picture in GIMP is almost as simple as using Photopea, although you might want to check out some GIMP tutorials before tackling the project!
Affinity Photo
Affinity Photo is also a great option for doing image editing work without Photoshop, although it’s not free like the other options on the list. That being said, if you’re looking for a paid alternative to Photoshop that doesn’t use the monthly subscription model, Affinity Photo is worth testing for yourself.
Pixlr
If you don’t want to use Photopea to do your image editing but you still need to use a web-based editor, Pixlr might be a better choice. Pixlr used to be as simple as Photopea, but once they got popular they split the project into two versions: Pixlr X and Pixlr E.
The X version is better for design and layout projects, while the E version is a great image editor.
A Final Word
While many image editors love Photoshop, it’s important to remember that you should use the right tool for the job. If you’ve already got Photoshop open, you may as well use it for your edits, but loading it up just to do a simple edit like resizing or meme-making sometimes feels a bit excessive (and slow).
Hopefully, you’ve got a better idea of how you can remove text from a picture without Photoshop. There are always other options available, even though we sometimes forget about them!
Happy editing!
About Thomas Boldt