I had a problem scaling a logo that I created which had a stroke applied to part of the lettering. When I tried to make the logo larger, the stroke got thinner. If you have the same problem, you’re in the right place!
Ok, so this is a website dedicated to Photoshop, but after searching the internet for more than 2 hours on how to scale strokes in Adobe Illustrator, I’ve found the key solution. I thought I’d share the solution to help you to find the answer a bit quicker than me when you need to scale any strokes 🙂
In Adobe Illustrator, you can scale an object by simply clicking and dragging on the corner of the object. If you want to scale proportionally, you can hold the Shift key as you drag. However, sometimes the object gets scaled but the stroke doesn’t.

What’s the trick? There’s just one option you need to check and your problem will be solved.
By default, Illustrator does not scale strokes and effects at the same proportion as the object, it will keep the settings originally applied. There is a very simple solution to this issue, all you have to do is:
On a Mac, go to the top menu Illustrator > Preferences > General, and check Scale & Stroke Effects.
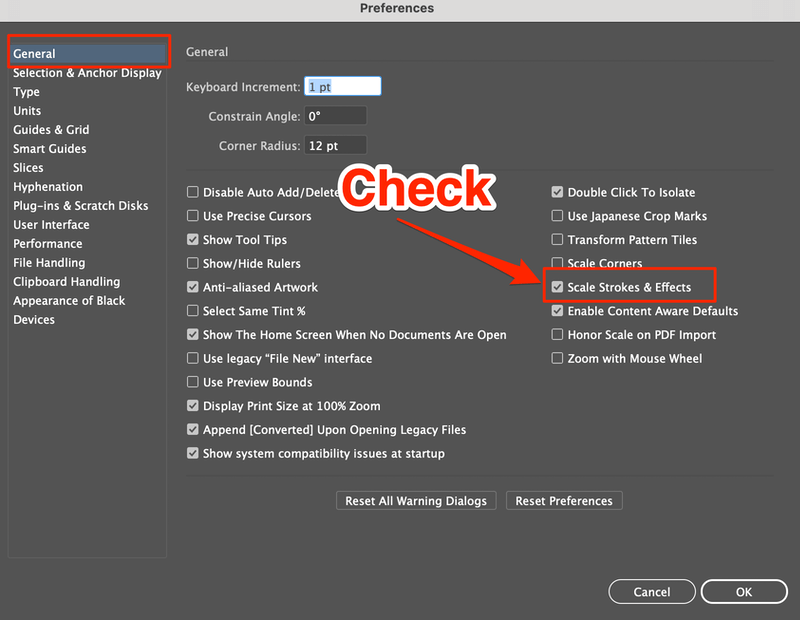
Note: The screenshot is taken from Adobe Illustrator CC Mac version. Windows users go to Edit > Preferences > General and check Scale & Stroke Effects.
Another place you can check this option is from the Properties > Transform panel. Click on the hidden menu and check Scale Strokes & Effects.

Wrapping Up
The stroke should now scale at the same rate as the object. The only problem with this solution is that when you change this in the preferences it’s only changing the preferences on your computer, it DOESN’T make the change document-wide. So if you open the same file on another device, you’ll have to check the option again.
About June
Laura
Excellent tip, thanks a lot. I’ve been trying to figure this out for a long time!
June
Glad you found it useful 🙂
Dean
You are an art saver. I always used Freehand, which I think is a better, more intuitive program, until I upgraded my Mac and now of course it’s unsupported and outdated. So I’ve been forced by Adobe to use Illustrator. Arrgh!
If not for you I might have ended up in the Self Inflicted Wounds column of the local paper…lol
June
Glad I could help 🙂
Anonymous
Thank you so much for posting this tip!! I was nearly pulling my hair out trying to solve this exact problem. The file I have was created by someone else, and had about 100 layers, so it was not logical to change the stroke on each layer. I have to scale down this file, and every time I would scale it down, I would get larger then normal stroke, and when I saved the document as a PNG, I would lose resolution, and the illustration would become pixelated. So glad I found this tip.
Once again, thanks so so so so much for postin this tip.
Rins Varghese
Excellent tip, thanks a lot. I’ve been trying to figure this out for a long time!
June
You’re welcome 🙂 Glad you found it useful.
Emma
I could kiss you right now
Adrienne
So glad this is still posted! Just helped me solve a problem really quickly as we have a tight deadline. thank you thank you thank you!
Thomas
Thank you so much! My deadlines tomorrow and you’ve solved my problem that was beginning to drive me crazy.
Alexandre
Just what I needed… cheers!
Amazing Sey
Thanks this worked!
Another workaround is outlining the stroke (illustrator: Object -> Path -> Outline stroke). That way the file works fine on other machines.
James
Really helpful thank you!!
Shaw Fee
Seriously, this has been annoying me for so long. Thank you for the help.
kassandra
thank you so much!! i could kiss you too! @Emma haha
vengesh
thank you very much
Iuri
thank you, this really helped
Hilary
THANK YOU!!!!!!!!!!!!!!
beccy
THANK YOU, THAKN YOU, THANK YOU 🙂
BOJAN
Thank You very much. This is very simple tutorial and usefull too.
kamimi
have been struggling for the issue, glad that i found your post. Save my time and eyes. 😀
k
THHHANNKKK YOU!!!!! This was driving me crazy, glad to have found your post and fixed the issue.
efy
marry me
SimonSolar2C
What a fantastic tip – I have so many little icon files that dont scale properly – strange thing is not all the strokes had this problem – only some within each picture – but now I dont need to figure that out – I change change that setting and voila
Thanks so very much
Smeeta
Thanks for the tip. I was struggling to find same 🙂
Siddharth arora
Thanks a lot for the help, i was doing this wrong for 3 years. God bless you for this 🙂
hitesh
thank you so much for this post..
you just pinpointed my problem.
Jennifer Alvarado
Hi! Thanks for the tip! I can´t believe I’ve never seen that option on “General”… I was getting tired of changing the stroke size every time I shrink or enlarge a vector (: This was very helpful! Greetings from CR.
Cece
Thank you sooooo muchhh!!! You’re a lifesaver!